Push Notification Setup
SDK for Android
Add Firebase SDK to Your Android App
Please follow the steps from Google's documentation: https://firebase.google.com/docs/android/setup
Add HYPR Dependencies
Copy the Android .aar files into the app/libs directory from the downloaded package /aars folder. These will be referenced as needed in the modules' build.gradle files.
Add Firebase SDK to Your Android App
Here is an example of the default shipped app/commonlibraries/build.gradle file:
plugins {
    id 'com.android.library'
    id 'kotlin-android'
}

// HYPR Related
ext {
    hyprVersion = "9.1.0"
    hyprCode = 90100
    cryptoVersion = "3.7.0"

}

android {
  namespace "com.hypr.commonlibraries"
  compileSdk 34

  buildFeatures {
    viewBinding true
    buildConfig true
  }
  defaultConfig {
    targetSdk 34
    versionCode hyprCode
    versionName hyprVersion

    vectorDrawables.useSupportLibrary = true

    testInstrumentationRunner "androidx.test.runner.AndroidJUnitRunner"
    consumerProguardFiles "consumer-rules.pro"

    // HYPR Related
    minSdk 26
    multiDexEnabled true
    ndk {
      abiFilters "armeabi", "armeabi-v7a", "arm64-v8a", "x86", "x86_64"
      // Restricts the set of ABIs that the application supports.
    }
  }

  buildTypes {
    release {
      minifyEnabled false
      proguardFiles getDefaultProguardFile('proguard-android-optimize.txt'), 'proguard-rules.pro'
    }
  }
  compileOptions {
    sourceCompatibility = JavaVersion.VERSION_1_8
    targetCompatibility = JavaVersion.VERSION_1_8
  }
  kotlinOptions {
    jvmTarget = "1.8"
  }
}

// HYPR Related: References the HYPR AARs in the /libs directory
allprojects {
  repositories {
    mavenCentral()
    flatDir {
      dirs "$rootProject.projectDir/libs"
    }
  }
}

dependencies {
  api fileTree(dir: "$rootProject.projectDir/libs", include: ['*.jar'])

  // Android
  api 'androidx.multidex:multidex:2.0.1'
  api 'androidx.appcompat:appcompat:1.6.1' // do not change yet - https://stackoverflow.com/questions/69033022/message-error-resource-androidattr-lstar-not-found
  api 'com.google.android.material:material:1.10.0'
  api 'androidx.constraintlayout:constraintlayout:2.1.4'
  api 'androidx.lifecycle:lifecycle-process:2.6.2'
  annotationProcessor 'androidx.lifecycle:lifecycle-common:2.6.2'
  api "androidx.security:security-crypto:1.1.0-alpha06"

  api 'com.google.android.gms:play-services-location:21.0.1'

  // GJON / POJO
  api 'com.google.code.gson:gson:2.10'
  api 'org.apache.commons:commons-lang3:3.12.0'

  // RxAndroid
  api group: 'io.reactivex.rxjava2', name: 'rxandroid', version: '2.1.1'
  api group: 'io.reactivex.rxjava2', name: 'rxjava', version: '2.2.21'
  api 'javax.annotation:jsr250-api:1.0'

  // Retrofit
  api 'com.squareup.retrofit2:retrofit:2.9.0'
  api 'com.squareup.retrofit2:converter-gson:2.9.0'
  api 'com.squareup.retrofit2:adapter-rxjava2:2.9.0'
  api 'com.squareup.okhttp3:logging-interceptor:4.10.0'

  // QR Scanner
  // HYPR Barcodes
  // if you upgrade these libs, please test both (Ml and no ML) scenarios
  api 'com.google.mlkit:barcode-scanning:17.2.0'
  // Old Barcode - Fallback Backwards Compatibility - Keep these versions
  api 'com.google.android.gms:play-services-vision:20.1.3'
  api 'com.google.firebase:firebase-ml-vision:24.1.0'

  // Fingerprint
  api 'androidx.biometric:biometric:1.1.0'

  // HYPR Crypto
  api(name: "crypto", version: "${cryptoVersion}", ext: 'aar') { transitive = true }

  api(name: 'HyprCommon', version: "${hyprVersion}", ext: 'aar')
  api(name: 'HyprBiometricPrompt', version: "${hyprVersion}", ext: 'aar')
  api(name: 'HyprPin', version: "${hyprVersion}", ext: 'aar')
  api(name: 'HyprPresence', version: "${hyprVersion}", ext: 'aar')
}
Create the CustomFirebaseMessagingService Subclass
The example subclass is named CustomFirebaseMessagingService for the purposes of demonstration.
public class CustomFirebaseMessagingService extends FirebaseMessagingService {
    @Override
    public void onMessageReceived(@NonNull RemoteMessage remoteMessage) {
        Map<String, String> data = remoteMessage.getData();
        HyprPushNotificationAdapter.getInstance()
                .setOnNotificationPressedLaunchActivity(MainActivity.class)
                .shouldSavePendingAuthenticationRequest(true)
                .processRemoteMessage(this, remoteMessage.getData());
    }

    @Override
    public void onNewToken(@NonNull String s) {
        super.onNewToken(s);
        HyprPushNotificationAdapter.getInstance().onNewPushChannelId(this, s);
    }
}
Activity That Processes the Push Notification
@Override
protected void onNewIntent(Intent intent) {
    super.onNewIntent(intent);
    HyprApp.getDbAdapter().onNewIntent(this, intent);
}

@Override
protected void onPause() {
    super.onPause();
    HyprPushNotificationAdapter.getInstance().unregisterBroadcastReceiver(this);
}

@Override
protected void onResume() {
    super.onResume();
    HyprPushNotificationAdapter.getInstance().registerBroadcastReceiver(this, new HyprActionCallbacks.HyprWebLoginCallback() {
        @Override
        public void onSuccess(@NonNull HyprActionCallbacks.WebLoginType webLoginType, @NonNull HyprStatusResult hyprStatusResult) {
            // success
        }

        @Override
        public void onFailure(@NonNull HyprActionCallbacks.WebLoginType webLoginType, @NonNull HyprStatusResult hyprStatusResult) {
            // fail
        }
    });
    handlePushIfAvailable();
}

public void handlePushIfAvailable() {
  if(HyprApp.getDbAdapter().isPushPayloadAvailable(this)) {
    HyprActions.getInstance().startPushNotificationIntent(this, new HyprActionCallbacks.HyprWebLoginCallback() {
      @Override
        public void onSuccess(@NonNull HyprActionCallbacks.WebLoginType webLoginType, @NonNull HyprStatusResult hyprStatusResult) {
        toast("Success");
      }

      @Override
        public void onFailure(@NonNull HyprActionCallbacks.WebLoginType webLoginType, @NonNull HyprStatusResult hyprStatusResult) {
        toast("Success");
      }
    });
  }
  else if (HyprApp.getDbAdapter().isPendingAuthenticationAvailable(this)) {
    HyprActions.getInstance().startPendingAuthentication(this, new HyprActionCallbacks.HyprWebLoginCallback() {
      @Override
        public void onSuccess(@NonNull HyprActionCallbacks.WebLoginType webLoginType, @NonNull HyprStatusResult hyprStatusResult) {
        toast("Success");
      }

      @Override
        public void onFailure(@NonNull HyprActionCallbacks.WebLoginType webLoginType, @NonNull HyprStatusResult hyprStatusResult) {
        toast("Fail");
      }
    });
  }
}
Firebase in AndroidManifest.xml
Ensure the following values are present in the web account unlock manifest in app/webaccountunlock/src/main/res. Make sure to replace <package.path.to> with the correct path from your build.
<manifest>
  // ...
  <application>
    ...
    <service android:name="<package.path.to>.CustomFirebaseMessagingService">
      <intent-filter>
        <action android:name="com.google.firebase.MESSAGING_EVENT"/>
      </intent-filter>
    </service>
    ...
  </application>
</manifest>
Update the MultiDexApplication Subclass
public class App extends MultiDexApplication {
  @Override
  public void onCreate() {
    super.onCreate();
  	initPushNotifications();
    HyprApp.initializeApp(this, new HyprInit.InitTrustDataCallback() {
      @Override
        public void onInstallComplete() {
        Log.d(LOG_TAG, "onInstallComplete");
        updateWebAppProfile()
        }

      @Override
        public void onInstallError(@NonNull String s, @Nullable Throwable throwable) {
        Log.e(LOG_TAG, "onInstallError: " + s);
      }
    });
  }

  private void updateWebAppProfile() {
    try {
      HyprAppProfileData appProfileData = HyprApp.getDbAdapter().getCurHyprAppProfileData(this);
      appProfileData.setCustomerConfiguredDefaultRpVersion(this, 4);
      appProfileData.setHyprRpAppType(this, HyprRpAppType.WebsiteOnly);
    } catch (HyprException e) {
      Log.e(LOG_TAG, e.toString());
    }
  }

  private void initPushNotifications() {
    FirebaseApp.initializeApp(this);
    HyprPushNotificationAdapter.getInstance().setPushId(context, FirebaseModel.getFirebaseSenderId());
  }
}
UI Customization
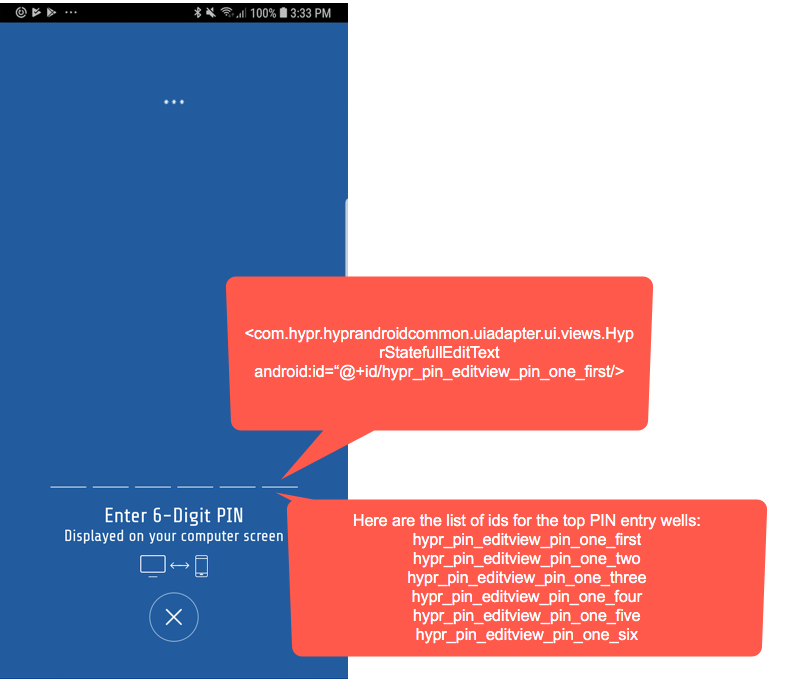
We can customize the OOB Device Setup screens via XML overrides. Each screen has a corresponding XML layout file. By creating a layout file with the same name as the one you want to override, the SDK will present that layout file instead.
If you are overriding the layout files, please make sure to keep all the android:ids with their respective view from the layout that you want to override as the SDK uses those IDs.
Overriding the OOB Device Setup Screen
Create a file called hypr_common_view_single_pin.xml using the example below. Now you can alter/add views and change the properties of those views.
<RelativeLayout xmlns:android="http://schemas.android.com/apk/res/android"
    android:layout_width="match_parent"
    android:layout_height="match_parent">

    <RelativeLayout
        android:id="@+id/layout_movable_parent"
        android:layout_width="match_parent"
        android:layout_height="match_parent">

        <LinearLayout
            android:id="@+id/hypr_pin_layout_pin_one"
            android:layout_width="match_parent"
            android:layout_height="wrap_content"
            android:layout_above="@+id/layout_pin_instructions_text"
            android:layout_gravity="center_horizontal"
            android:gravity="center_horizontal"
            android:orientation="horizontal">

            <com.hypr.hyprandroidcommon.uiadapter.ui.views.HyprStatefullEditText
                android:id="@+id/hypr_pin_editview_pin_one_first"
                style="@style/PinEditTextStyle"
                android:layout_width="wrap_content"
                android:layout_height="wrap_content"
                android:textColor="@color/hyprColorPinFocusedLine" />

            <com.hypr.hyprandroidcommon.uiadapter.ui.views.HyprStatefullEditText
                android:id="@+id/hypr_pin_editview_pin_one_second"
                style="@style/PinEditTextStyle"
                android:layout_width="wrap_content"
                android:layout_height="wrap_content"
                android:textColor="@color/hyprColorPinFocusedLine" />

            <com.hypr.hyprandroidcommon.uiadapter.ui.views.HyprStatefullEditText
                android:id="@+id/hypr_pin_editview_pin_one_third"
                style="@style/PinEditTextStyle"
                android:layout_width="wrap_content"
                android:layout_height="wrap_content"
                android:textColor="@color/hyprColorPinFocusedLine" />

            <com.hypr.hyprandroidcommon.uiadapter.ui.views.HyprStatefullEditText
                android:id="@+id/hypr_pin_editview_pin_one_fourth"
                style="@style/PinEditTextStyle"
                android:layout_width="wrap_content"
                android:layout_height="wrap_content"
                android:textColor="@color/hyprColorPinFocusedLine" />

            <com.hypr.hyprandroidcommon.uiadapter.ui.views.HyprStatefullEditText
                android:id="@+id/hypr_pin_editview_pin_one_fifth"
                style="@style/PinEditTextStyle"
                android:layout_width="wrap_content"
                android:layout_height="wrap_content"
                android:textColor="@color/hyprColorPinFocusedLine" />

            <com.hypr.hyprandroidcommon.uiadapter.ui.views.HyprStatefullEditText
                android:id="@+id/hypr_pin_editview_pin_one_sixth"
                style="@style/PinEditTextStyle"
                android:layout_width="wrap_content"
                android:layout_height="wrap_content"
                android:textColor="@color/hyprColorPinFocusedLine" />
        </LinearLayout>

        <LinearLayout
            android:id="@+id/layout_pin_instructions_text"
            android:layout_width="match_parent"
            android:layout_height="wrap_content"
            android:layout_above="@+id/hypr_common_view_cancel_button"
            android:layout_marginTop="@dimen/hypr_common_pin_instructions_text_margin_top"
            android:layout_marginBottom="@dimen/hypr_common_pin_instructions_text_margin_bottom"
            android:gravity="center_horizontal"
            android:orientation="vertical">

            <TextView
                android:layout_width="wrap_content"
                android:layout_height="wrap_content"
                android:fontFamily="@font/sharetech_regular"
                android:gravity="center_horizontal"
                android:text="@string/hypr_pin_instructions_title"
                android:textColor="@color/hyprColorTextPrimary"
                android:textSize="@dimen/hypr_common_license_entry_title_size" />

            <TextView
                android:layout_width="wrap_content"
                android:layout_height="wrap_content"
                android:fontFamily="@font/sharetech_regular"
                android:gravity="center_horizontal"
                android:text="@string/hypr_pin_instructions_text"
                android:textColor="@color/hyprColorTextPrimary"
                android:textSize="@dimen/hypr_common_license_entry_desc_size" />

            <com.hypr.hyprandroidcommon.uiadapter.ui.icons.SetupWorkstationAndDevice
                android:layout_width="@dimen/hypr_common_license_entry_img_width"
                android:layout_height="@dimen/hypr_common_license_entry_img_height"
                android:layout_marginTop="@dimen/hypr_common_license_entry_img_margin_top"
                android:contentDescription="@string/hypr_todo_content_description"
                android:gravity="center_horizontal" />

        </LinearLayout>

        <include
            android:id="@+id/hypr_common_view_cancel_button"
            layout="@layout/hypr_common_view_cancel_button"
            android:layout_width="match_parent"
            android:layout_height="wrap_content"
            android:layout_above="@+id/view_pin_entry_text_buffer"
            android:layout_marginBottom="@dimen/hypr_common_pin_cancel_margin_bottom" />

        <View
            android:id="@+id/view_pin_entry_text_buffer"
            android:layout_width="match_parent"
            android:layout_height="@dimen/hypr_common_pin_buffer_view_height"
            android:layout_above="@+id/view_bottom_anchor"
            android:visibility="visible" />

        <View
            android:id="@+id/view_bottom_anchor"
            android:layout_width="match_parent"
            android:layout_height="@dimen/hypr_common_keyboard_divider_bar_height"
            android:layout_alignParentBottom="true"
            android:background="@color/hyprColorKeyboardAnchorView"
            android:visibility="invisible" />

    </RelativeLayout>

    <include layout="@layout/hypr_common_view_keyboard_layout" />
</RelativeLayout>
After OOB Device Setup is implemented, you can now perform OOB Authentication.
Check the Server for Push Payload
In the event that the push notification does not arrive on the device, we still would like to authenticate.
The HYPR SDK for Android provides functionality to check the HYPR server for any push notifications for authentication, and if found, to start the authentication. You can do so with the code provided here:
val webAccounts = HyprApp.getDbAdapter().getCurHyprAppProfileData(activity).hyprMachineProfileDatas
val webAccount = webAccounts[0]; // Get the web account that you want to check
HyprActions.getInstance().checkServerForPendingAuthentication(activity, webAccount.dbId, object: HyprActionCallbacks.HyprActionCallback {
  override fun onSuccess(statusResult: HyprStatusResult) {
    HyprActions.getInstance().startPendingAuthentication(activity, object: HyprActionCallbacks.HyprWebLoginCallback {
      override fun onSuccess(
        webLoginType: HyprActionCallbacks.WebLoginType,
        statusResult: HyprStatusResult
      ) {

      }

      override fun onFailure(
        webLoginType: HyprActionCallbacks.WebLoginType,
        statusResult: HyprStatusResult
      ) {

      }

    })
    }

  override fun onFailure(statusResult: HyprStatusResult) {

  }
})
SDK for iOS
Add Firebase SDK to Your iOS App.
Please follow the steps from Google's documentation: https://firebase.google.com/docs/ios/setup
Pairing the Web Account with the Mobile Device
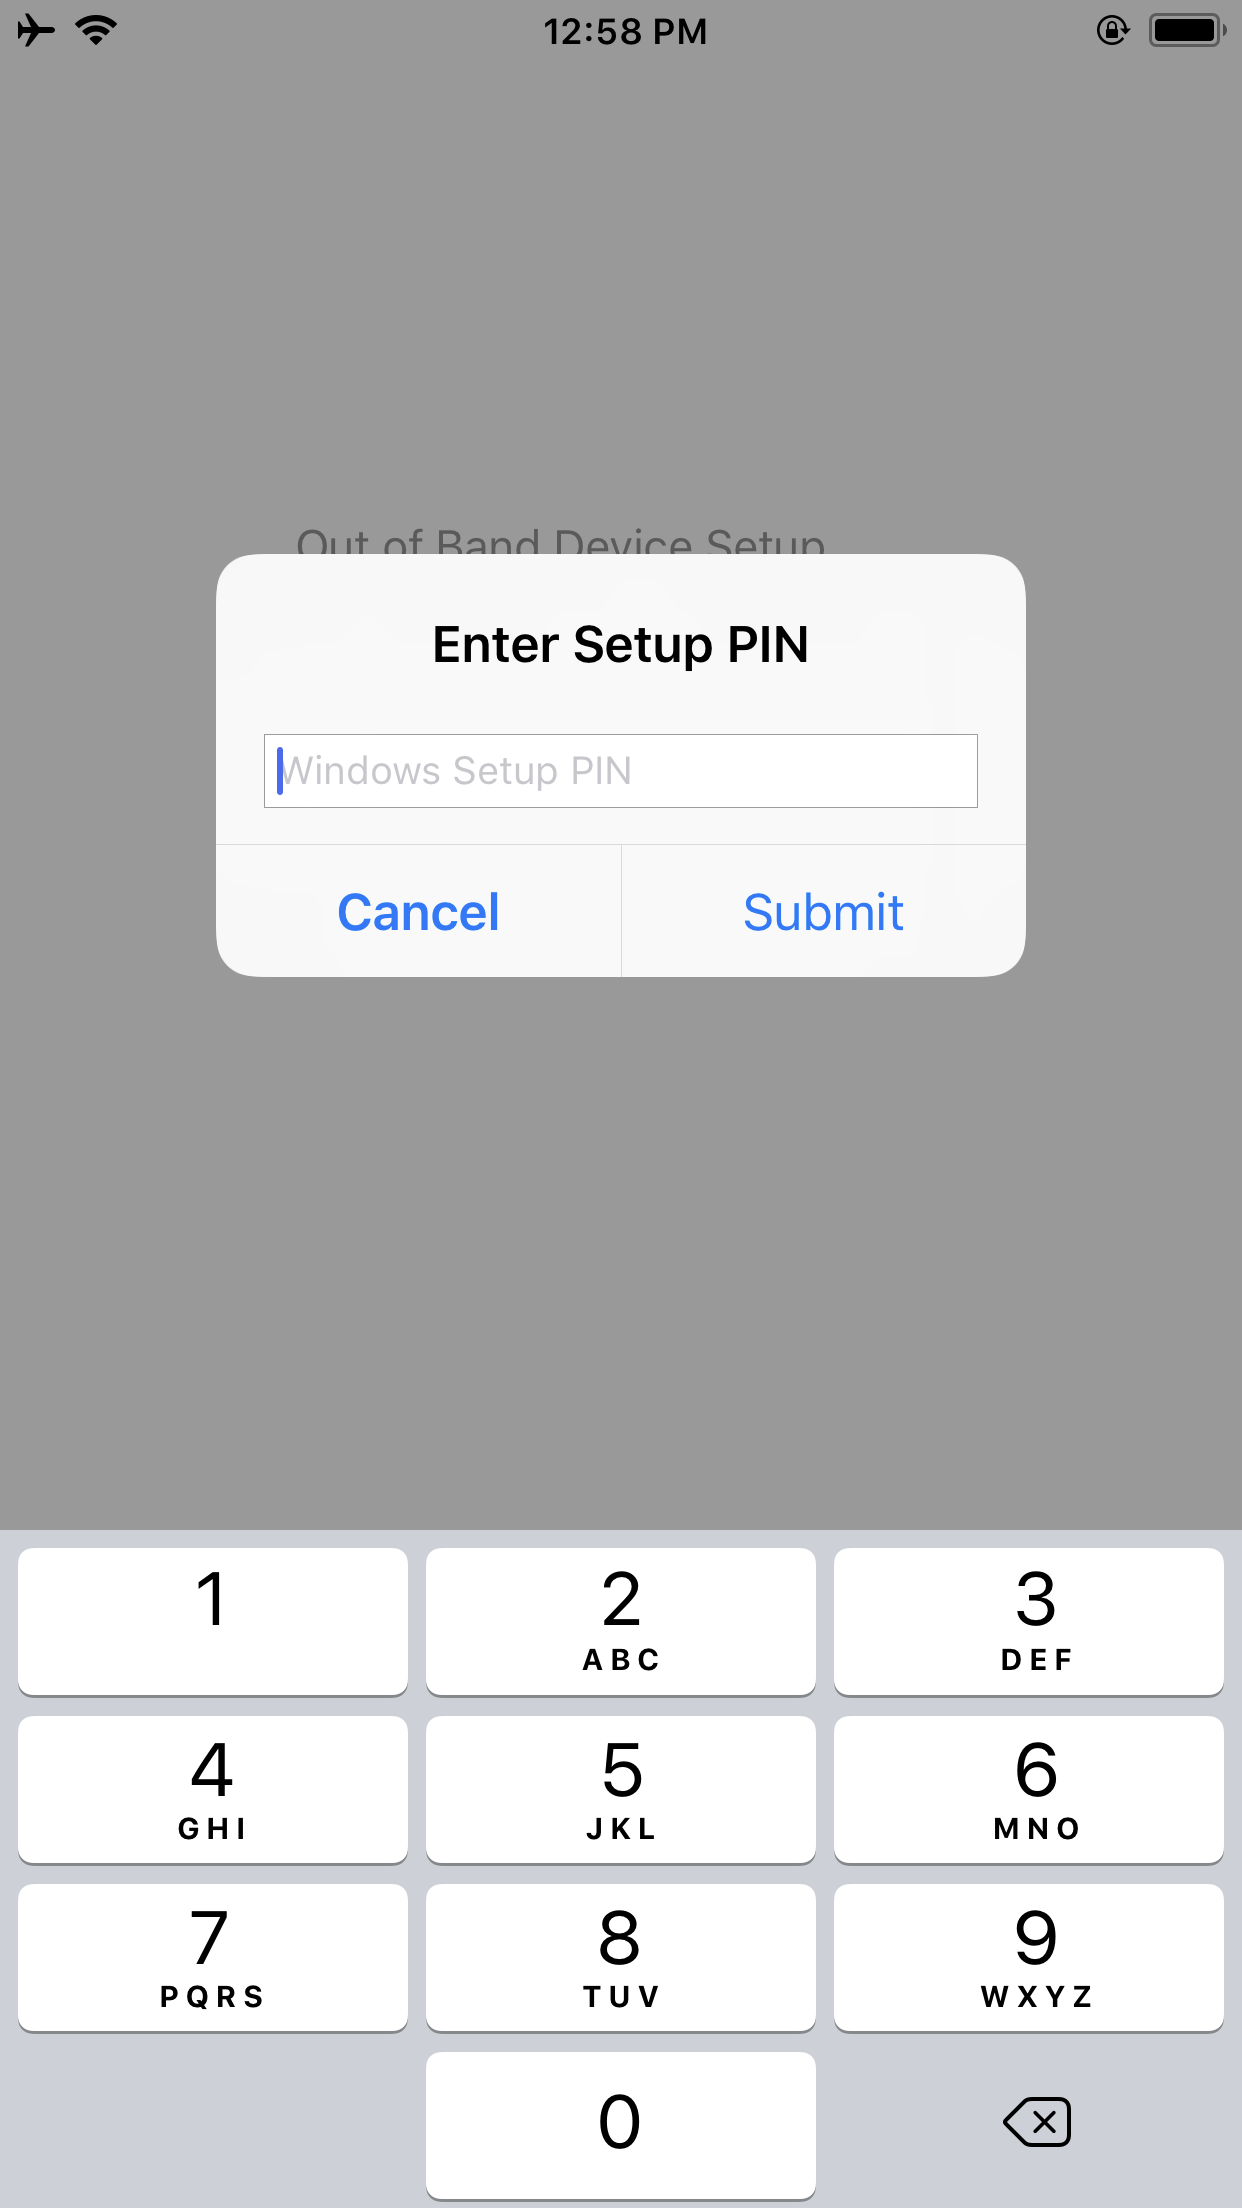
To pair your mobile device with the web account, you must generate the PIN/QR Code, then call the HYPRUserAgent registerRemoteDevice method to pair via PIN or QR Code.
Out-of-band device setup has an option of presenting an Alert View Controller that accepts a PIN or a QR Code Scan view. To display an Alert View Controller for PIN input, use one of two public methods provided as shown below. Either method will prompt an Alert View Controller for PIN input.
The default policy for remote device registration is defaultRegAction. This means that the authenticators specified in defaultRegAction will be the authenticators used during remote device registration. To learn more about policies, check out Policy Matching.
PIN Entry Setup Example
class ViewController: UIViewController {
  func outOfBandDeviceSetup() {
    HYPRUserAgent.setParentViewController(self)
    // Here you need to pass in .alert for pinInputType
    HYPRUserAgent.sharedInstance().registerRemoteDevice(forUser: nil, pinInputType: .alert, actionId: "<your policy name goes here>") { error in
      if let error = error {
        // Handle Error
        print(error)
      }
      else {
        // Out of Band Device Setup is successful
        print("Out of Band Device Setup Successful!")
      }
    }
  }
}
Alert PIN Input View
QR Code Scan View
To display a QR Code Scan view, please use the method provided below.
class ViewController: UIViewController {
  func outOfBandDeviceSetup() {
    HYPRUserAgent.setParentViewController(self)
    // Setting UI elements for QR Scan view
    let qrCodeConfig = HYPRViewConfiguration.qrCodeViewConfiguration()
    qrCodeConfig.titleText = "SCAN QR CODE"
    qrCodeConfig.titleFont = UIFont(name: "You Font", size: 16.0)
    qrCodeConfig.titleColor = UIColor.white
    qrCodeConfig.logoImage = UIImage(named: "you logo")
    // Here you need to pass in .qrCodeScan for pinInputType
    HYPRUserAgent.sharedInstance().registerRemoteDevice(forUser: nil, pinInputType: .qrCodeScan, actionId: "<your policy name goes here>") { error in
      if let error = error {
        // Handle Error
        print(error)
      }
      else {
        // Out of Band Device Setup is successful
        print("Out of Band Device Setup Successful!")
      }
    }
  }
}
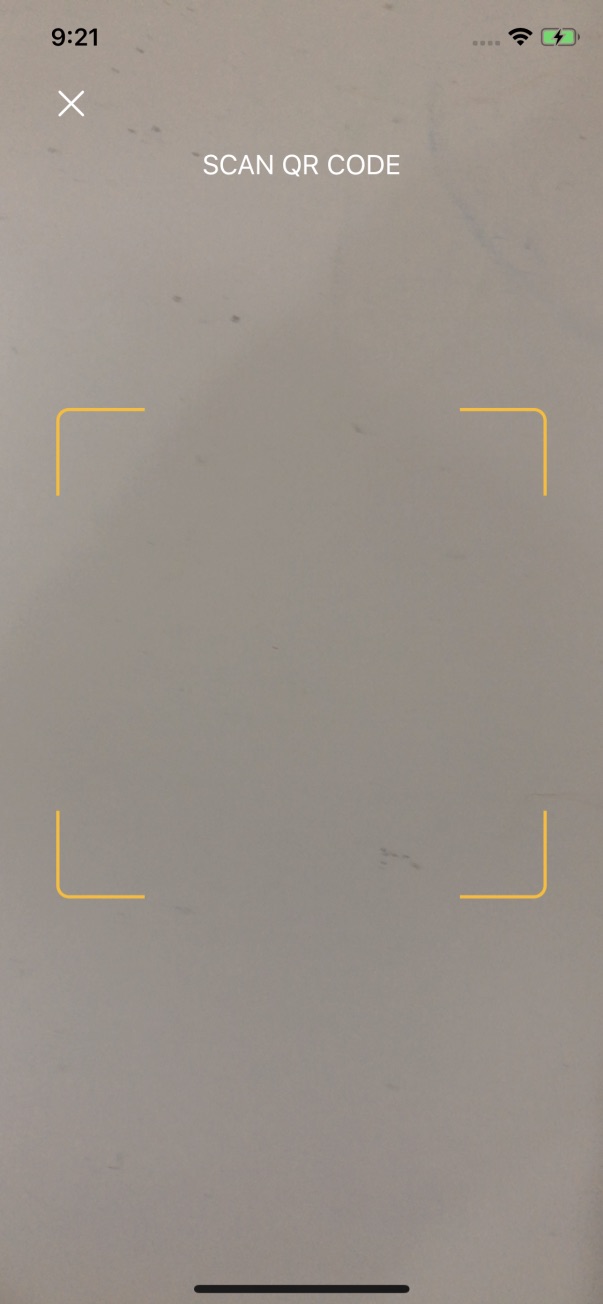
Modifiable options include the following:
| Option | Resulting Change |
|---|---|
titleText | Title text at the top of the view. |
titleFont | Font at the top of the view. |
titleColor | Text color at the top of the view. |
logoImage | The logo displayed at the top. |
Processing the Push Notification
Here are steps to enable push notifications along with your chosen authenticator(s). For the purposes of demonstration we will only enable the PIN authenticator, but the method applies for any you might use.
We need to enable push Notifications and authenticators during App startup, so we placed it within AppDelegate.swift.
Within func application(_ application: UIApplication, didReceiveRemoteNotification userInfo: [AnyHashable : Any], fetchCompletionHandler completionHandler: @escaping (UIBackgroundFetchResult) -> Void), if the callback in HYPRFirebaseAdapter.handlePushPayloadUserInfo returns an error, OOB authentication was unsuccessful and your app will need to inform the user.
The HYPRFirebaseAdapter.handlePushPayloadUserInfo method returns a userInfo dictionary in the completion block. The following keys will return the corresponding values:
HYPR_OOB_ACTION_TITLE_KEY | The out-of-band Authentication screen title text of type NSString. |
HYPR_OOB_ACTION_MESSAGE_KEY | The out-of-band Authentication screen message text of type NSString. |
HYPR_OOB_ACTION_TYPE | A HYPROOBActionType enum. |
HYPR_OOB_ACTION_REMOTE_DEVICE_KEY | The HYPRUserAgentRemoteDevice asking for authentication. |
import HyprCore
import HyprCore
import HYPRPIN
import HYPRFirebaseNotificationAdapter

@UIApplicationMain
class AppDelegate: UIResponder, UIApplicationDelegate {
  func application(_ application: UIApplication, didFinishLaunchingWithOptions launchOptions: [UIApplicationLaunchOptionsKey: Any]?) -> Bool {
    // Enable any authenticator you like.
    // We are just enabling PIN for the purposes of demonstration
    HYPRUAFClient.registerAuthenticatorModule(HYPRPINAsm.self)

    // Set SSLPinningEnabled to true if you are using SSL Pinning
    HYPRUserAgent.setSSLPinningEnabled(false)
    HYPRUserAgent.setNotificationProviderAdapter(HYPRFirebaseAdapter.shared())
    HYPRFirebaseAdapter.shared().userPushNotifications(enabled: true)
    if HYPRUserAgent.sharedInstance().activeProfile() == nil {
      let config = HYPRUserAgentProfileConfiguration(
        rpAppId: "Relying Party App ID i.e: HYPRDefaultApplication",
        rpServerUrl: "Relying Party URL i.e.: https://9999-pov.hypr.com",
        deviceType: "WEB",
        rpSSLPinCredentials: nil,
        additionalData: nil)

        let profile = HYPRUserAgentProfile(displayName: "Place a profile name name here: i.e. MyProfile",
          configuration: config,
          persona: nil,
          userAccounts: nil)

        HYPRUserAgent.sharedInstance().registerProfile(profile!)
      }
    return true
  }

  func application(_ application: UIApplication, didReceiveRemoteNotification userInfo: [AnyHashable : Any], fetchCompletionHandler completionHandler: @escaping (UIBackgroundFetchResult) -> Void) {
    if let rootController = self.window?.rootViewController {
      HYPRUserAgent.setParentViewController(rootController)
    }
    let didHandle = HYPRFirebaseAdapter.handlePushPayloadUserInfo(userInfo) { (responseUserInfo, error) in
      //the responseUserInfo includes one or more key-value pairs. Keys are:
      //extern NSString * const HYPR_OOB_ACTION_TITLE_KEY;
      //extern NSString * const HYPR_OOB_ACTION_MESSAGE_KEY;
      //extern NSString * const HYPR_OOB_ACTION_TYPE;
      //details can be found in HYPRPushNotificationAdapter.h
      // if there is no error, then success
      // if there is an error, with code != cancelled, then fail
      if error == nil {
        print("push notification successfully processed!")
      } else if let hyprError = error as NSError?, hyprError.code != HYPRError.cancelled.rawValue {
        print("\(#function): \(hyprError.description)")
      }
    }

    if didHandle {
      completionHandler(.newData)
    } else {
      completionHandler(.noData)
    }
  }
}
To perform OOB authentication upon receiving the push, add the following line of code in your Initial View Controller's viewWillAppear method:
class ViewController: UIViewController {

    override func viewWillAppear(_ animated: Bool) {
        super.viewWillAppear(animated)
        HYPRUserAgent.setParentViewController(self)
    }
}
Your application will not process the OOB push notification unless your initial view controller has the HYPRUserAgent.setParentViewController(self) method in its viewWillAppear method.
UI Customization
OOB Device Setup has an option of presenting an Alert View Controller that accepts a PIN or a QR Code Scan view.
To display an Alert View Controller for PIN input, use one of two public methods provided as shown below. Either one of those two methods will prompt an Alert View Controller for PIN input.
class ViewController: UIViewController {
  func outOfBandDeviceSetup() {
    HYPRUserAgent.setParentViewController(self)
    // Here you need to pass in a nil for pin to prompt an alert for PIN input
    HYPRUserAgent.sharedInstance().registerRemoteDevice(forUser: nil, pin: nil, actionId: "<your policy name goes here>") { error in
      if let error = error {
        // Handle Error
        print(error)
      }
      else {
        // Out of Band Device Setup is successful
        print("Out of Band Device Setup Successful!")
      }
    }
  }
}
class ViewController: UIViewController {
  func outOfBandDeviceSetup() {
    HYPRUserAgent.setParentViewController(self)
    // Here you need to pass in .alert for pinInputType
    HYPRUserAgent.sharedInstance().registerRemoteDevice(forUser: nil, pinInputType: .alert, actionId: "<your policy name goes here>") { error in
      if let error = error {
        // Handle Error
        print(error)
      }
      else {
        // Out of Band Device Setup is successful
        print("Out of Band Device Setup Successful!")
      }
    }
  }
}
Alert PIN Input View

If you are creating your own out-of-band Device Setup screen, you'll need to create a view controller that accepts the 6-digit PIN. Once you have that PIN, you must provide it to the HYPRUserAgent registerRemoteDevice method as shown here:
class ViewController: UIViewController {
  func outOfBandDeviceSetup() {
    HYPRUserAgent.setParentViewController(self)
    // Here you pass in your PIN
    HYPRUserAgent.sharedInstance().registerRemoteDevice(forUser: nil, pin: "<Your PIN here>", actionId: "<your policy name goes here>") { error in
      if let error = error {
        // Handle Error
        print(error)
      }
      else {
        // Out of Band Device Setup is successful
        print("Out of Band Device Setup Successful!")
      }
    }
  }
}
QR Code Scan View
To display a QR Code Scan view, use the method provided below.
class ViewController: UIViewController {
  func outOfBandDeviceSetup() {
    HYPRUserAgent.setParentViewController(self)
    // Setting UI elements for QR Scan view
    let qrCodeConfig = HYPRViewConfiguration.qrCodeViewConfiguration()
    qrCodeConfig.titleText = "SCAN QR CODE"
    qrCodeConfig.titleFont = UIFont(name: "your font", size: 16.0)
    qrCodeConfig.titleColor = UIColor.white
    qrCodeConfig.logoImage = UIImage(named: "your logo")
    // Here you need to pass in .qrCodeScan for pinInputType
    HYPRUserAgent.sharedInstance().registerRemoteDevice(forUser: nil, pinInputType: .qrCodeScan, actionId: "<your policy name goes here>") { error in
      if let error = error {
        // Handle Error
        print(error)
      }
      else {
        // Out of Band Device Setup is successful
        print("Out of Band Device Setup Successful!")
      }
    }
  }
}
Modifiable options include the following:
| Option | Resulting Change |
|---|---|
titleText | Title text at the top of the view. |
titleFont | Font at the top of the view. |
titleColor | Text color at the top of the view. |
logoImage | The logo displayed at the top. |
To receive push notifications when your app is backgrounded, you must add the certificate to your Firebase iOS Project. Please refer to these documents for more information:
After OOB Device Setup is implemented, you can now perform OOB Authentication.
Limiting the Number of Relying Party Profiles
To limit the number of Relying Parties the user can have, call the following method:
HYPRUserAgent.sharedInstance().setLimit(<your limit goes here>, forProfilesOf: .web)
Register with JSON Content
The QR code content used for web account pairing will be in JSON format. If you prefer not to scan a QR code to register, there is an option to directly register with the JSON content that the QR code represents.
Example
HYPRUserAgent.sharedInstance().registerRemoteDevice(withJsonContent: contentJson) { error in
if let error = error {
    // Process Error
  } else {
    self.presentInfoAlert(title: "Success!", message: "Registered Successfully!")
  }
}
To receive push notifications when your App is backgrounded, you must add the certificate to your Firebase iOS Project. Please refer to these documents for more information:
Check Server for Push Payload
In the event that the push notification does not arrive on the device, we still would like to authenticate.
HYPR SDK for iOS provides functionality to check the HYPR server for any push notifications for authentication, and if so, to start the authentication. You can do so with the code provided here:
if let webAccounts = HYPRUserAgent.sharedInstance().activeUserAccount()?.remoteDevices,
	let webAccount = webAccounts.first {
  HYPRUserAgent.sharedInstance().pendingOOBAuthenticationPayload(for: webAccount) { pushPayload, error in
		if let error = error {
			// Error
 		}
		else {
			// Process the Push Payload
		 	CustomFirebaseAdapter.handlePushPayloadUserInfo(pushPayload, completion: { (userInfo, error) in
				window.rootViewController = tempRootViewController
					if let error = error {
						print("Encountered an error during OOB Authentication: \(error.localizedDescription)")
					}
			})
			if didHandle {
				completionHandler(.newData)
			} else {
				completionHandler(.noData)
			}
	}
}