HYPR SDK for FIDO2 Browser
HYPR SDK for FIDO2 Browser provides an abstraction layer to the FIDO2 WebAuthn APIs for a simpler developer experience.
Getting HYPR SDK for FIDO2 Browser
To add the SDK to your app, run the following command in the root of your project:
npm i @hyprjs/hypr-fido2-sdk
You can also add the SDK through a script tag:
<script src="https://unpkg.com/@hyprjs/hypr-fido2-sdk/dist/hyprfido2sdk.min.js"></script>
If your app needs to run on older browsers, use the following instead:
<script src="https://unpkg.com/@hyprjs/hypr-fido2-sdk/dist/hyprfido2sdk.compatible.js"></script>
Function Overview
Five core functions can be leveraged before and during registration and authentication.
HYPRFido2Client.isFido2Available
Call this function to check FIDO2 browser support. To ensure an optimal user experience, make this check before any of the other functions below.
| Parameter Name | Description | Default Value |
|---|---|---|
callback | The callback that gets invoked as a result of this check. | none |
requirePlatformAuthenticator | Whether or not to check if a platform authenticator is available at the same time. Default value is true. | true |
Example
let isFido2AvailableCallback = (error, result) ={
  if (error !== null) {
    console.log("(isFido2AvailableCallback Callback) There was an error: " + String(error));
    return;
  }
  console.log("(isFido2AvailableCallback Callback) Got use credential result: " + result);
};

HYPRFido2Client.isFido2Available(isFido2AvailableCallback);
HYPRFido2Client.createAttestationOptions
Call this function to get the payload you must send to the FIDO2 server options endpoint for registration.
Make sure username validation is being handled in your server when making an options request.
The parameters are described below:
| Parameter Name | Description | Default Value |
|---|---|---|
username | The username of the user you'd like to register. | none |
displayName | The display name of the user you'd like to register. | none |
authenticatorAttachment | The authenticator attachment for this registration. | platform |
userVerification | The user verification type for this registration. | required |
isResidentKeyRequired | Whether or not to use a resident key. | false |
attestationType | The attestation type to use for registration. | direct |
Example
/**
* @returns {{attestation: *, displayName: *, authenticatorSelection: {authenticatorAttachment: *, userVerification: *, requireResidentKey: *}, username: *}}
*/
createAttestationOptions: function (username,
                                     displayName,
                                     authenticatorAttachment = "platform",
                                     userVerification = "preferred",
                                     isResidentKeyRequired = false,
                                     attestationType = "direct");
HYPRFido2Client.createAssertionOptions
Called to make an options request to your FIDO2 server for authentication.
The parameters are described below:
| Parameter Name | Description | Default Value |
|---|---|---|
username | The username for this particular user. | none |
userVerification | The user verification type. | preferred |
authenticatorAttachment | The authenticator attachment type. | platform |
Example
/**
* @returns {{userVerification: *, authenticatorSelection: {authenticatorAttachment: *}, username: *}}
*/
createAssertionOptions: function (username,
                                   userVerification = "preferred",
                                   authenticatorAttachment = "platform");
HYPRFido2Client.createFido2Credential
Call this function when you are registering with FIDO2.
| Parameter Name | Description | Default Value |
|---|---|---|
serverAttestationOptionsResponse | This is the options response from the attestation FIDO2 options request. | none |
callback | This is your callback function that will be invoked in the event of an error or successful completion. | none |
removeExcludeCredentials | Whether or not to remove the exclude credentials list from the server during the create request. *This will allow the user to register the same authenticator on the same computer multiple times | true |
Example
createFido2Credential: function (serverAttestationOptionsResponse, callback);
HYPRFido2Client.useFido2Credential
Called when you are authenticating with FIDO2.
| Parameter Name | Description |
|---|---|
serverAssertionOptionsResponse | This is the JSON response of your assertion options request to the FIDO2 server. |
callback | This is your callback function that will be invoked in the event of an error or successful completion. |
Example
useFido2Credential: function (serverAssertionOptionsResponse, callback);
User Registration
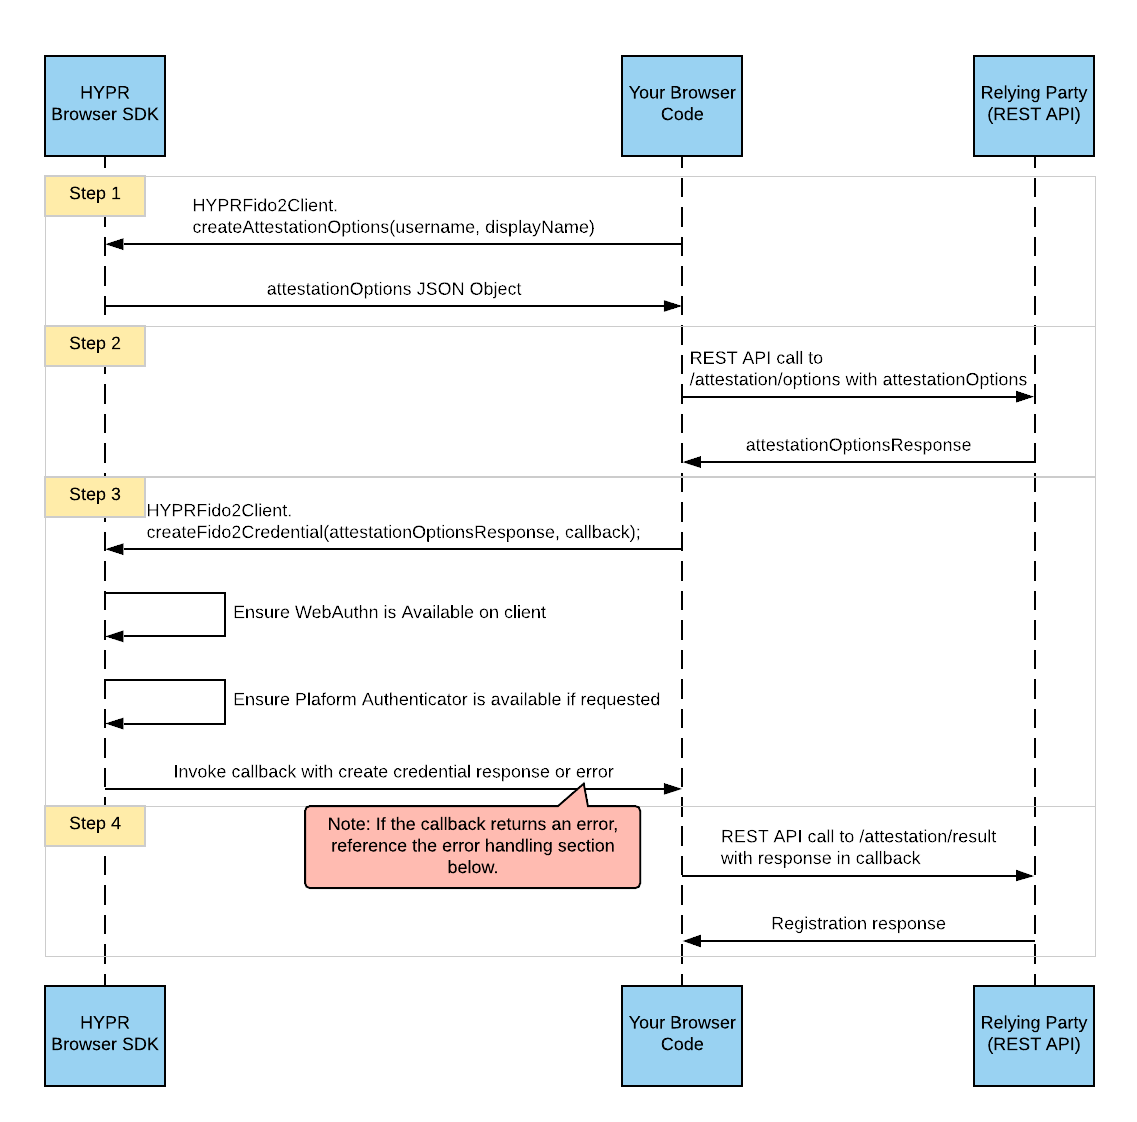
The flow of a HYPR FIDO2 user registration is shown here:

Use the below steps to register a new user with your application.
- Create your options request. Get your registration options by calling the
createAttestationOptionsfunction. The example uses the default argument values shown in the Function Overview, excepting the username and display name.
//Pass your arguments to the function
let attestationOptions = HYPRFido2Client.createAttestationOptions("john.doe@hypr.com", "John Doe");
- Get the registration options from the server. Make a REST API call to your FIDO2 server attestation options request (
/attestation/options).
The payload that you pass in the POST request should be the attestationOptions from Step 1.
HYPR provides a Postman collection with samples of the REST APIs for this step. This collection includes specific payload information you can use. You can see the public APIs that are currently available here.
- Create the passwordless credential. Once you get a 200 response from the REST API call in Step 2, call the
createFido2Credentialfunction in the SDK to create your local credential.
To call this function, you must define a callback that will be invoked in the event of either an error or completion of the credential creation.
let attestationCallback = (error, result) ={
  if (error !== null) {
    console.log("(Attestation Callback) There was an error: " + String(error));
    return;
  }
  console.log("(Attestation Callback) Got create credential result: " + result);
};

HYPRFido2Client.createFido2Credential(responseFromStep2, attestationCallback);
- Complete the registration . Once your callback in Step 3 is called and the credential is created, make a REST API POST request to the FIDO2 server attestation result (
/attestation/result) endpoint. The body of the REST API call will be the result in your callback from Step 3.
HYPR provides a Postman collection with samples of the REST APIs for this step. This collection includes specific payload information that you can use. You can see the public APIs that are currently available here.
User Authentication
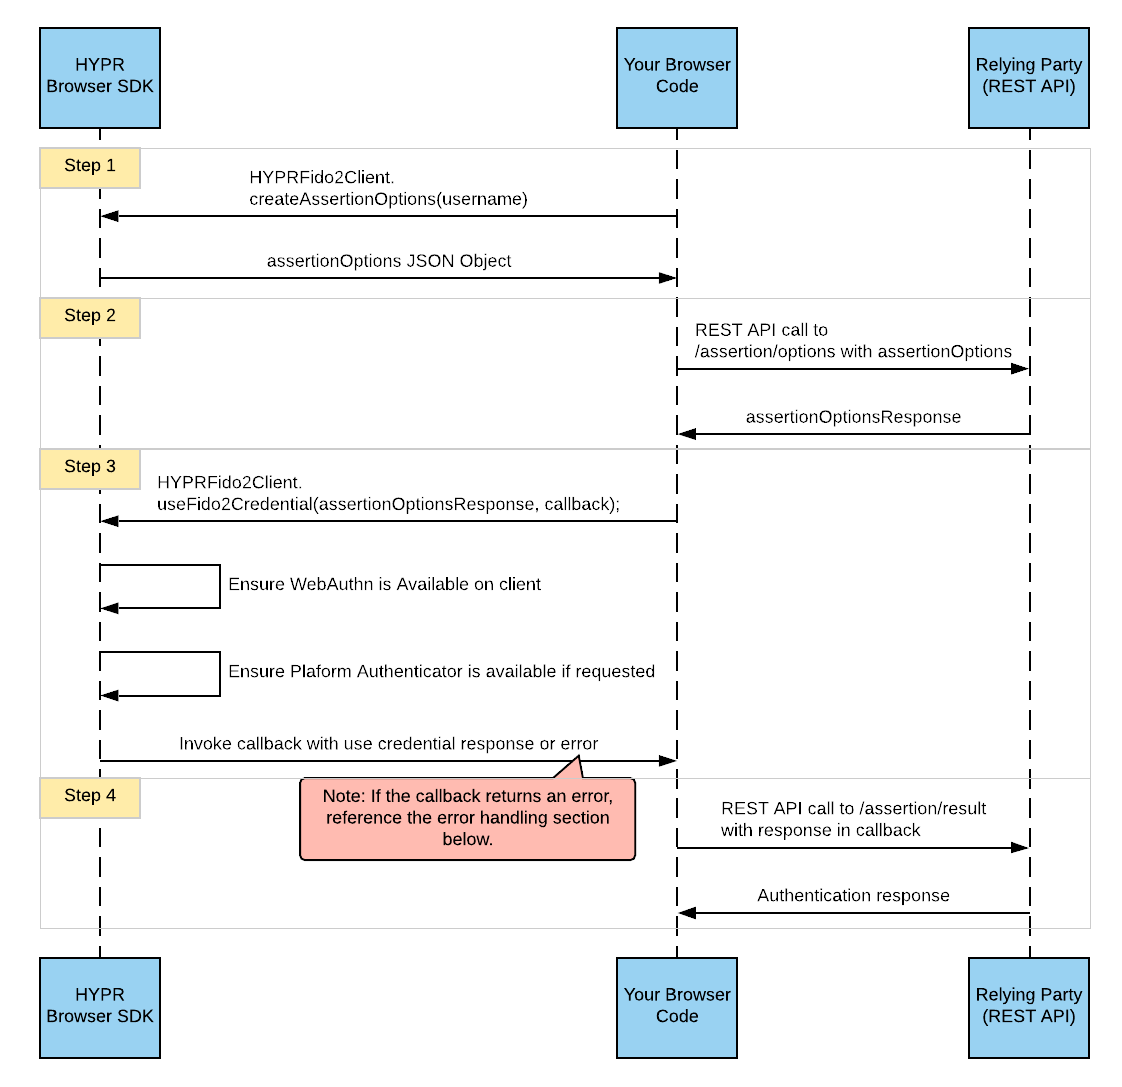
The flow of a HYPR FIDO2 user authentication is shown here:

Use the steps below to authenticate registered users.
- Create your options request. Create the authentication options for the server by calling the
createAssertionOptionsfunction on the SDK. The only required parameter here is the username. In the example below, we use the default parameters for user verification and attachment.
let authnOptions = HYPRFido2Client.createAssertionOptions("john.doe@hypr.com");
- Get the authentication options from the server. Once you get your authentication options from Step 1, you must make a REST API POST request to the assertion options (
/assertion/options) endpoint on your FIDO2 server.
The payload in this POST request should be the authnOptions from Step 1.
HYPR provides a Postman collection with samples of the REST APIs for this step. This collection includes specific payload information that you can use. You can see the public APIs that are currently available here.
- Use the stored credential. Once you get a successful response from your FIDO2 API in Step 2, you must leverage the SDK to use the previously registered credential.
The useFido2Credential function will take in the response from Step 2 and a callback as parameters. This callback will be invoked by the SDK in either the event of a successful use of the credential, or in the event of an error.
let assertionCallback = (error, result) ={
  if (error !== null) {
    console.log("(Assertion Callback) There was an error: " + String(error));
    return;
  }
  console.log("(Assertion Callback) Got use credential result: " + result);
};

HYPRFido2Client.useFido2Credential(resp, assertionCallback);
- Complete the authentication. Once your callback in Step 3 is called and the credential is successfully used, make a REST API POST request to the FIDO2 server assertion result (
/assertion/result) endpoint. The body of the REST API call will be the result in your callback from Step 3.
HYPR provides a Postman collection with samples of the REST APIs for this step. This collection includes specific payload information that you can use. You can see the public APIs that are currently available here.
Error Handling
The below section highlights common errors that can occur when using the SDK, and suggestions on how they should be handled.
WebAuthnUnavailable
Message: Cannot continue since WebAuthn is not available on this browser and client.
Explanation: This error will occur if you try to register or authenticate a user but their browser doesn't support FIDO2 WebAuthn APIs.
If you encounter this error, then you should provide the user with an alternative method for authentication or registration such as a Push to mobile capability.
WebAuthnPlatformUnavailable
Message: Cannot continue since WebAuthn Platform Authentication is not available on this browser and client.
Explanation: If you encounter this error, it means that your authenticator attachment during registration was platform and the user's computer doesn't support platform authenticators in the WebAuthn APIs.
If you encounter this error, give the user an alternative authenticator to register, such as a mobile device or SmartKey device, by leveraging the cross-platform authenticator attachment in your createAttestationOptions request.
InvalidStateError
**Message: **The user attempted to register an authenticator that contains one of the credentials already registered with the relying party.
Explanation: If you encounter this error, it means that the username provided is already registered on this particular computer with the same authenticator.
If you feel that this is a mistake, you can try deleting the authenticator on the FIDO2 server by using the proper REST API call (see the Postman collection for more details).
If you would like to register the same username multiple times on the same computer, you can do so by removing the excludeCredentials array from the server response in User Registration.
NotAllowedError
**Message: ** The operation either timed out or was not allowed.
Explanation: If you encounter this error, it can mean one of these items:
- The username you're trying to authenticate doesn't have any credentials registered on this computer. This can happen if they never registered or if they removed the credential from their computer or device.
If the user is not registered on this machine, then you should register them first.
-
The user cancelled the authentication or registration prompt that was given to them by the browser.
-
The user didn't complete the request within 30 seconds and their authentication or registration request timed out. In this case, you can try authenticating or registering the user again.
NotSupportedError
Message: Either the device has received unexpected request parameters, or the device cannot support this request.
Explanation: If you see this error, it most likely means that you are trying to register a device with the resident key value set to true in the create credentials request.
To overcome the issue, you should set the isResidentKeyRequired parameter to false when creating the FIDO credential.