Entra ID: HYPR Enterprise Passkey in CC
Please note, this integration is in a beta phase. Please provide any feedback or enhancement requests to your HYPR Account Manager and these will be worked into our next release.
HYPR Enterprise Passkey enables your HYPR Mobile App-enabled device to act as a device-bound passkey (FIDO2) provider when authenticating through Microsoft Entra. Once implemented, Entra will see any affected mobile devices as security key based passkeys.
HYPR Enterprise Passkey can be integrated with several different workstation setups, depending on your environment:
-
Entra joined: Windows workstation is joined directly to Entra ID; the user can login to any workstation joined to Entra ID using the user account in Entra
-
Entra hybrid joined: Windows workstation is joined to both the on-premises Active Directory and to Entra ID; the user can login using the user credentials on the domain controller.
Use the following command to check the status of a Windows workstation:
dsregcmd /status
Getting the HYPR Enterprise Passkey integration up and running requires the following basic steps:
-
Understand how the Entra ID login process changes for end users after you integrate with HYPR. See What Will Happen in Entra?.
-
Configure the Entra ID side of the integration. See Setting Up Entra ID.
-
Configure the HYPR side of the integration. See Connecting Entra to HYPR.
-
Configure and download the HYPR Passwordless desktop client. See Configure and Download the Desktop Client
The following HYPR Integration common tasks are explained on the Integrationsmain page.
-
Monitor integration-specific user activity with the Audit Trail
Enrolling and authenticating with passkeys (FIDO2) on Microsoft Entra ID don't require any particular license subscription, but requires at least a Microsoft Entra ID P1 subsription if you want to enforce its usage through Conditional Access policies. Please check your Microsoft subscription before proceeding with configuring the integration.
HYPR Enterprise Passkeys leverages Entra ID FIDO2 Provisioning API in order to seamlessly enroll users' passkeys into Entra. This feature has been launched as Public Preview in August 2024. Learn more about the launch in the FIDO2 provisioning API public preview announcement and the HYPR announcement.
What Will Happen in Entra ID?
Login Flow
Once you activate the HYPR Entra ID Enterprise Passkey integration, users will continue to have the usual Entra ID login flow.
Enrolled Users
Users who have been successfully enrolled via HYPR Passwordless are going to have their Enterprise Passkey automatically enrolled into Entra ID.
When signing in to Entra ID on the browser, after entering their username users can authenticate with HYPR Enterprise Passkey by selecting security key. When loggin into Windows, users will tap on their copmuter account on their HYPR Mobile application to sign in.
Behind the Scenes
Once you create the integration, HYPR will handle as much of the back-end configuration in Entra ID as possible.
Non-enrolled Group Membership
Users who haven't registered a device with HYPR before you activate the HYPR Entra ID Enterprise Passkey integration will automatically be added to a “Users Not Yet Enrolled” Entra ID group created by HYPR during the setup process. They'll automatically be removed from the non-enrolled group as soon as they register a device.
What You'll Need
-
Since you're setting up the HYPR Enterprise Passkey integration through the HYPR Control Center, you should have already registered for an account, paired your mobile device with HYPR, and used your new passwordless login to access the Control Center; if this isn't the case, please contact HYPR Support and we'll help you out
-
Make sure you have the Entra tenant available and an account that exists on the
\*.onmicrosoft.comdomain with administrative privileges. -
Enable FIDO2 Security Keys in the Entra tenant as referenced here. The Get started with phishing-resistant passwordless authentication deployment in Microsoft Entra ID guide provides a comprehensive walkthrough over enabling passkeys in Entra ID.
Workstation
-
Currently the workstation OS must be Windows, as macOS is not yet supported
-
Entra joined or Entra hybrid joined machines with which to test
-
Ensure the Windows Workstation OS patch level requirements are met
-
HYPR Passwordless client must be installed on the affected workstation(s)
-
Workstation support for FIDO2 security keys will vary depending on how the workstation is joined:
-
Microsoft does not support FIDO2 security keys for authentication to Active Directory joined workstations
-
Microsoft supports FIDO2 security keys for authentication to Entra hybrid joined workstations
-
Microsoft supports FIDO2 security keys for authentication to Entra joined workstations
-
-
Entra hybrid joined workstations only:
-
Ensure Domain Controller patch level requirements are met
-
Ensure AES256_HMAC_SHA1 is enabled [required]
-
Configure Active Directory and Entra to support Entra ID Kerberos
-
Additional steps to support administrative accounts.
- By default, administrative accounts can't use security keys
-
Known Issues
-
We recommend making yourself aware of known issues and FAQs
- The most impactful is “Signing in or unlocking a Windows device with a security key containing multiple Microsoft Entra accounts”
Setting Up Entra ID
Registering the HYPR Entra ID Application
-
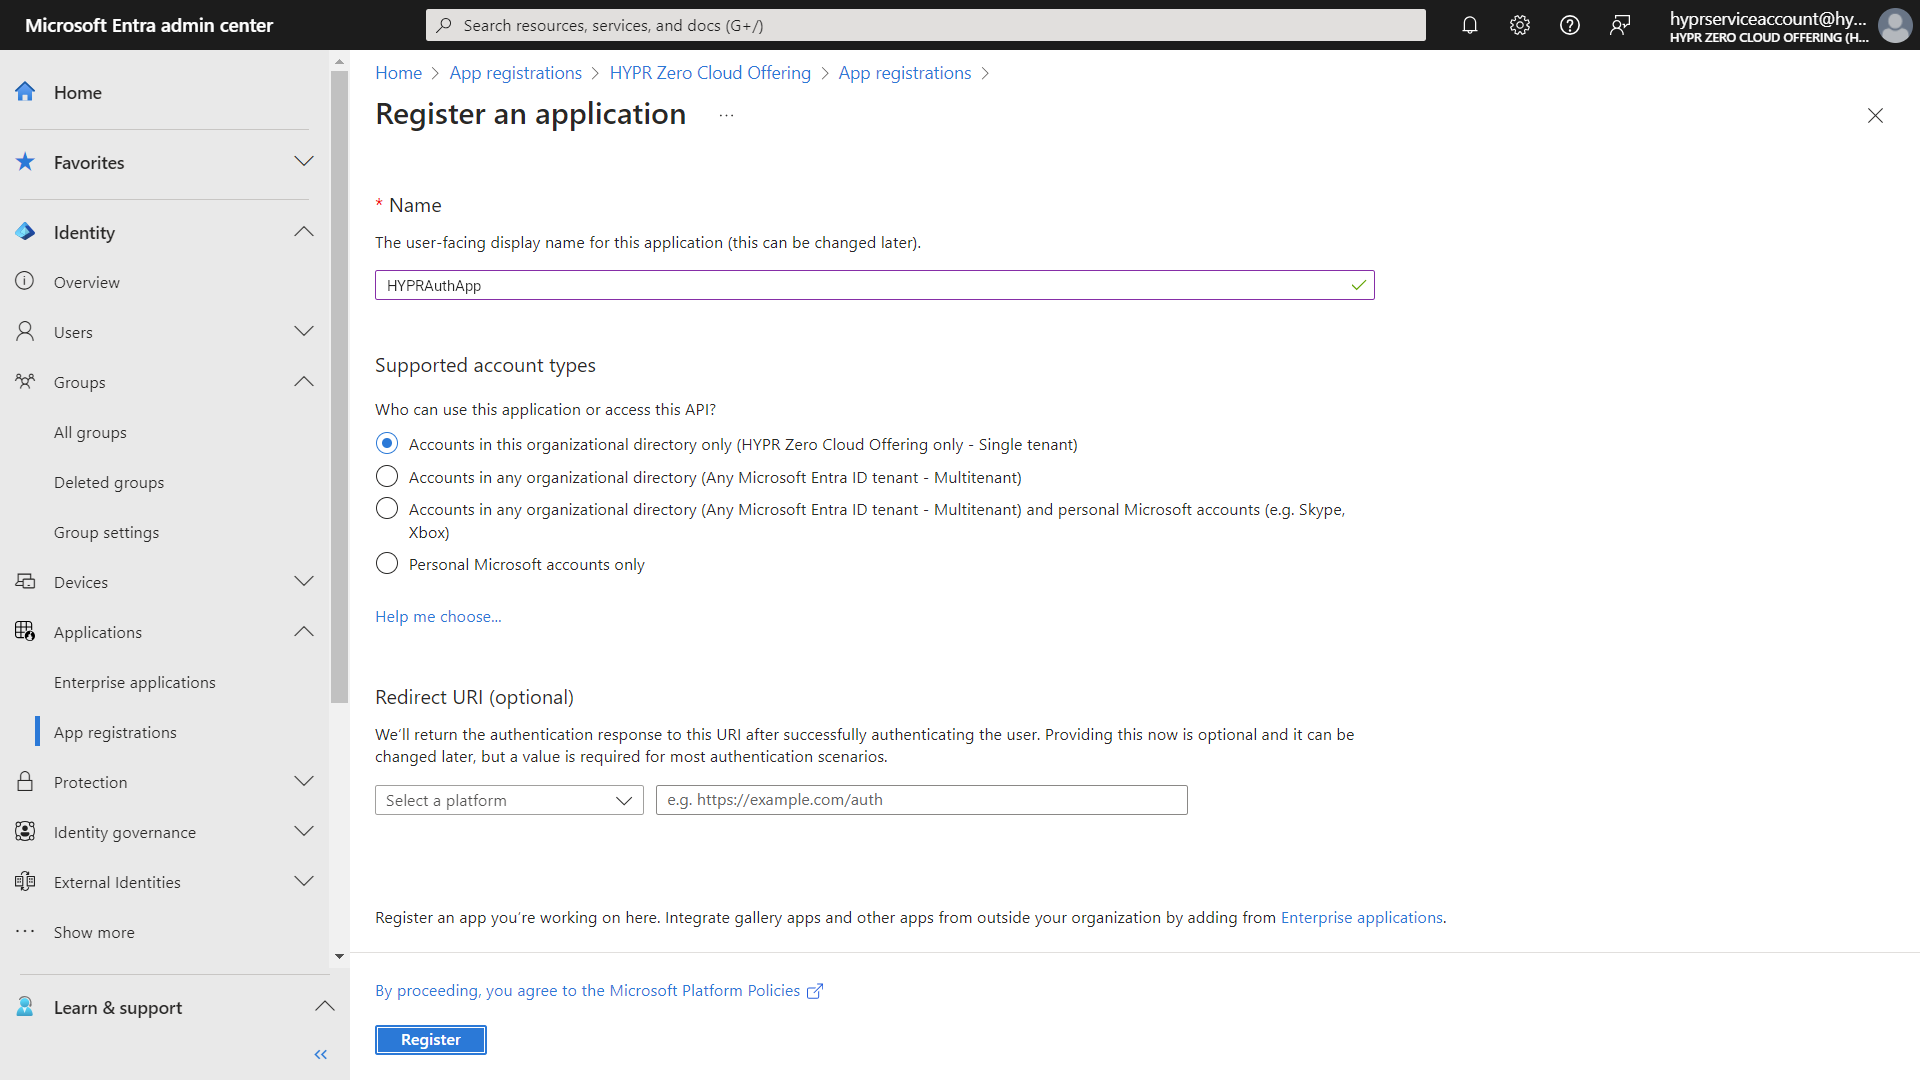
From the Entra ID portal home screen, select Entra ID > App registrations > New registration.
-
Enter the application name HYPRAuthApp and select Accounts in this organizational directory only.
-
Click Register when done.
-
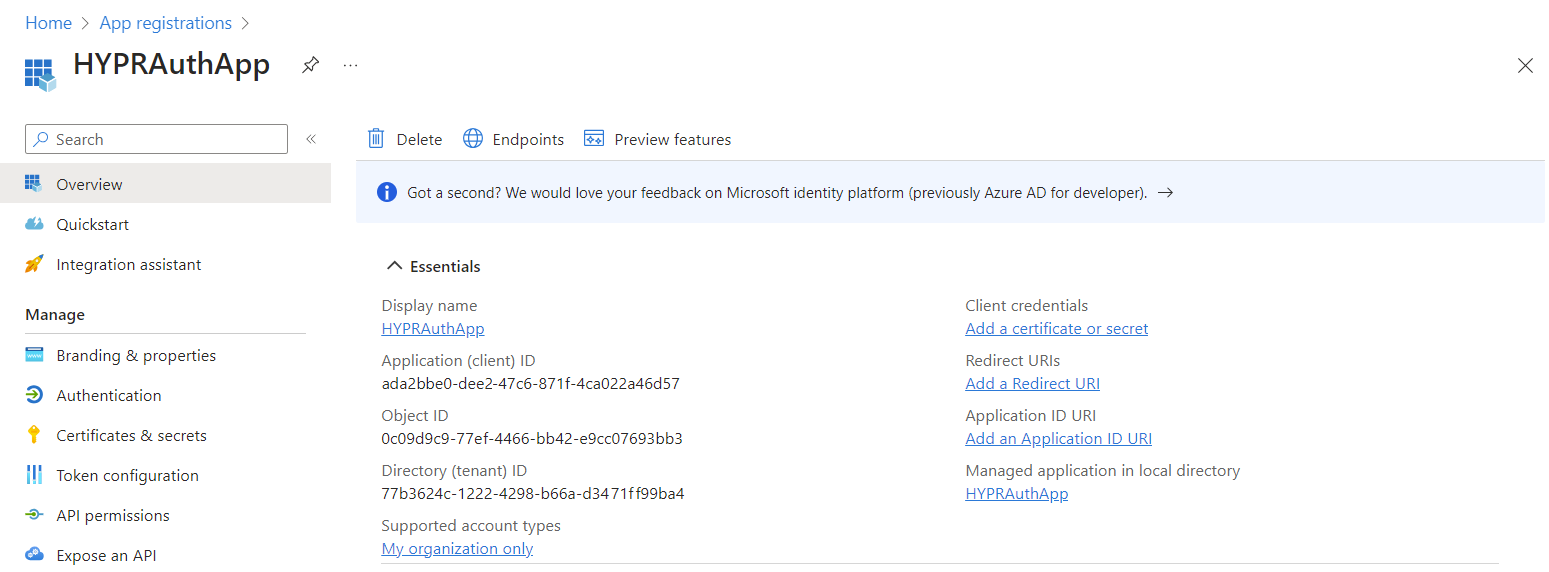
On the Overview page, make a note of the following values which you'll need later when configuring the integration in the HYPR Control Center:
-
Application (client) ID
-
Directory (tenant) ID
-
Grant Required API Permissions
-
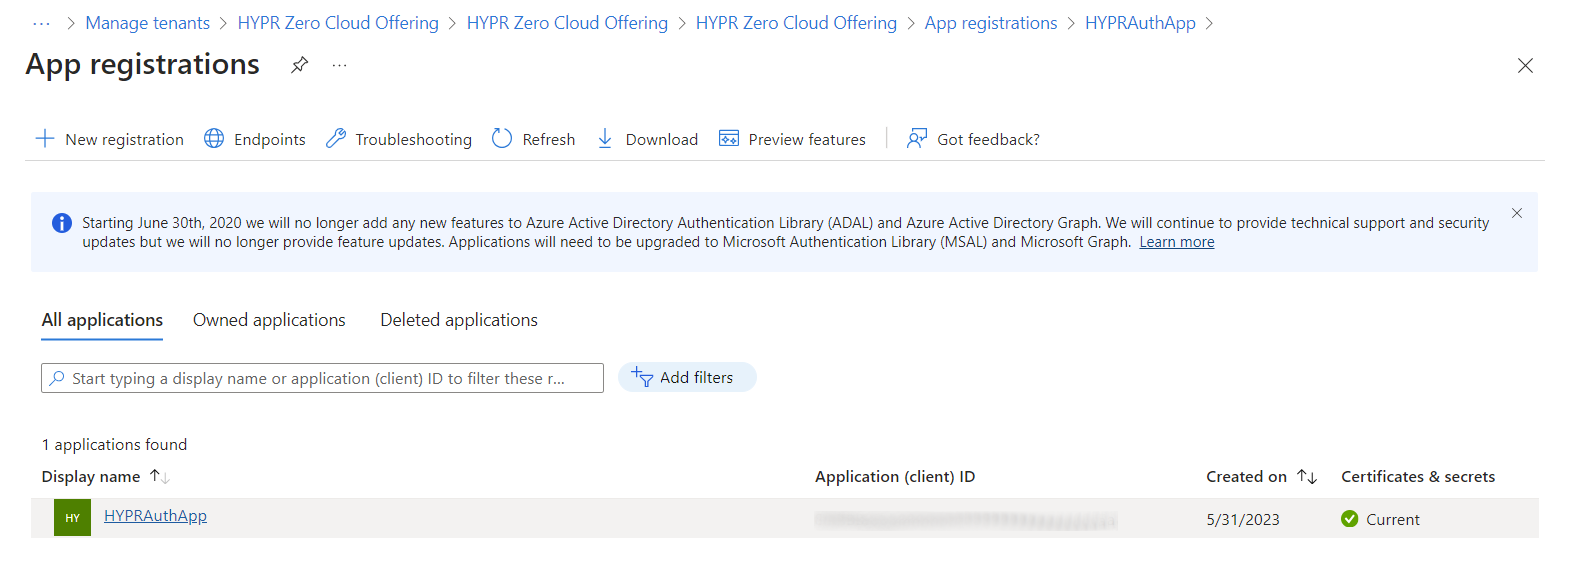
From the Entra ID screen, select App registrations and select the app you just made.
-
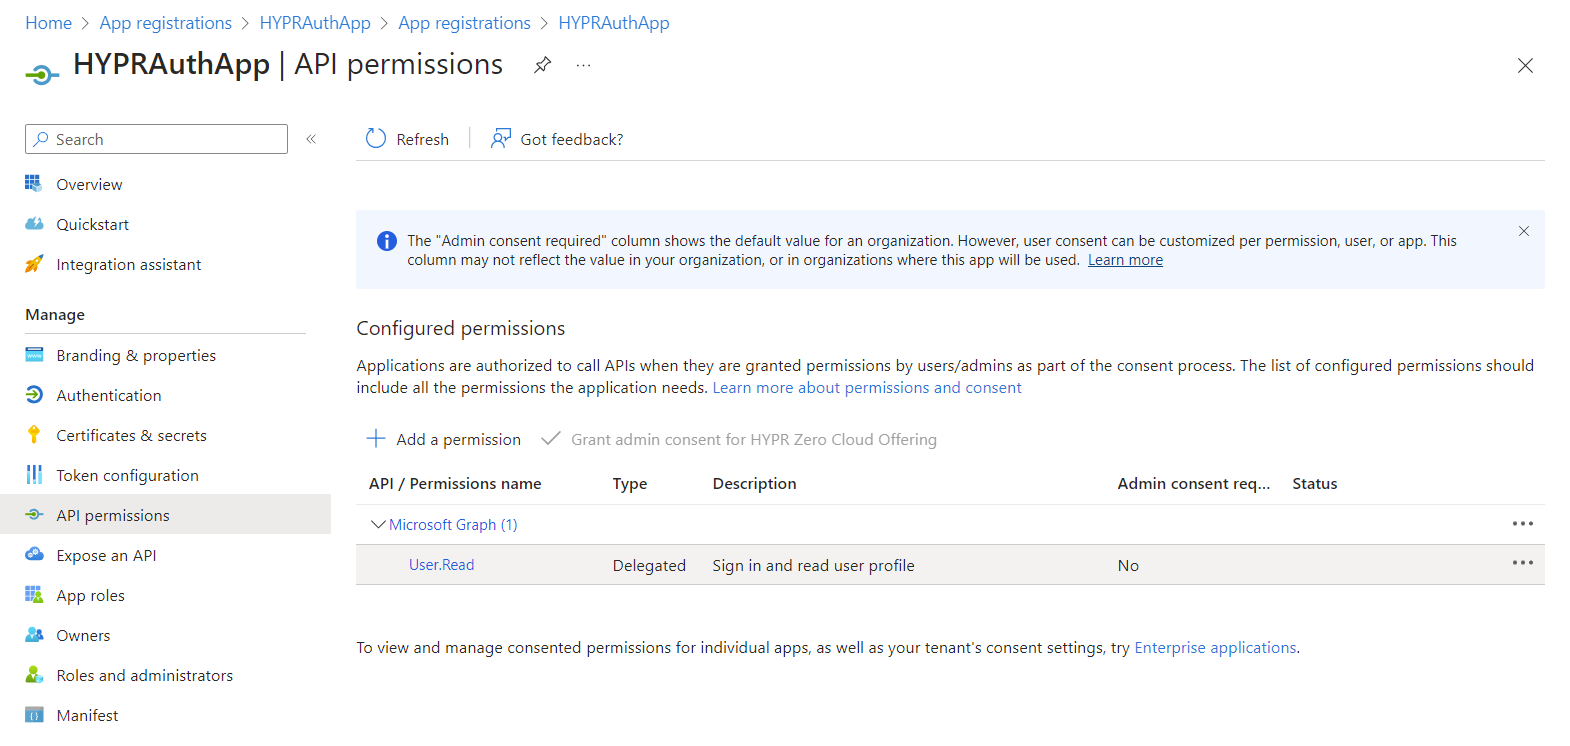
Select API permissions.
-
By default, the application will already have Microsoft Graph's User.Read permission. This isn't required, so remove it by clicking the ... icon and choosing Remove permission. Click Yes, remove to confirm when prompted.

-
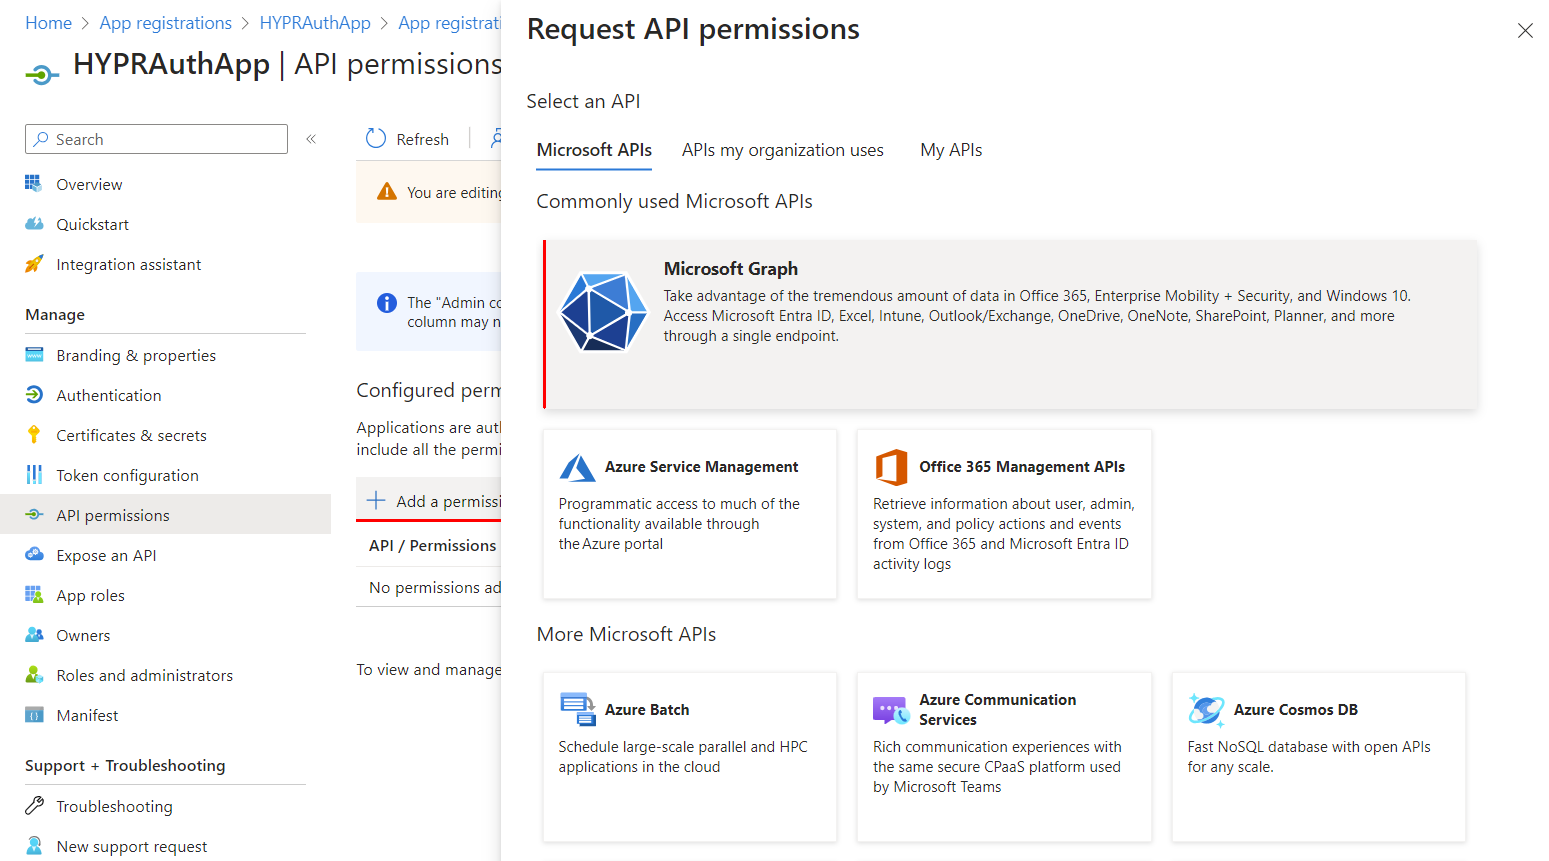
Click Add a permission, and on the tiled choices, select Microsoft Graph.
-
Select Delegated permissions.

Delegated by DefaultSometimes Entra ID will not display the option for Delegated or Application permissions, and will immediately assume Delegated as the choice. After you grant Admin Consent later in the process, you will be able to verify the permission type.
-
Locate and select the following:
-
Directory.AccessAsUser.All -
UserAuthenticationMethod.ReadWrite.All
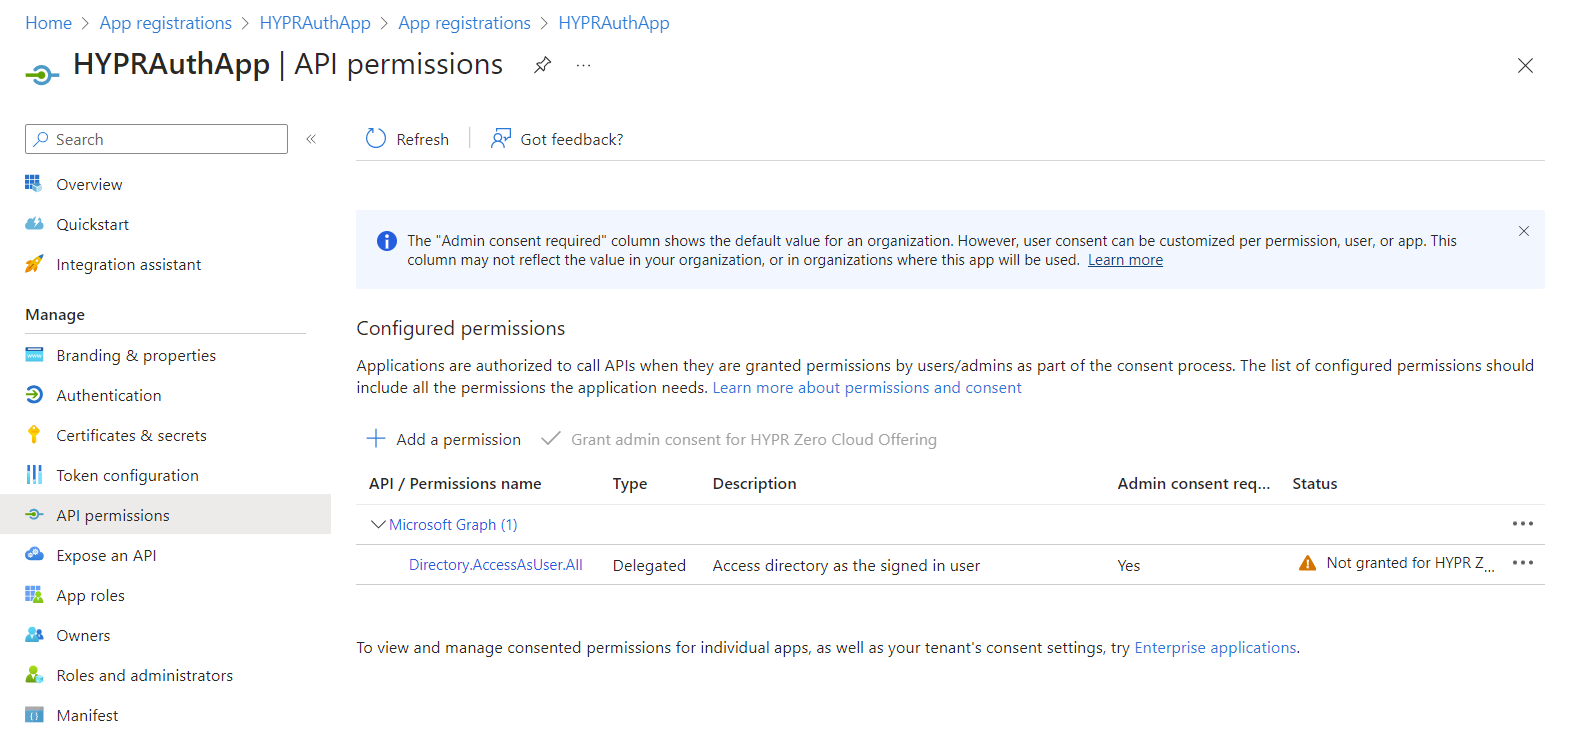
The API Permissions page now displays the new Delegated permissions.
-
-
Now select Application permissions, locate and select the following permissions, then click Add Permissions:
-
User.ReadWrite.All -
Directory.ReadWrite.All
-
-
Verify admin consent as been granted (beside + Add a permission). If not, click Grant admin consent to apply the permissions and click Yes to confirm when prompted.
Creating an application credential
You'll need to provide a credential when you set up the integration in the HYPR Control Center, which is going to be used to interact with the Entra resources via the Graph API. You can use a client secret or a client certificate as this credential.
The Entra ID External Authentication Method integration uses the OAuth 2.0 Client Credentials Grant flow to authenticate to Entra's Graph API.
Using a client secret
If you choose to use a client secret, you can generate it in Entra ID as follows:
-
From the Entra ID screen, select App registrations and choose your app.
-
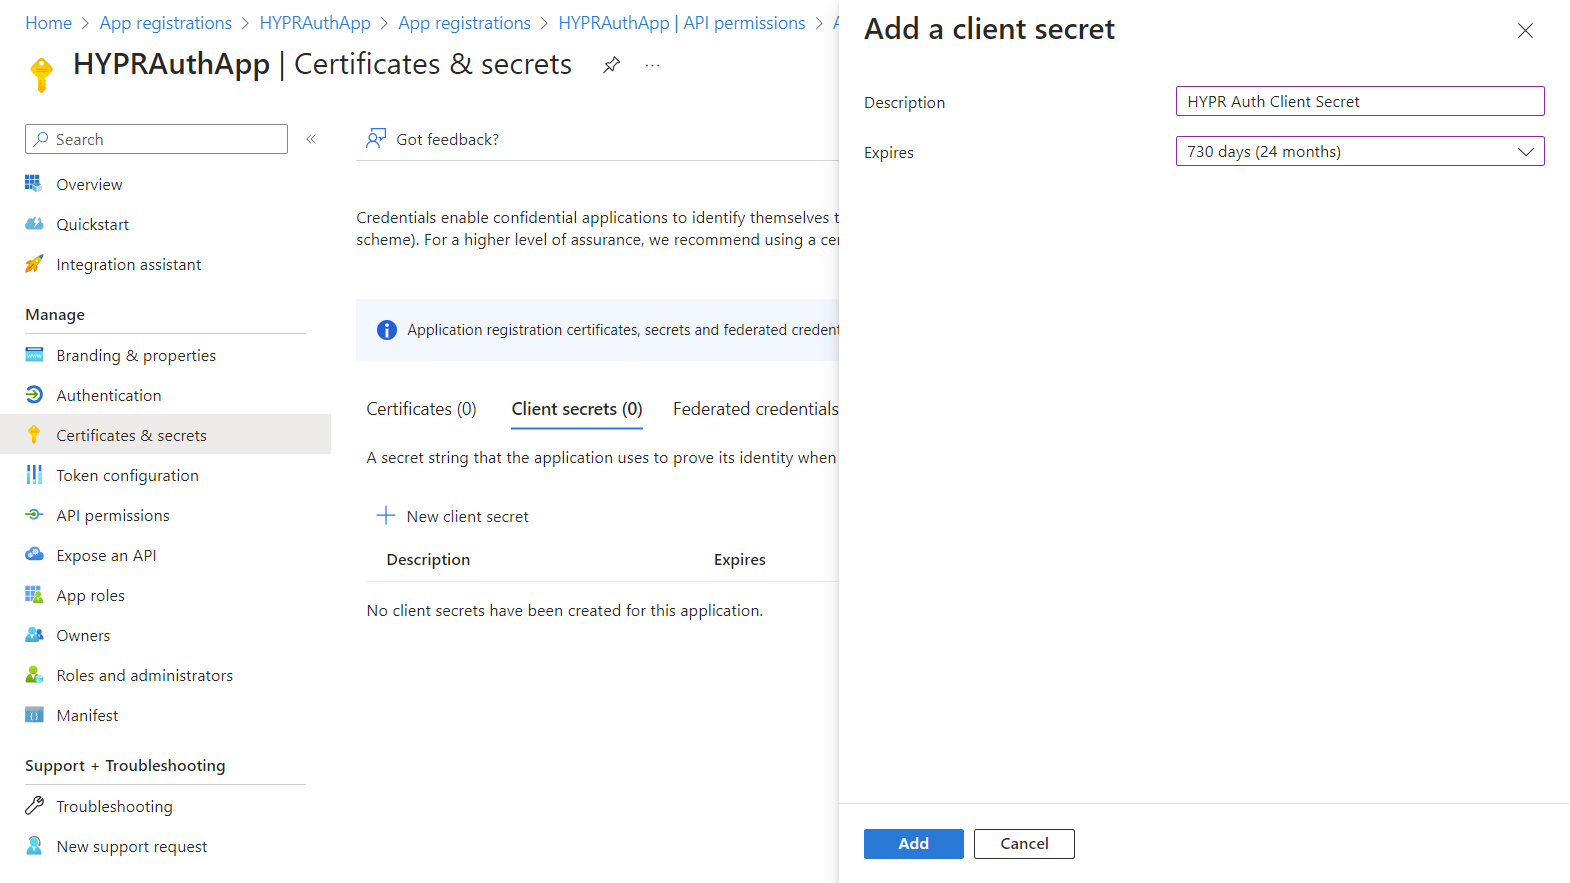
Select Certificates & secrets, then select Client secrets and click New client secret.
-
Enter a Description and an Expires date. Click Add when finished. Entra ID returns to the Certificates and Secrets list.
-
Make a note of the client secret value now so you can use it later.

One Time OnlyIf you return to this screen later, Entra ID will mask the value and you won't be able to copy it.
Using a client certificate
If you choose to use a client certificate, you can upload it in Entra ID as follows:
-
From the Entra ID screen, select App registrations and choose your app.
-
Select Certificates & secrets, then select Certificates and click Upload certificate.
-
Enter a Description and click Add when finished. Entra ID returns to the Certificates and Secrets list.
You will need to have an X.509 certificate and its corresponding private key available if you decide to use client certificate-based authentication. The certificate can be a self-signed or signed by a Certificate Authority trusted by your organization.
For more information about the use of X.509 certificates in Entra ID applications refer to the corresponding guide. You can also check their guidance on usage of self-signed certificates.
Enable Security Keys in the Entra Tenant
-
Open to Microsoft Entra ID > Protection > Authentication methods.
-
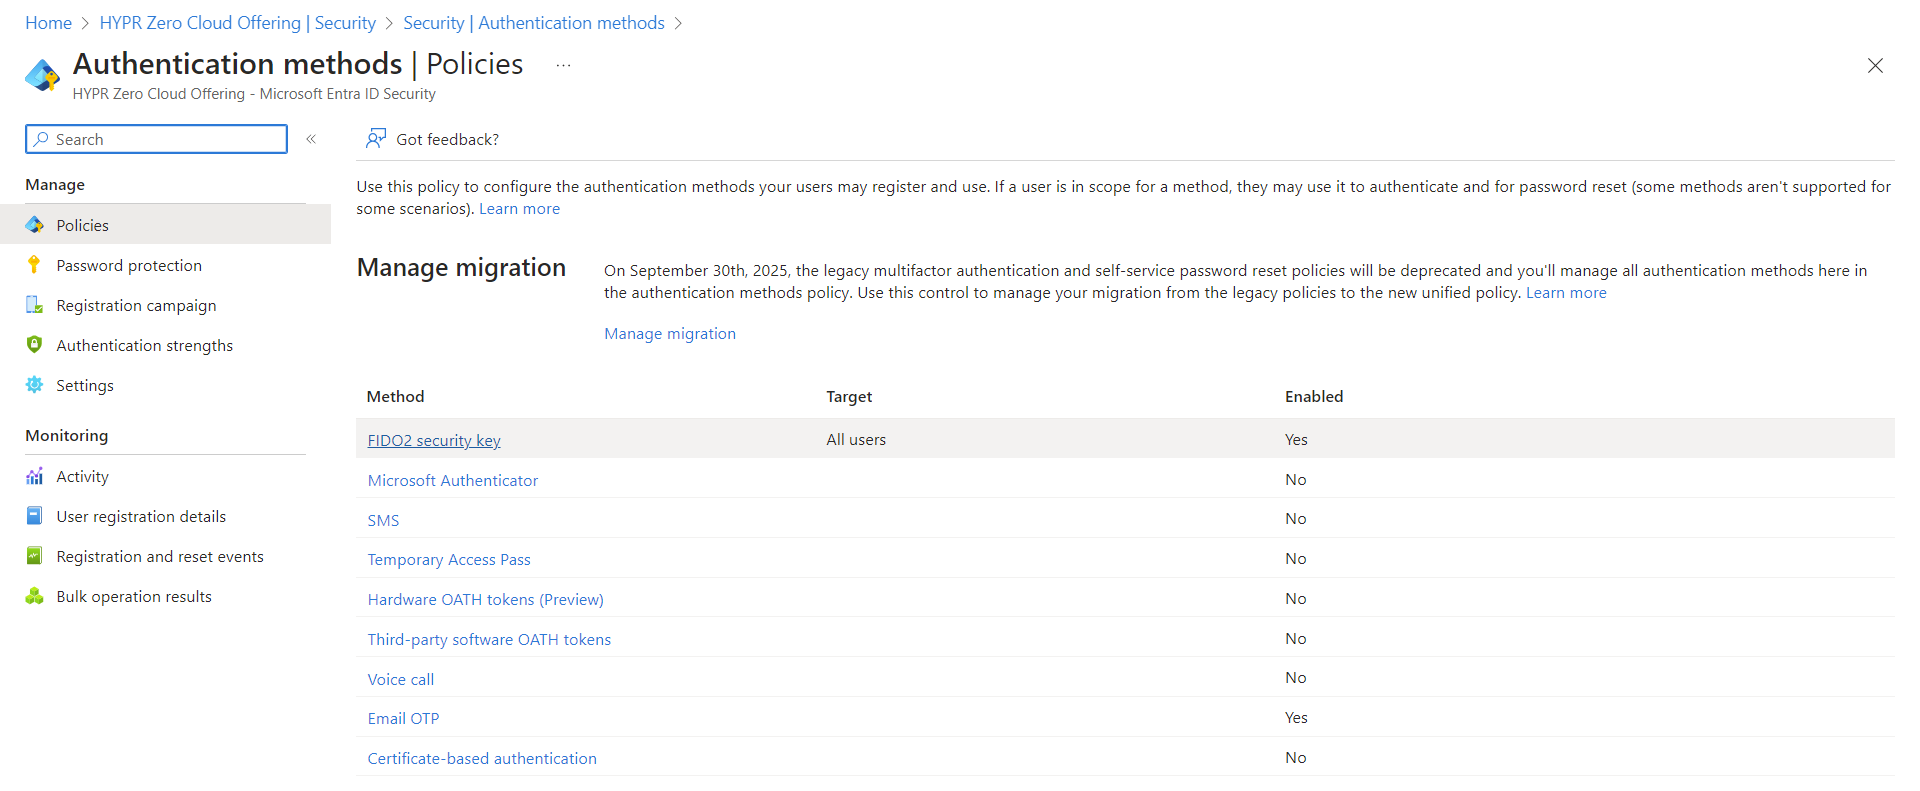
Click on the Passkey (FIDO2) authentication method policy.
-
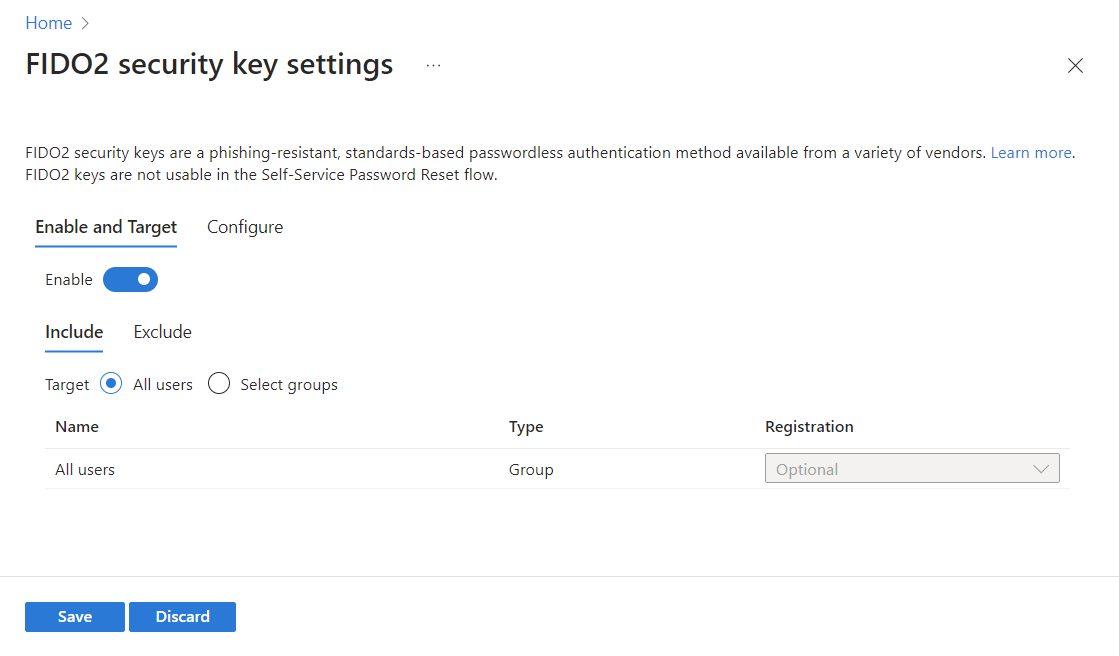
Passkey (FIDO2) settings defaults to the Enable and Target tab. Here you can enable security keys and define allowed users. Include All users and leave the registration as Optional.
-
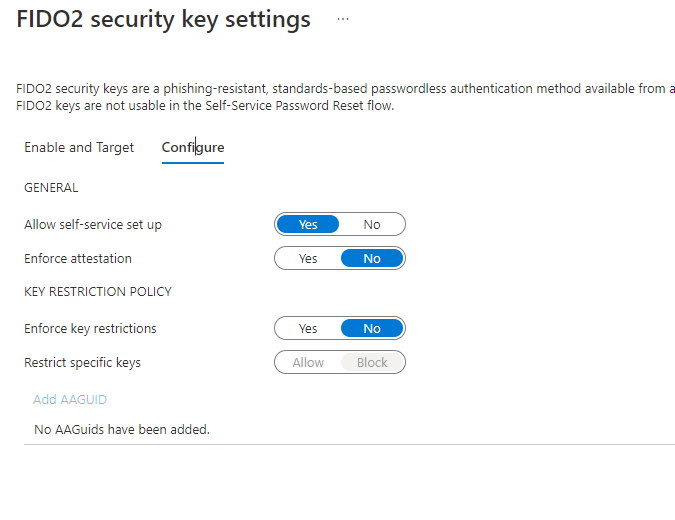
On the Configure tab, make sure the settings are as depicted below. This is the only configuration we will support at this time.
 Enforced Attestation
Microsoft uses the Enforce attestation feature to ensure the FIDO2 authenticator is certified by the FIDO Alliance and approved by Microsoft's team. HYPR's AAGUID was added as an approved FIDO2 Authenticator on March 2023. HYPR supports this setting as either True or False.
Enable Security Keys for Windows login
Once security keys are enabled in Entra, you must enable the use of security key login on Windows. You can do this through Intune, a provisioning package, or via a Group Policy in the case of Entra hybrid joined devices. Refer to Microsoft's instructions on using those methods.
HYPR Control Center - Connecting Entra ID to HYPR
Once Entra ID is set up, you can add the integration to HYPR.
-
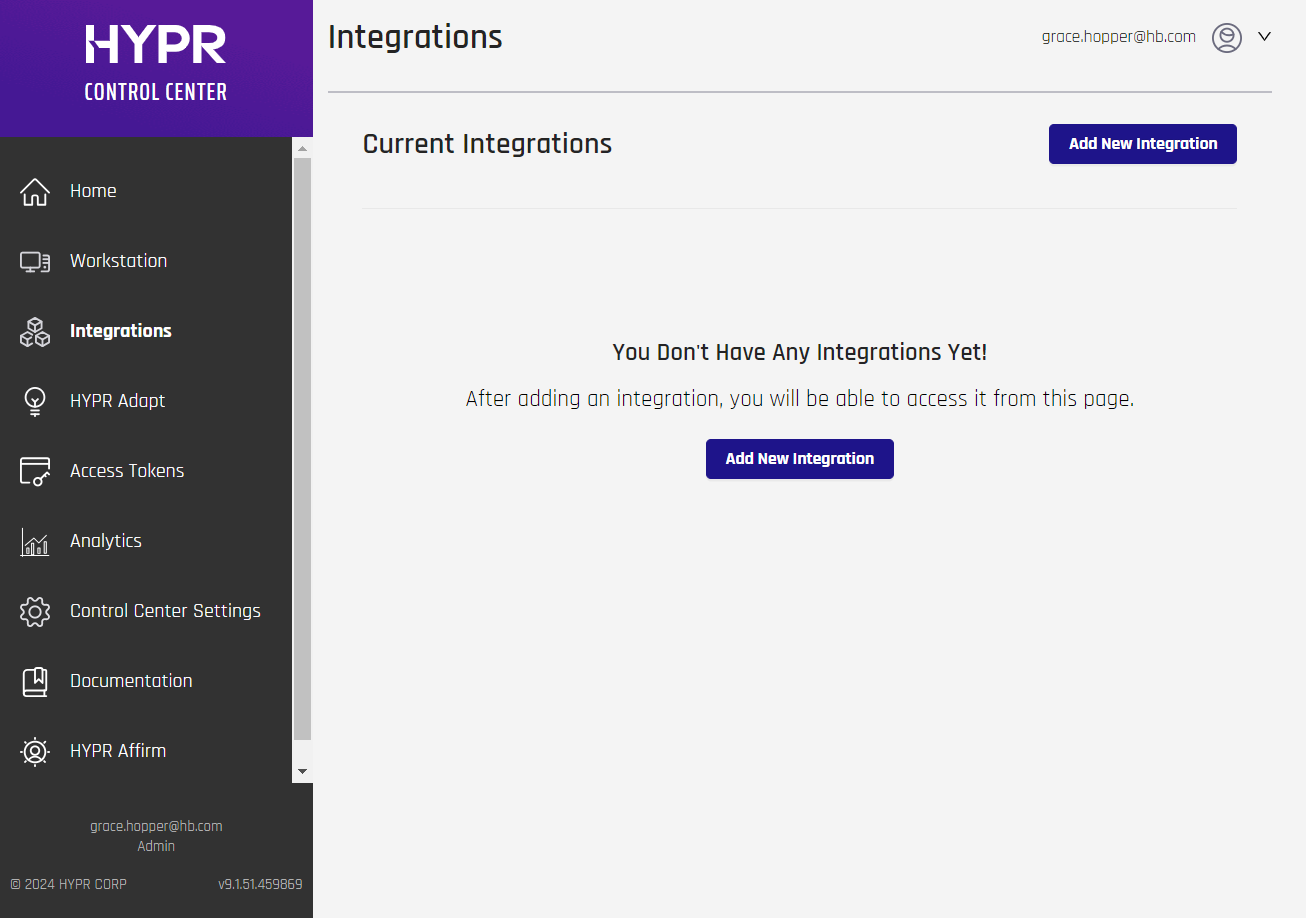
Go to the Integrations screen in the HYPR Control Center and click Add New Integration to show a list of available integration types.
-
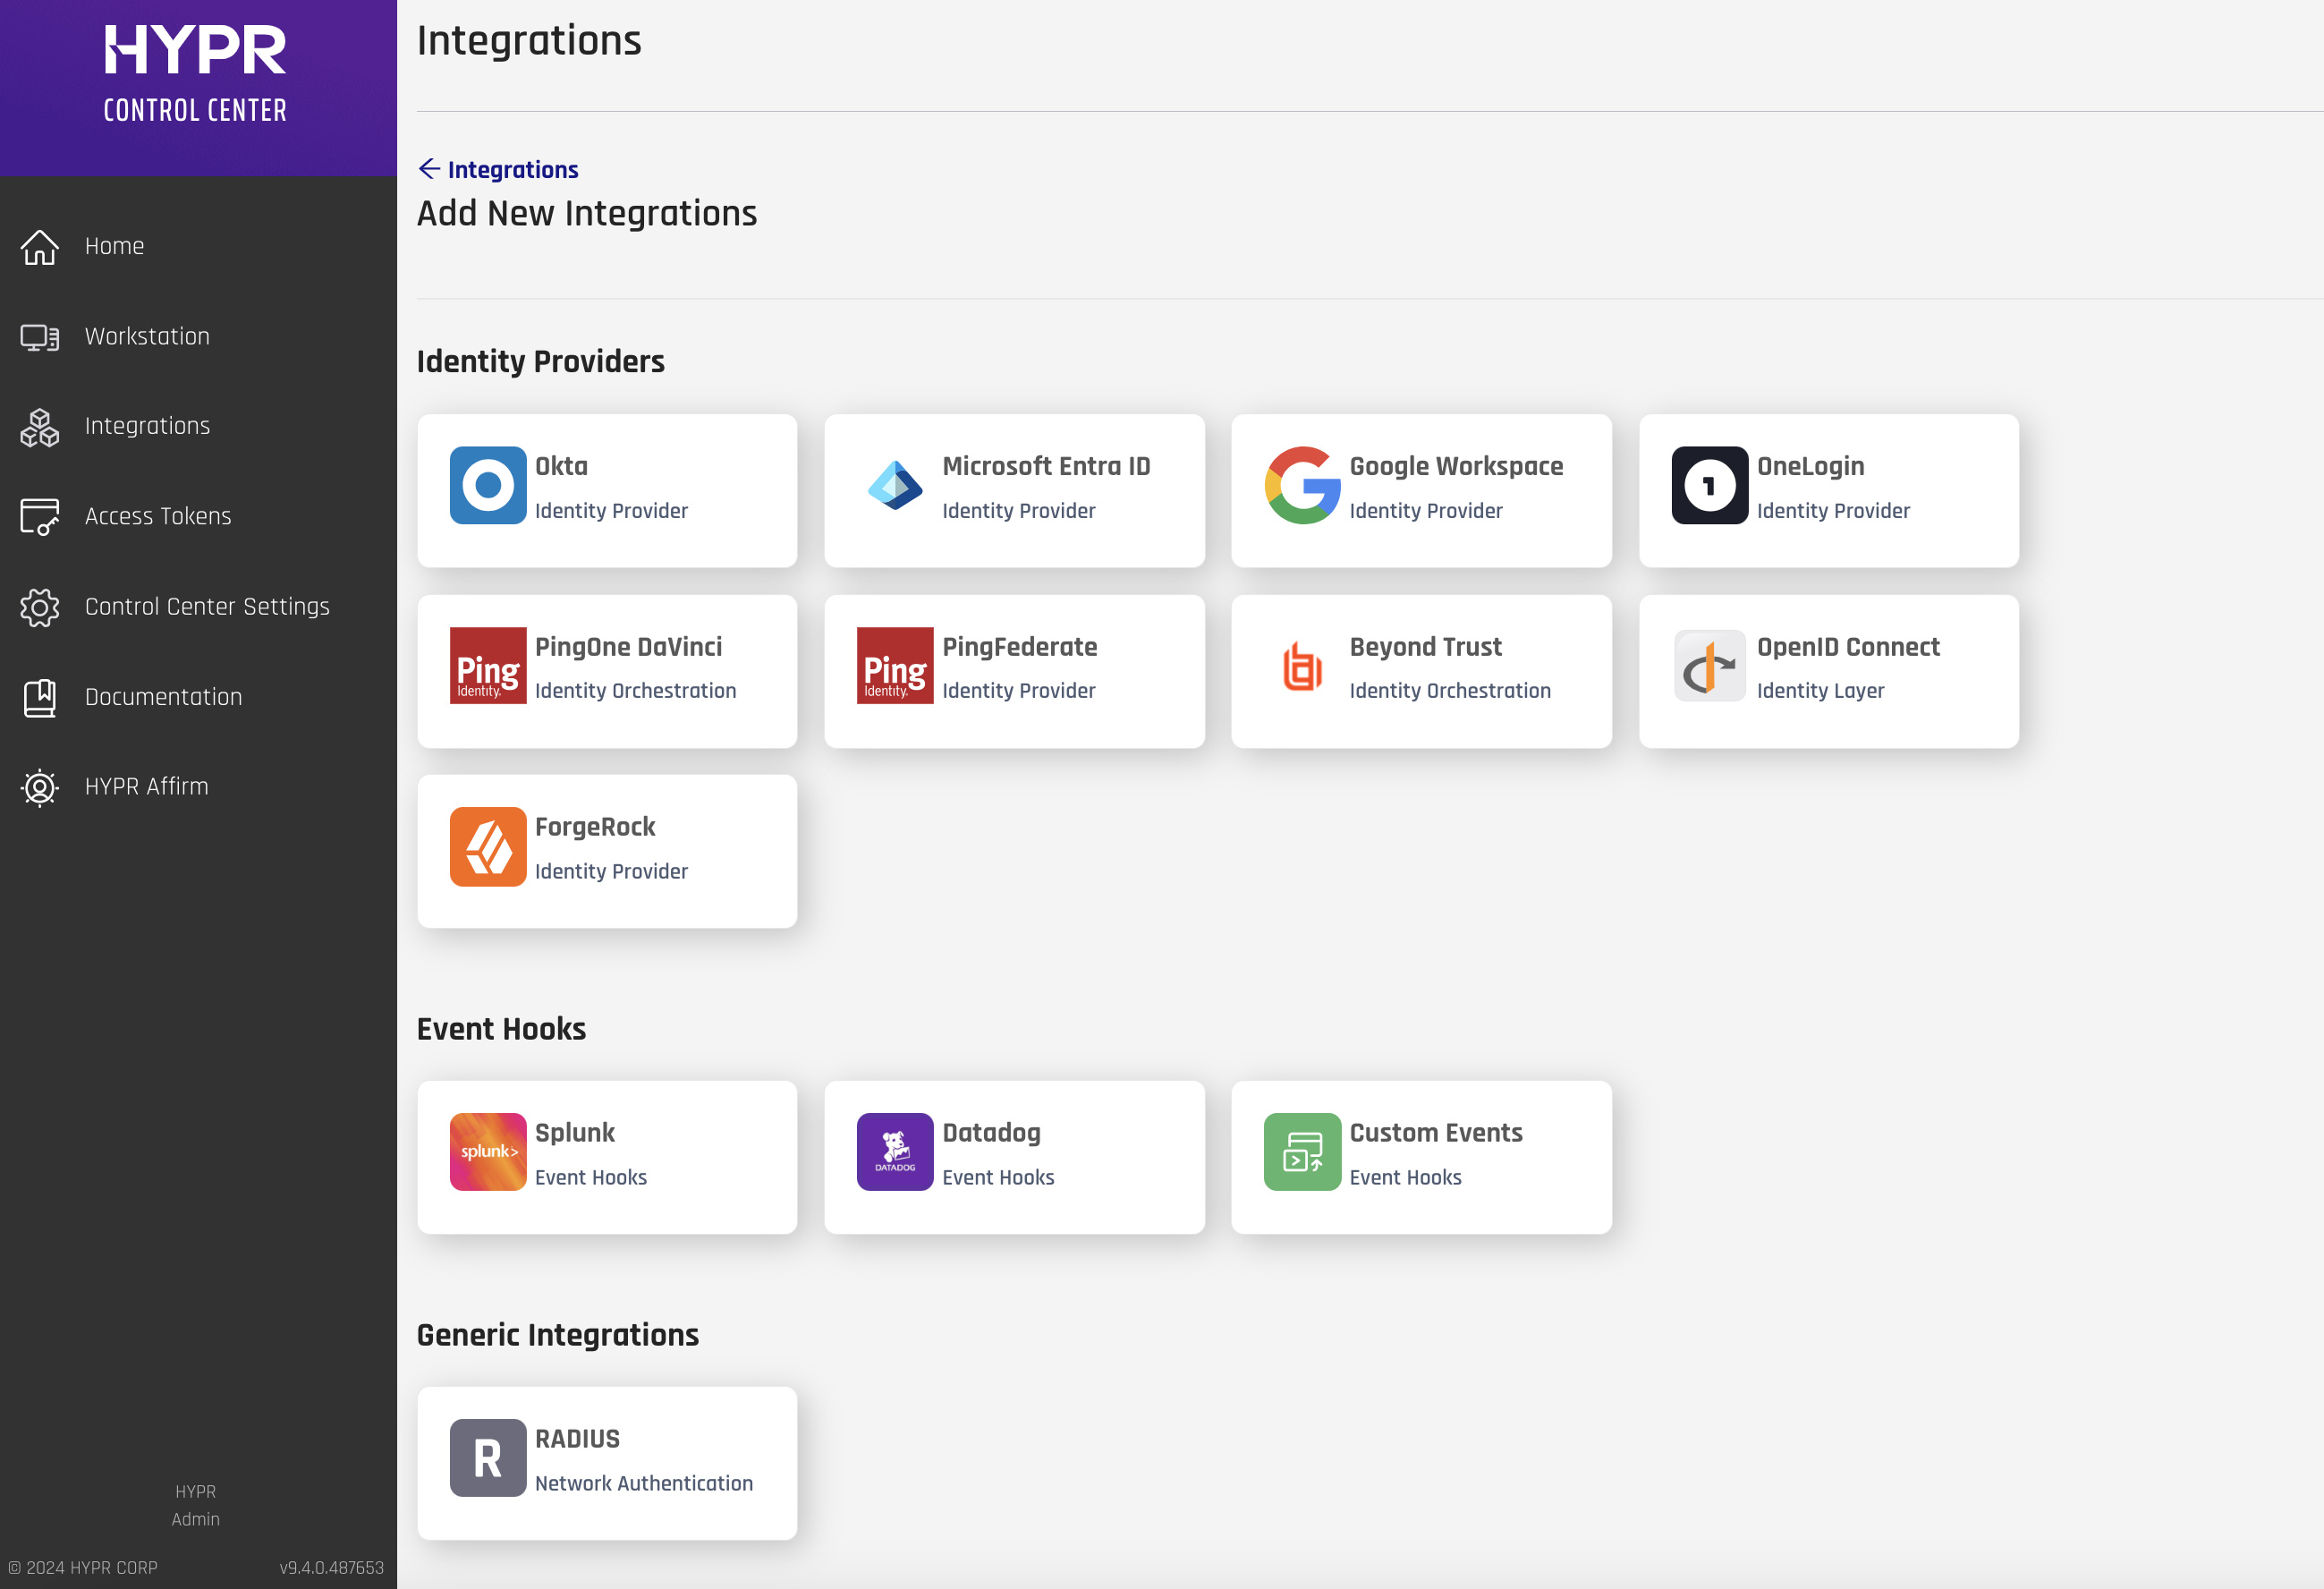
Select the Microsoft Entra ID integration.
-
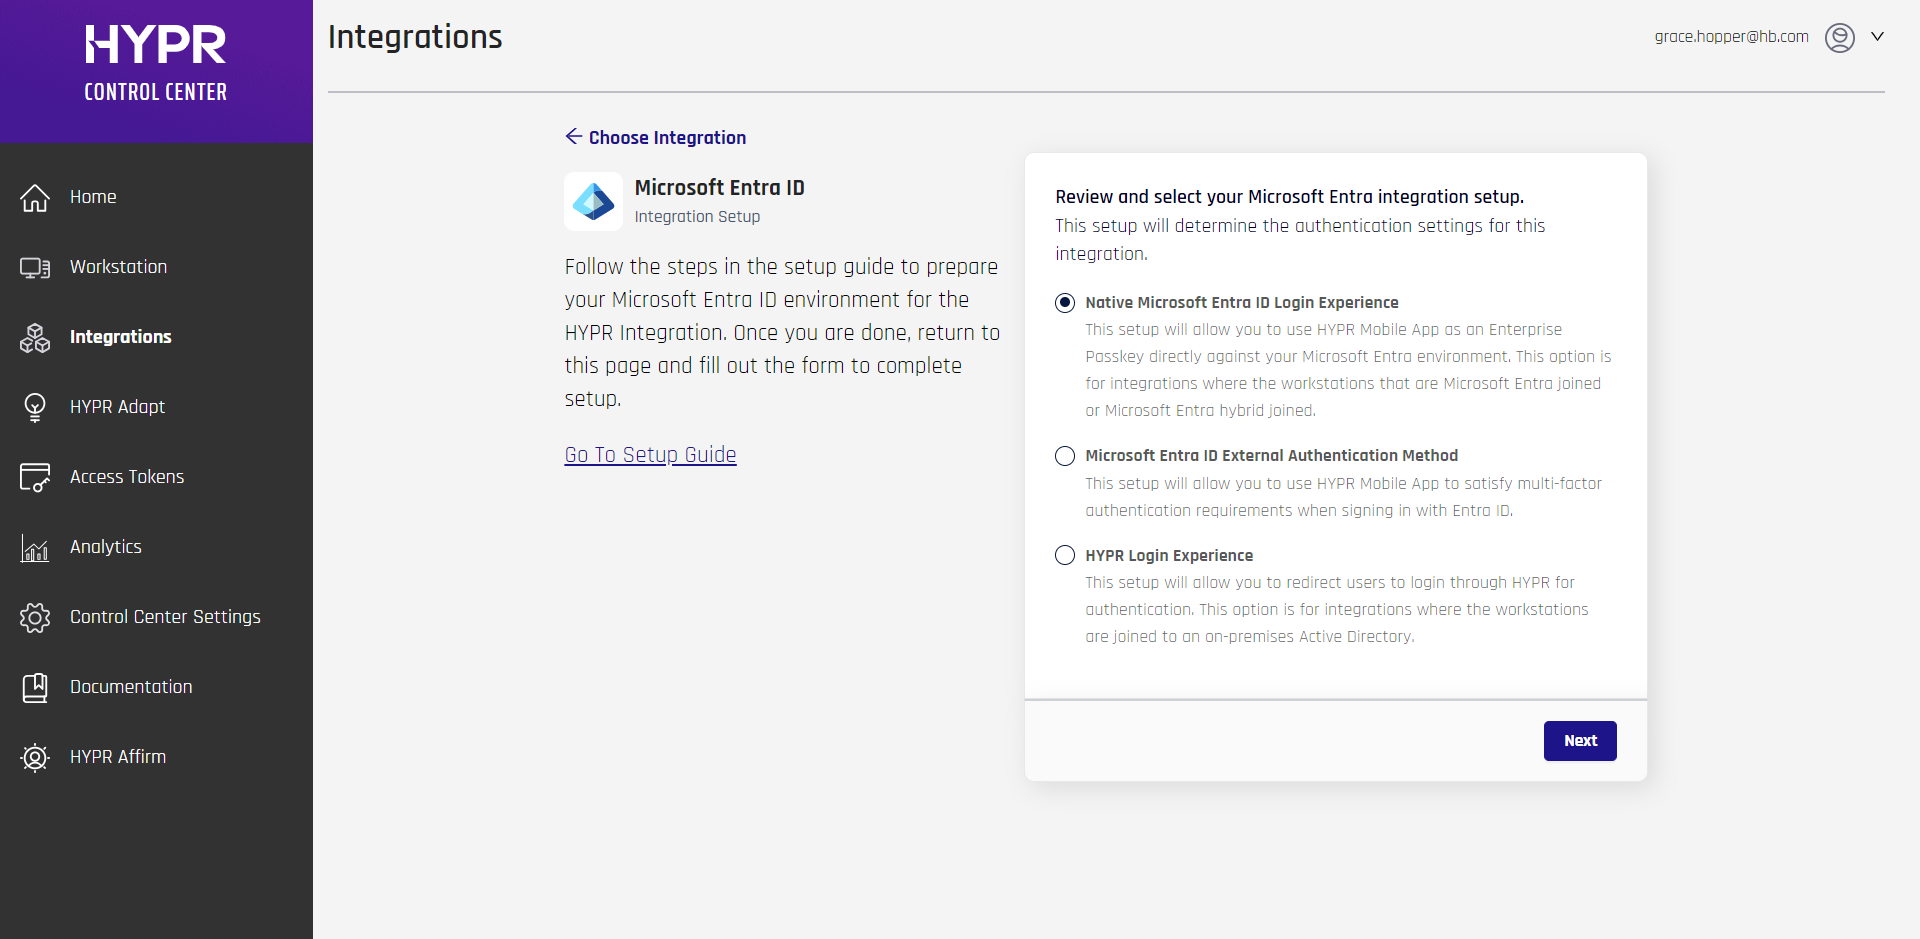
HYPR will present you with a choice; select Native Microsoft Entra Login Experience, and click Next.
-
To integrate HYPR and Entra ID, you just need to provide some information on the HYPR Login Setup screen.
Field Value Application Name The name you provide here will be used in three places:
- For the web account name that users will see in the HYPR Mobile App
- For the HYPR Device Manager page where users register their devices
- For internal identification of this integration within the HYPR platform
You can use any name you like, but it's best to go with something that indicates the purpose of the application. For example:
passwordlessClientEntraSSO
You can use numbers, spaces, hyphens, and underscores in the name but note that spaces will be stripped from the name used to internally identify the integration within the HYPR platform. The namespace is limited to 23 characters.
Once set, the only way to change the Application Name is to delete and re-add the integration.Tenant ID The Directory (tenant) ID from Entra ID.
If you didn't make a note of this earlier, you can retrieve it from the Overview page for the application in Entra ID (see Registering the HYPR Entra ID Application).
Once set, the only way to change the Tenant ID is to delete and re-add the integration.Client ID The Application (client) ID from Entra ID.
If you didn't make a note of this earlier, you can retrieve it from the Overview page for the application in Entra ID (see Registering the HYPR Entra ID Application).
Once set, the only way to change the Client ID is to delete and re-add the integration.Client Secret The client secret value for the Entra ID application
If you didn't make a note of this earlier, you'll need to go back and generate a new one in Entra ID (see Using a Client Secret).Client Certificate The X.509 certificate uploaded to the Entra ID application, if you decided to use a client certificate.
You'll need to provide the certificate in PEM-encoded format.Client Private Key The private key of the client certificate uploaded to the Entra ID application, if you decided to use a client certificate.
You'll need to provide the private key in PEM-encoded format. -
Click Add Integration to begin.
-
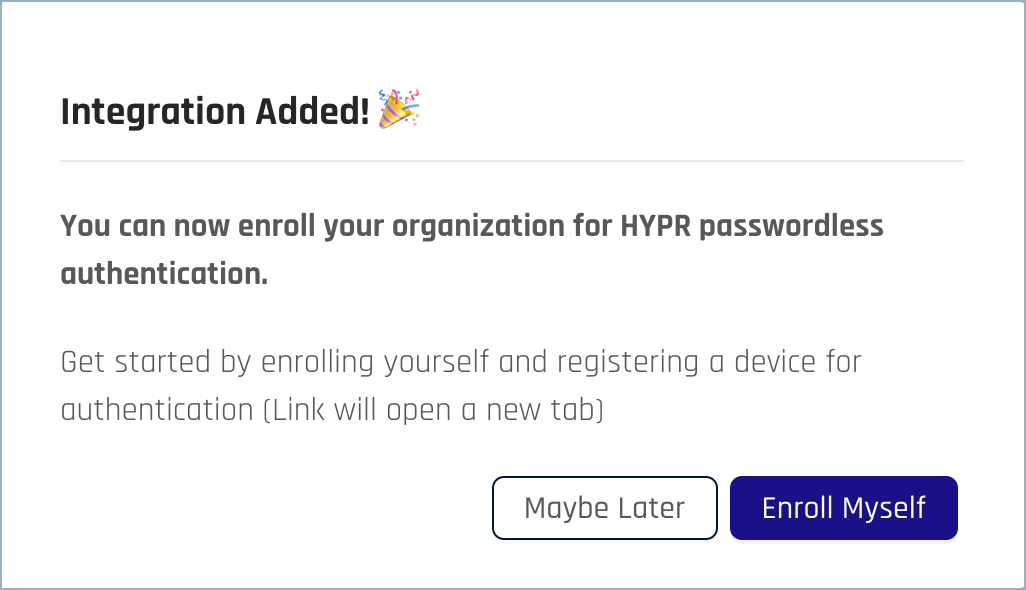
If the setup succeeds, you'll see the Integration Added! confirmation dialog.
HYPR Groups in EntraWhen a new Enterprise Passkey integration is successfully created, HYPR automatically creates three groups in Entra. You do not need to take any action to maintain these, but may wish to apply policies specific to the HYPR Enterprise Passkey. They correspond to the different phases of pairing an Enterprise Passkey:
-
HYPR Group (Eligible for Pairing) - Users who have only been invited
-
HYPR Group (Client Paired with HYPR) - Users paired with HYPR authentication (but not Entra)
-
HYPR Group (Client Paired with Entra) - Users with Enterprise Passkey authentication
-
-
With a new application in HYPR, you must make sure HYPR has enabled the necessary features; contact HYPR Support if you have not done so already to ensure full functionality.
-
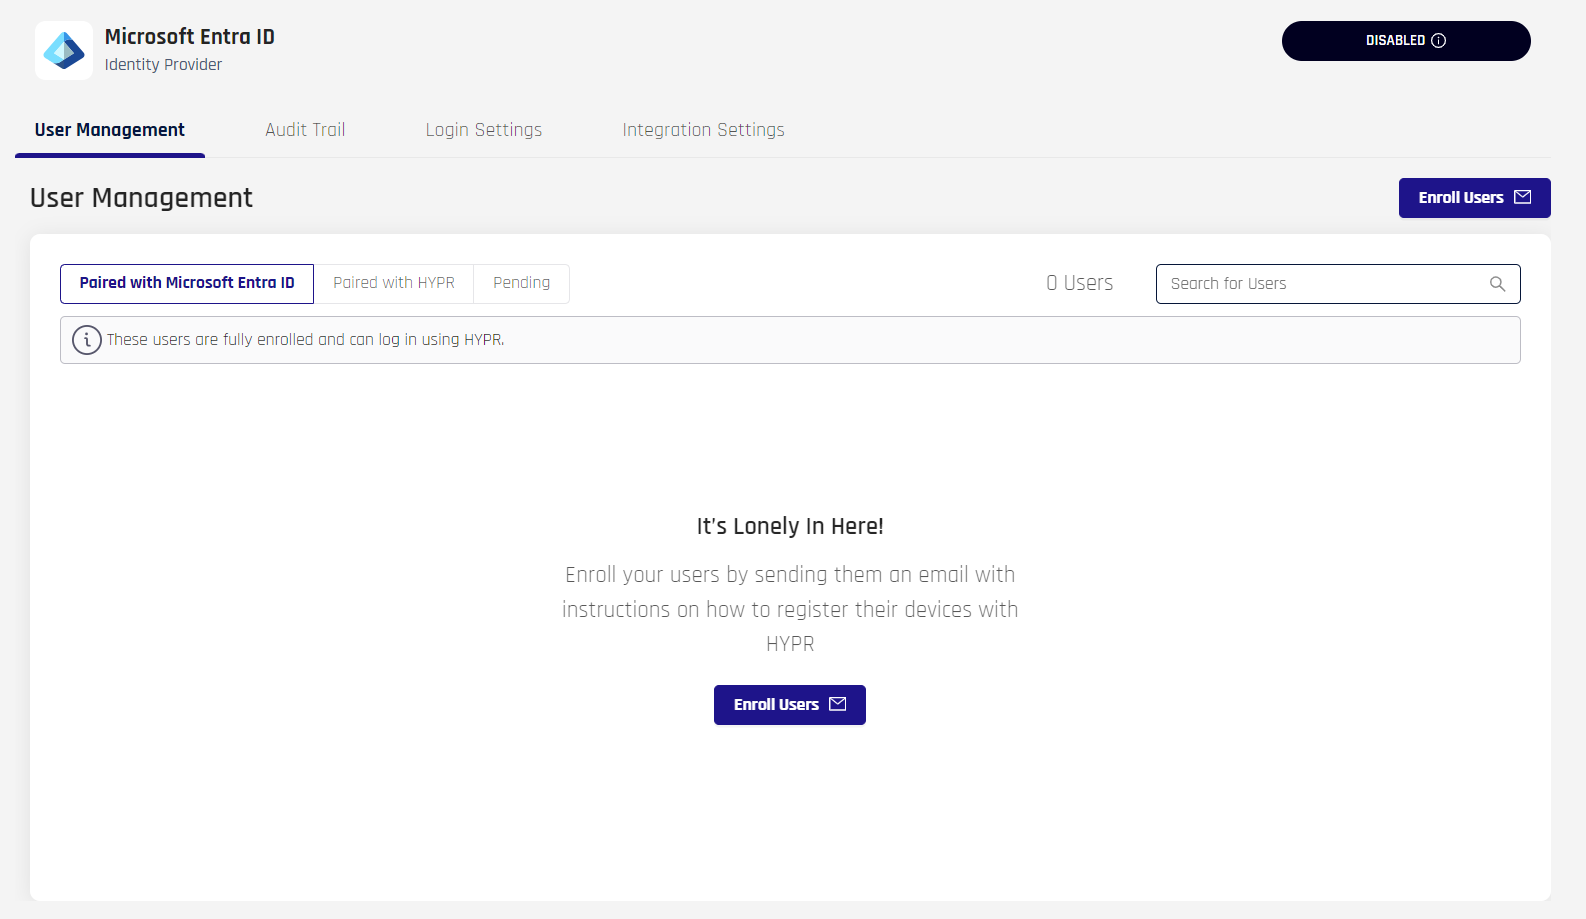
HYPR Control Center takes you to the Integration User Management page.
-
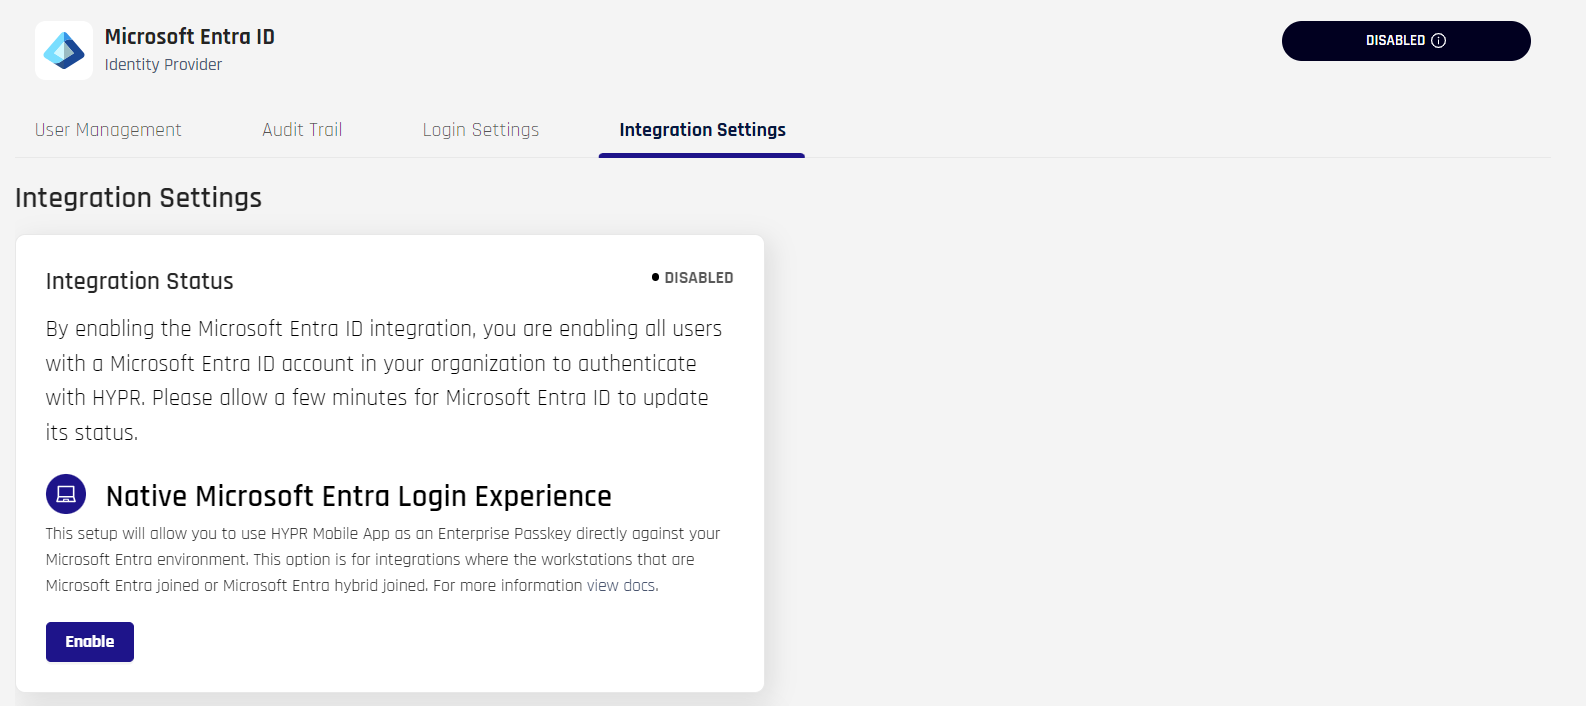
Select the Integrations Settings tab. You will see a brief description of the Native Entra ID Login Experience. Note it is DISABLED. When DISABLED, the expectation is the end-user can pair with HYPR using a QR code, but cannot register or authenticate to Entra.
-
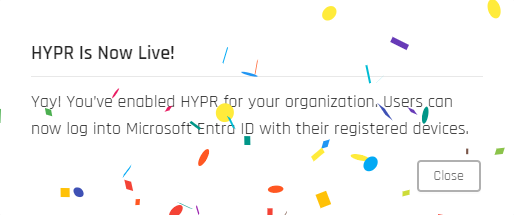
Click Enable and a confirmation appears.

-
Let the confetti fly, then click Close.
Configure and Download the Desktop Client
-
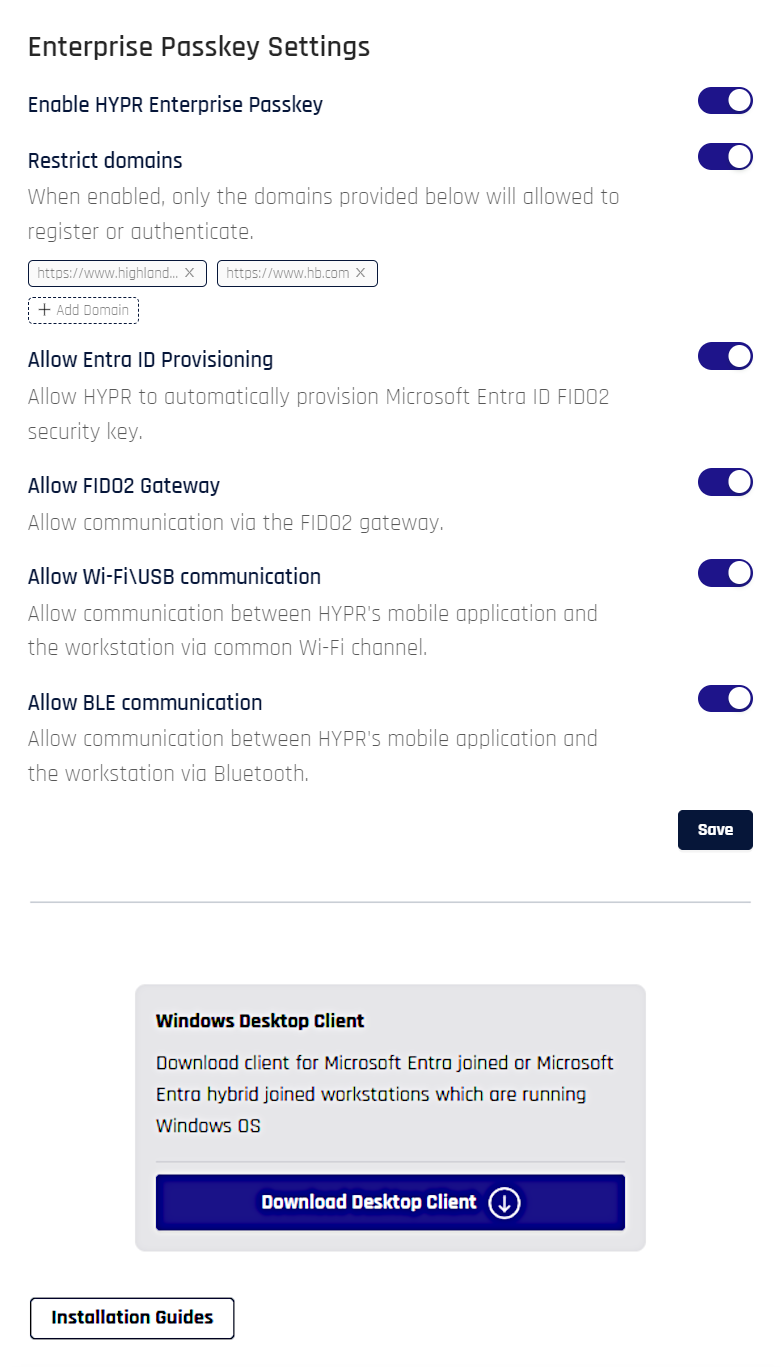
Navigate to Login Settings. Here you can restrict domains, and download the HYPR Passwordless client.
-
To accept any domain name, leave the toggle off for Restrict Domains. To limit acceptable domains, toggle the switch to the On position. The dialog expands.
-
Click +Add Domain and type the domain name (without
https://) in the resulting field. Press Tab or Enter to add another -
To remove a domain from the list, click the x next to it
-
Click Save when you are finished adding accepted domains; a confirmation message appears: "Restrict Domains saved successfully"
-
-
Select Download Desktop Client and a confirmation popup displays.
-
If you are unsure whether or not you should be downloading the HYPR Passwordless client in your environment, click Back and contact your support. Otherwise, click Download Now, and your browser will download a
.ziparchive containing the client installation file and ahypr.jsonfile.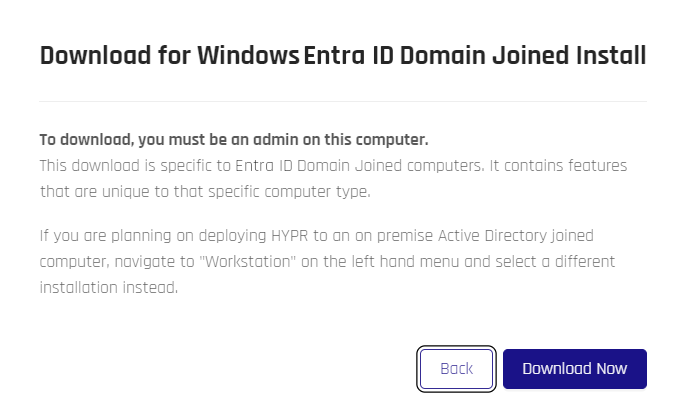
-
Unpack the archive. It contains two files:
-
hypr.json- JSON containing installation parameters -
WorkforceAccess-10.1.0_x64.msi- Microsoft installation file
-
-
Install the HYPR Passwordless client on an Entra joined workstation by double-clicking
WorkforceAccess-10.1.0_x64.msi. Complete the instructions for Windows in Installing with the UI.
Pairing a HYPR Enterprise Passkey
See the section in HYPR Passwordless describing the user experience when pairing a HYPR Enterprise Passkey.
User Management for HYPR Enterprise Passkey
Paired with HYPR and Paired with Entra
Due to the infrastructure underpinning the HYPR Enterprise Passkey, in addition to the Pending state shown in other Integrations, users may be either Paired with HYPR (awaiting Enterprise Passkey pairing completion) or Paired with Entra (fully paired as a HYPR Enterprise Passkey), instead of Enrolled.
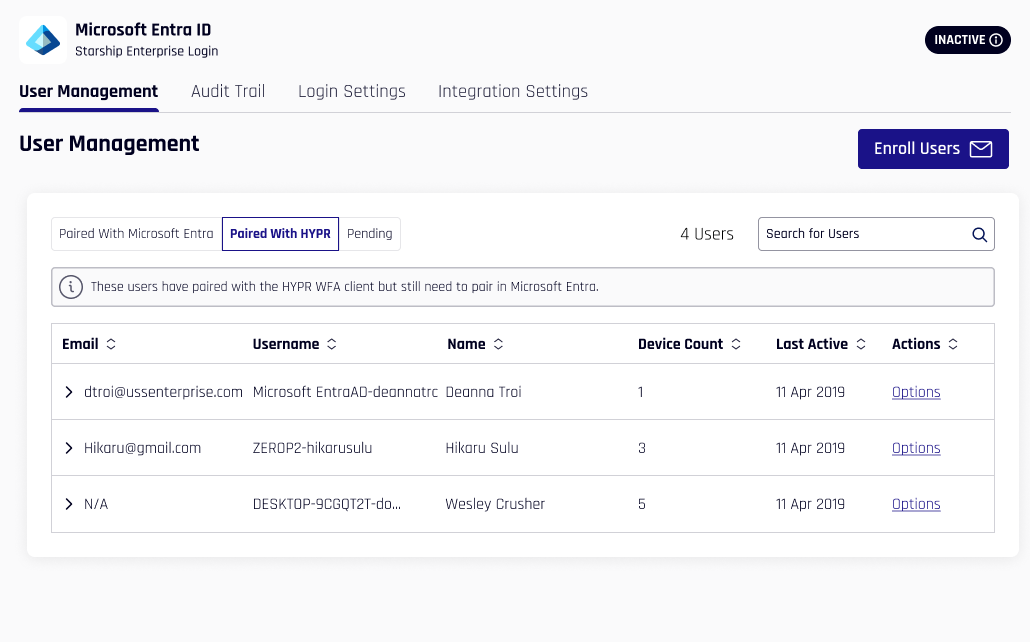
The information shown under each tab is the same as described here.
| Column | Description |
|---|---|
| The Entra account email. | |
| Username | The Entra username. |
| Name | The user's full name, if entered. |
| Device Count | The number of devices registered. |
| Last Active | The last time this device was used. |
| Actions | Hover on over Options; here you may Delete the account. |
Expanding a user displays all registered FIDO2 devices, including the ones that may be registered with other Integrations or IdPs.
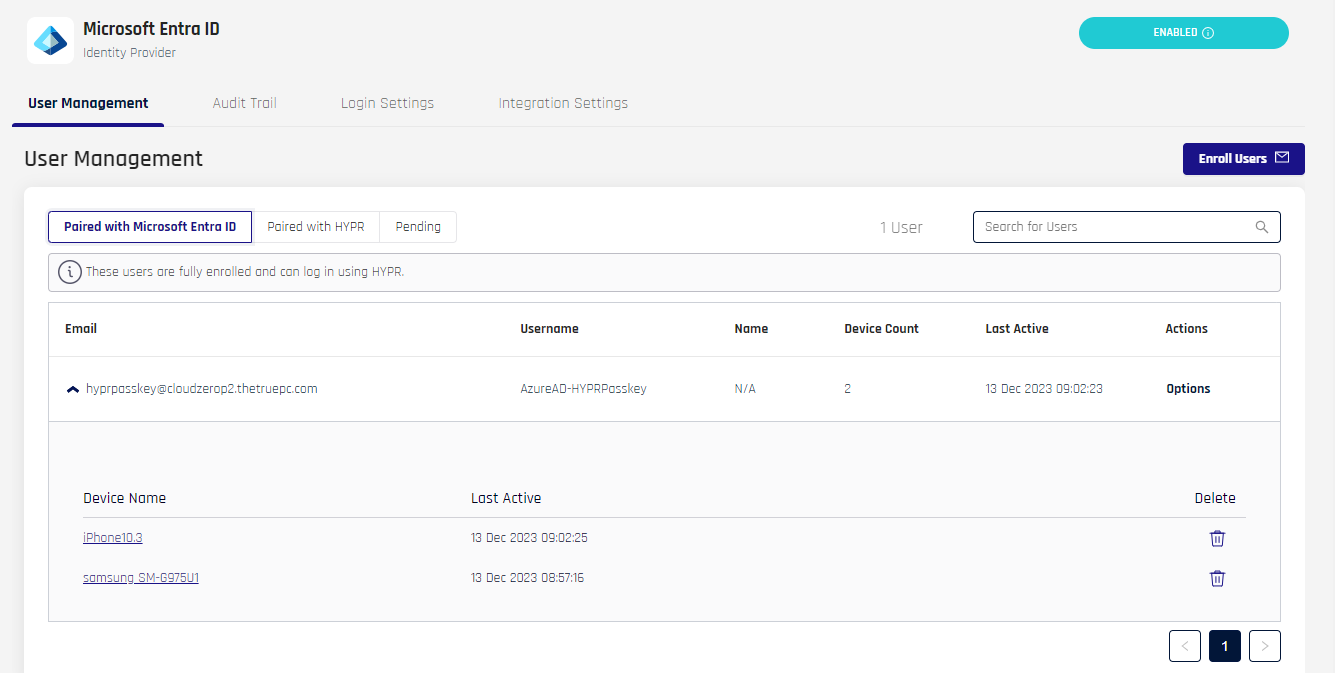
The labels here are as follows:
| Column | Description |
|---|---|
| Device Name | The name of the device as assigned by the user. This may be the default manufacturer's label or a name given to the device by the user in Device Manager. Click this value to open Device Details for that device. |
| Last Active | The time this key was last in use. |
| Delete | Click the trash can icon to delete this device from this user account. |
User Device Details
For users that are Paired with HYPR, drilling into one of the Device Name values will open Device Details.
-
The Mobile Devices tab shows the FIDO2 web domain and the FIDO2 username which were paired
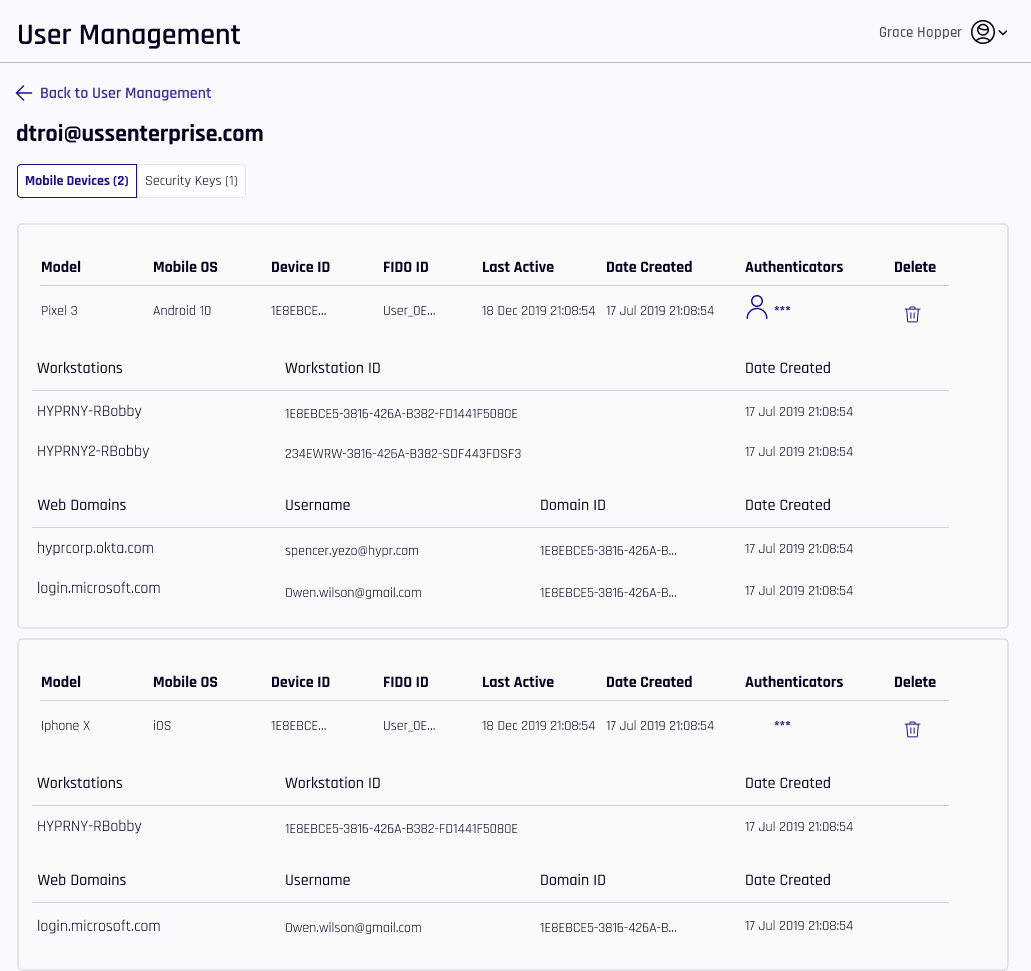
The following additional columns appear in this list:
Column Description Model The model of the Enterprise Passkey mobile device. Mobile OS The operating system (OS) of the Enterprise Passkey mobile device. Device ID The deviceIdattribute assigned to this device.FIDO ID A unique number for the FIDO credential. Date Created The time at which the device pairing was made for the device or machine in question. Authenticators Icons matching applied authenticators from Policy Management appear here. Delete Click the trash can icon to delete this device or domain. A confirmation will display before HYPR returns to this page. Workstations A list of workstations to which this HYPR Mobile App is paired. Workstation ID The unique identifier for the workstation. Web Domains The fully qualified FIDO2 web domain. Username The FIDO username, which may differ from the domain username. Domain ID The unique identifier for the domain.
-
The Security Keys tab shows a few different properties associated only with passkeys
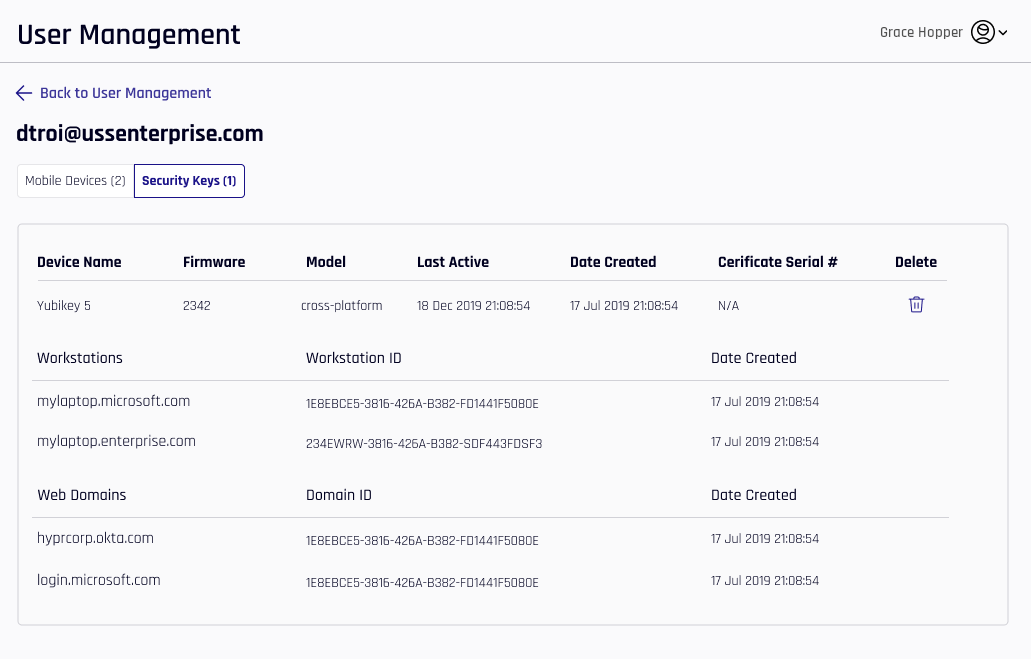
The values not already defined that appear under Security Keys are as follows:
Column Description Device Name The name of the device. This may be the factory label, or may have been changed by the user in Device Manager. Firmware The firmware version used by this device. Model platform: A security key built in to the machine; typically a biometric. Certificate Serial # The serialized number in the production series for this device.
- On either tab, click Back to User Management to return to the main User Management pane.
Unpaired Users
Users who are Paired with HYPR or Paired with Entra who unpair their devices will be moved to the Pending tab of User Management; a warning icon appears next to the Email field. Hovering over the icon, the text appears, "This user unpaired from HYPR." Likewise, accounts that are unpaired with Entra but still retain the HYPR pairing will be moved under Paired with HYPR.
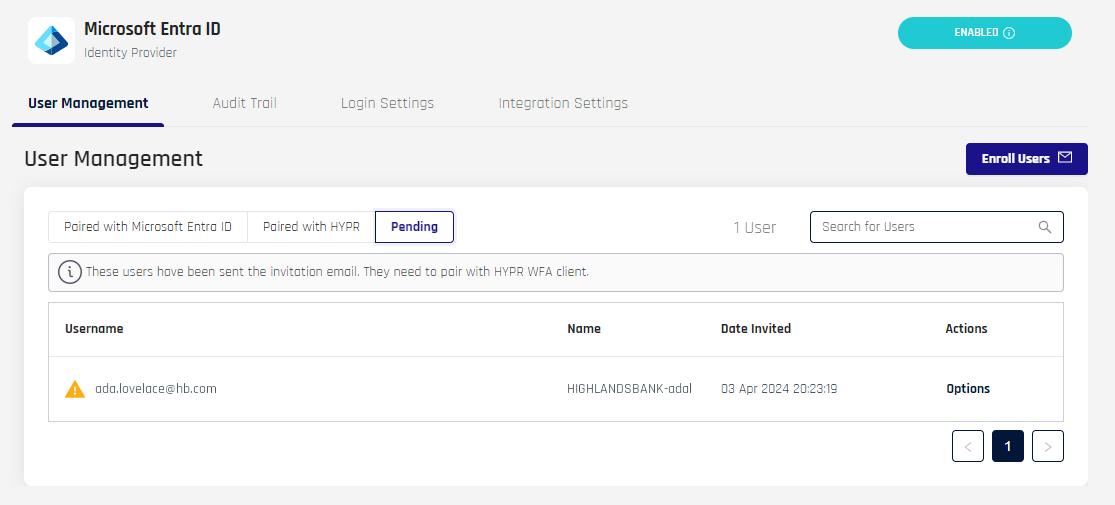
Likewise, if an Entra account is suspended or removed, HYPR shows an icon indicating, "This user cannot be found in Microsoft Entra." HYPR calls Entra ID to confirm account statuses when this page is opened.
