Control Center Users and Roles
Control Center Users can be administered in more than one place in Control Center:
-
In Standard Mode: Control Center Settings under the Control Center Users tab
-
In Advanced Mode: Global Settings: Control Center Users for the Application selected under Choose an App
In addition to regular users (who unlock their workstations or log in to web applications with HYPR), the Control Center also has its own separate set of users.
Depending on their assigned role, these Control Center Users can perform back-end actions such as creating RP Applications, changing registration and authentication policies, monitoring user activity, creating Access Tokens, and generating Recovery PINs. Unlike regular users who are added when they register a mobile device, Control Center User accounts must be created manually.
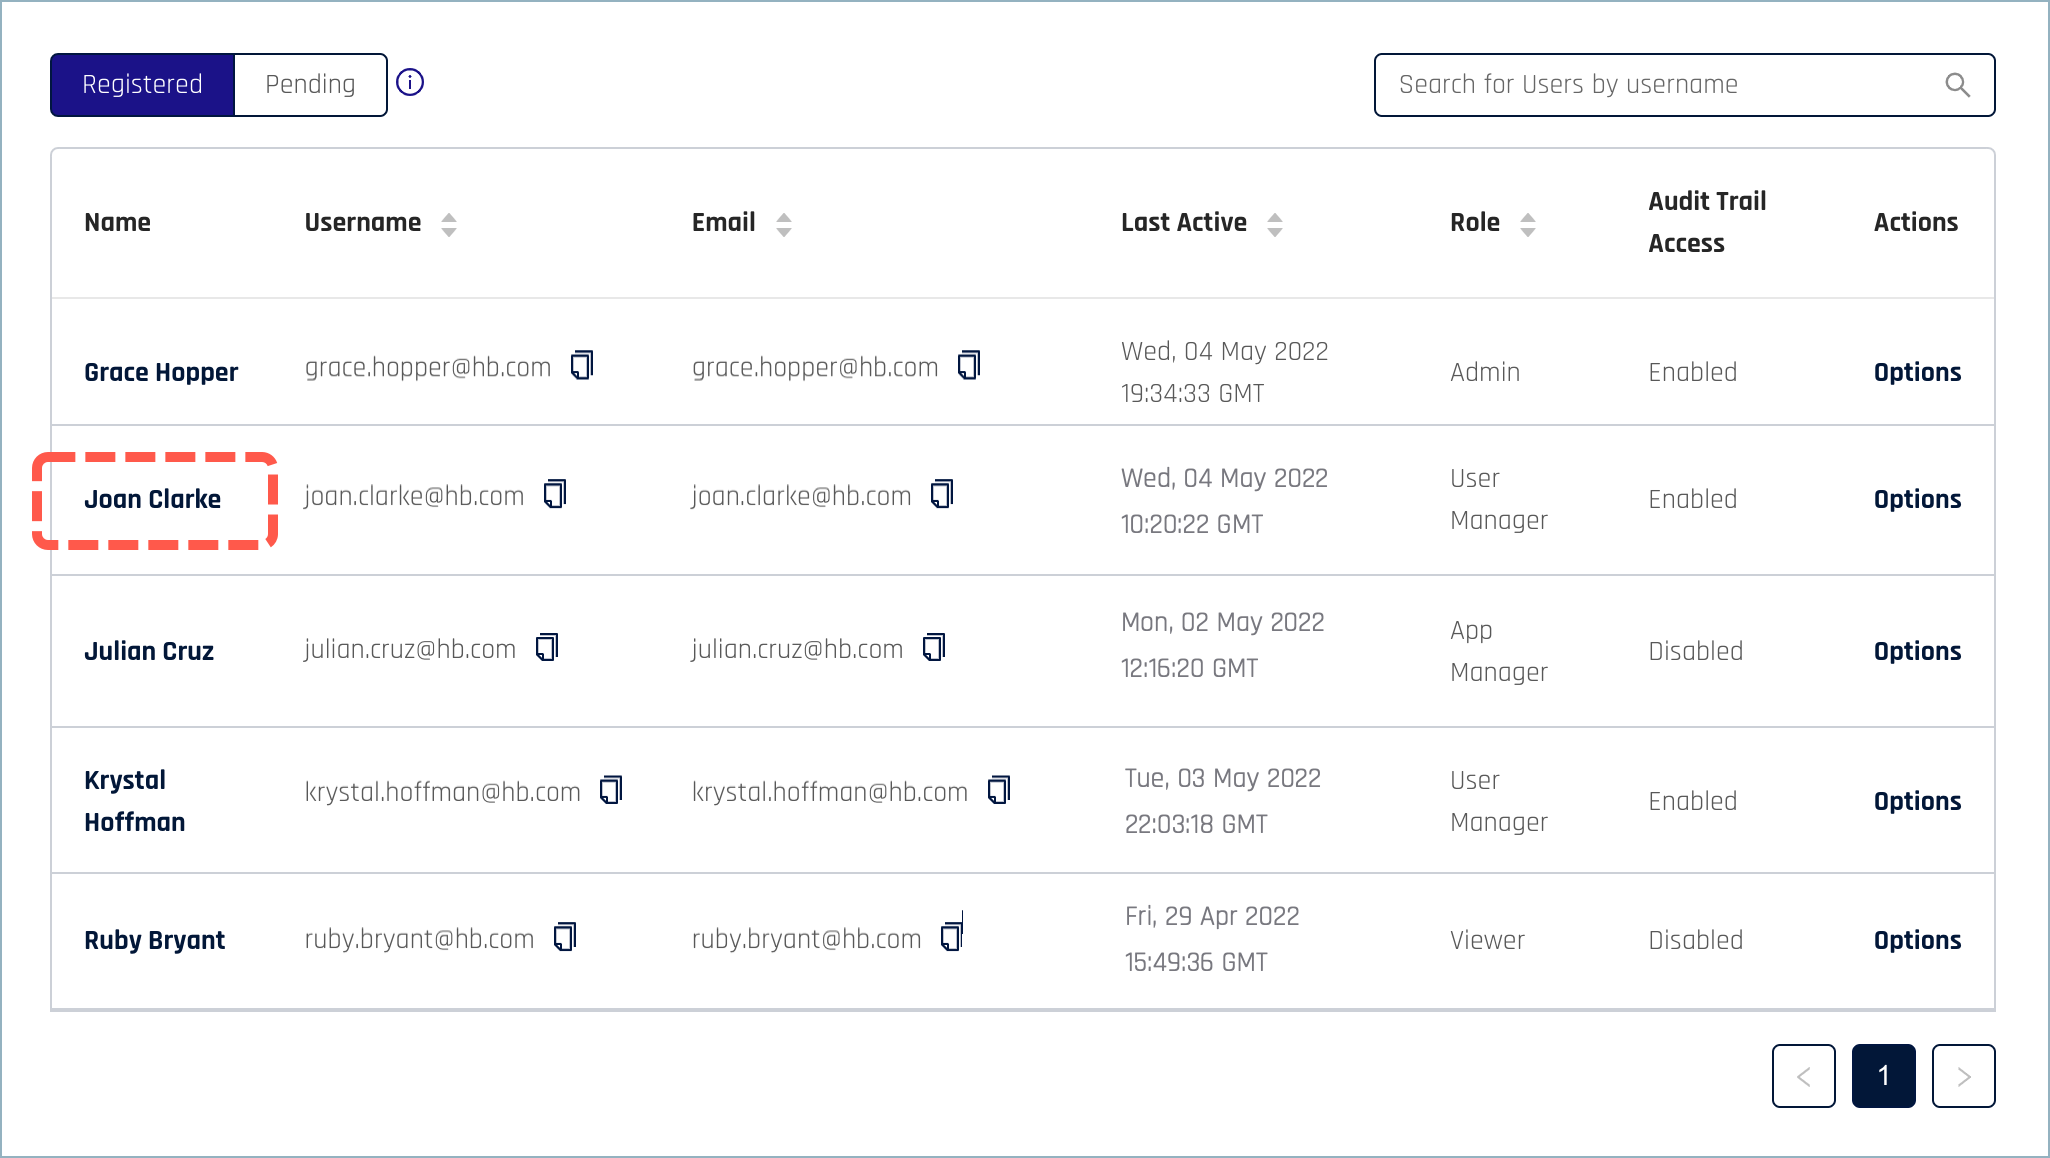
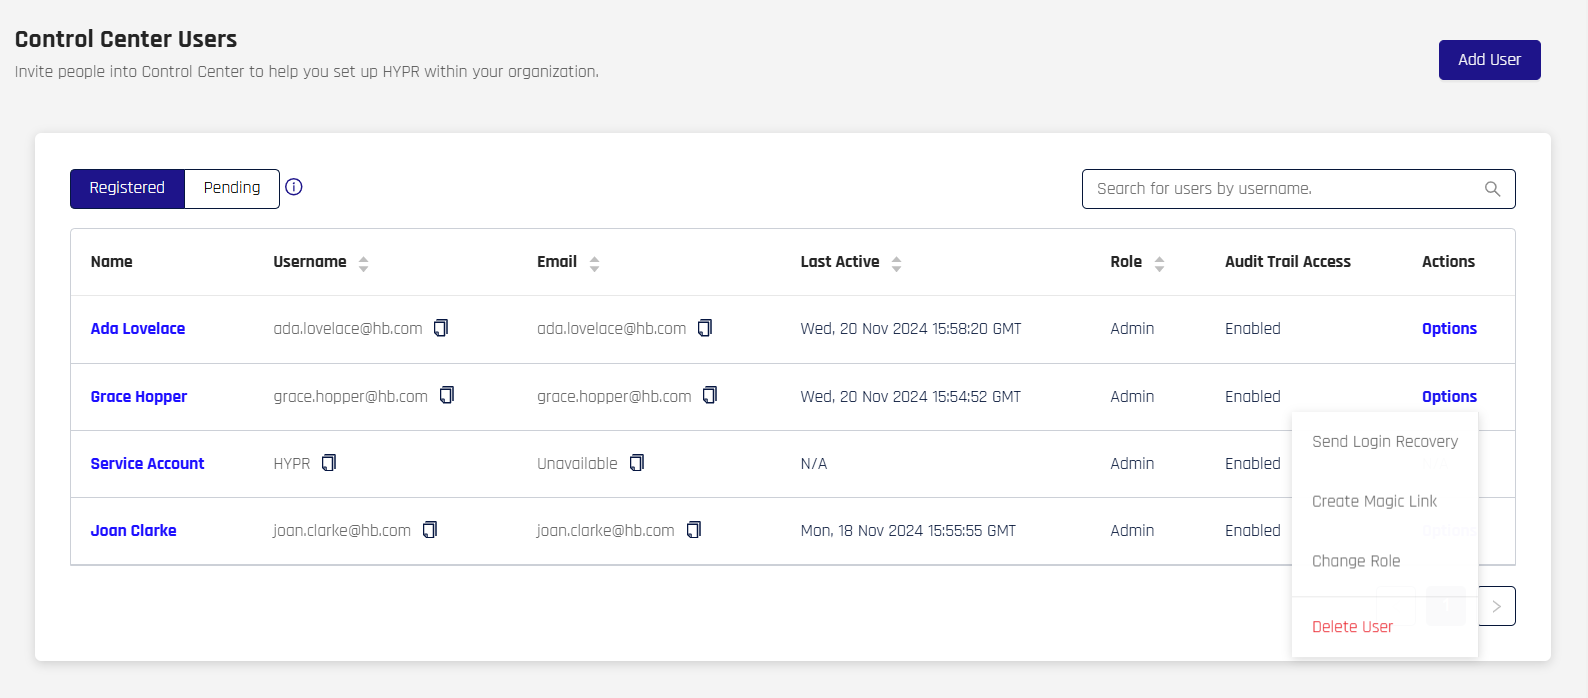
Control Center Users
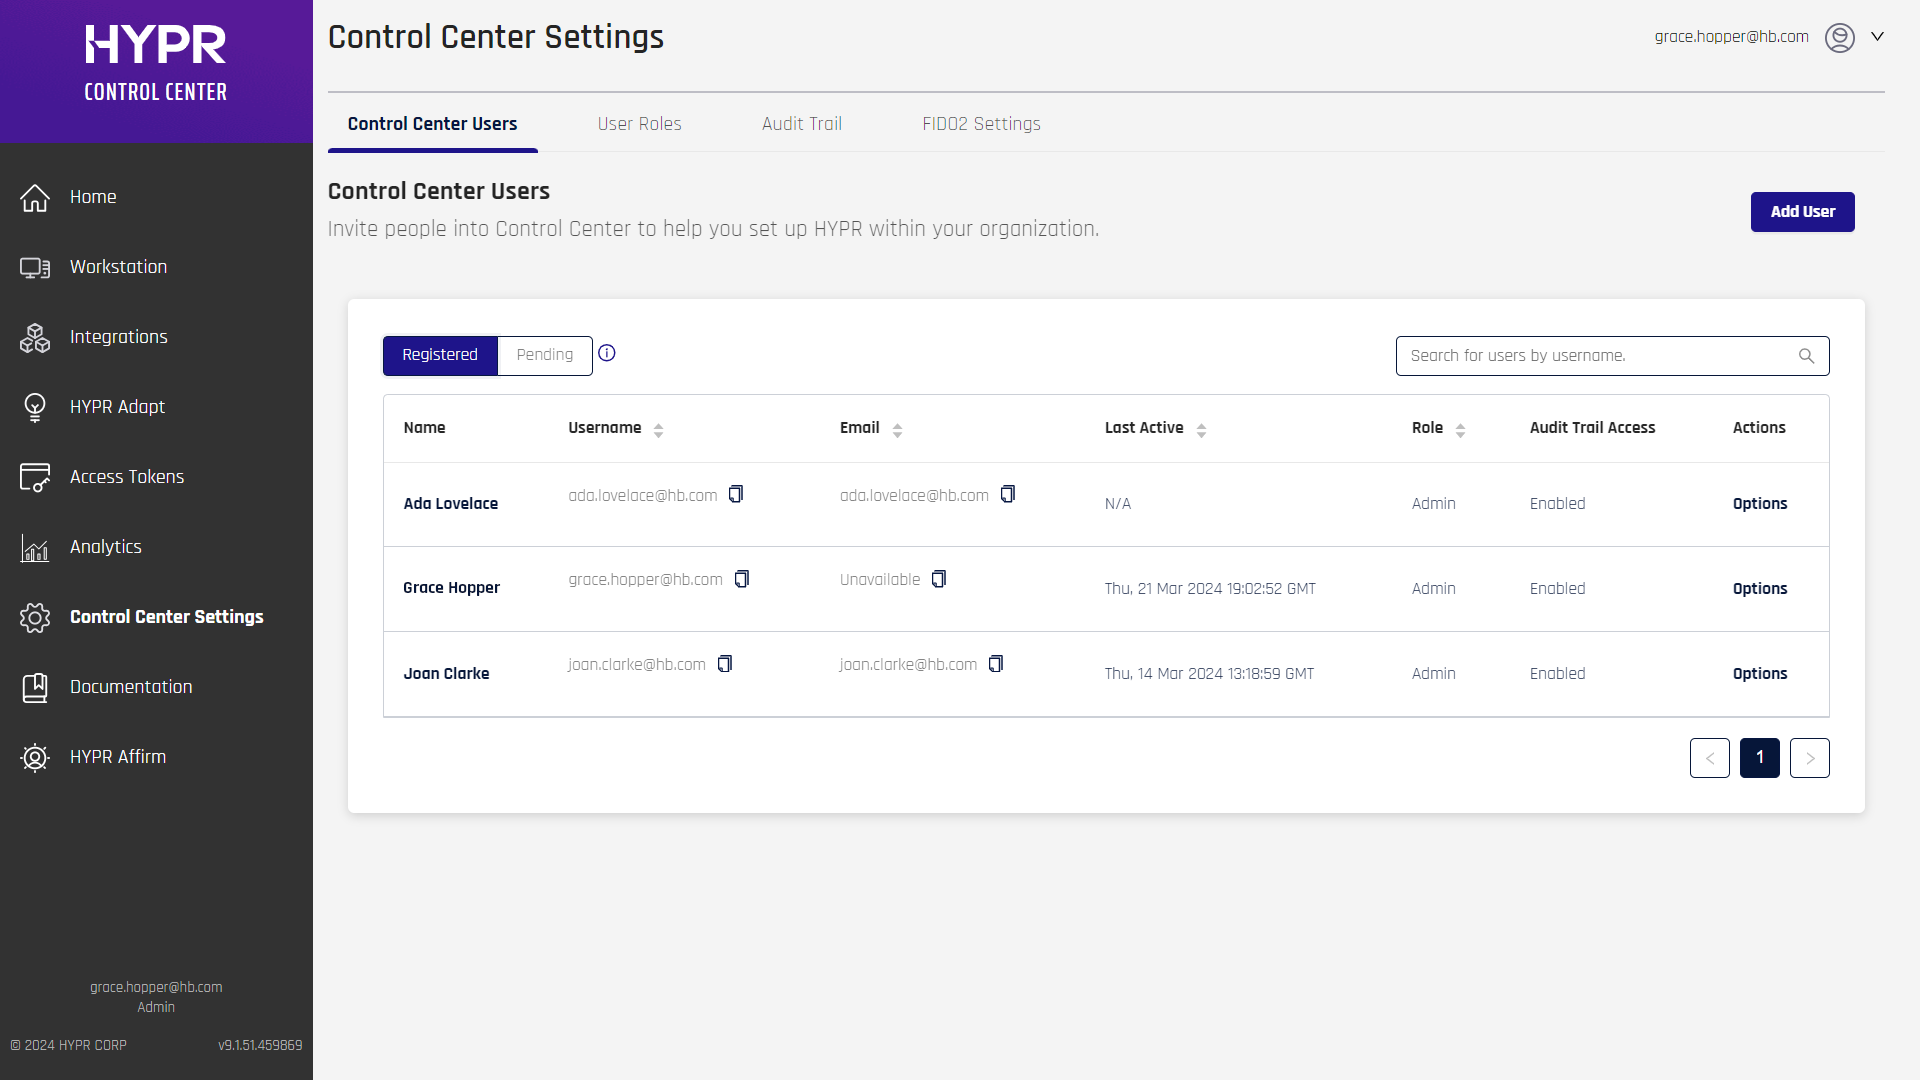
The default pane of Control Center Settings is Control Center Users. At the top right is a button to Add User and a Search bar. Beneath these controls is a list of Control Center users that displays the following fields.
| Field | Description |
|---|---|
| Name | The full name of the user, if applicable. Defaults to N/A if no value is present. |
| Username | Username of the user who logged in to the Application. Workstation Applications show the workstation-authenticated username; Web Applications show the email used to authenticate. |
| The user's email address. | |
| Last Active | Time the user was last active on the workstation or web. |
| Role | One of: Admin | Viewer | App Manager | User Manager | Basic Login See Control Center User Roles for role descriptions. |
| Audit Trail Access | Is user access to Audit Trail Enabled or Disabled? |
| Actions | Delete a user. See Deleting a Workstation User for the full process. |
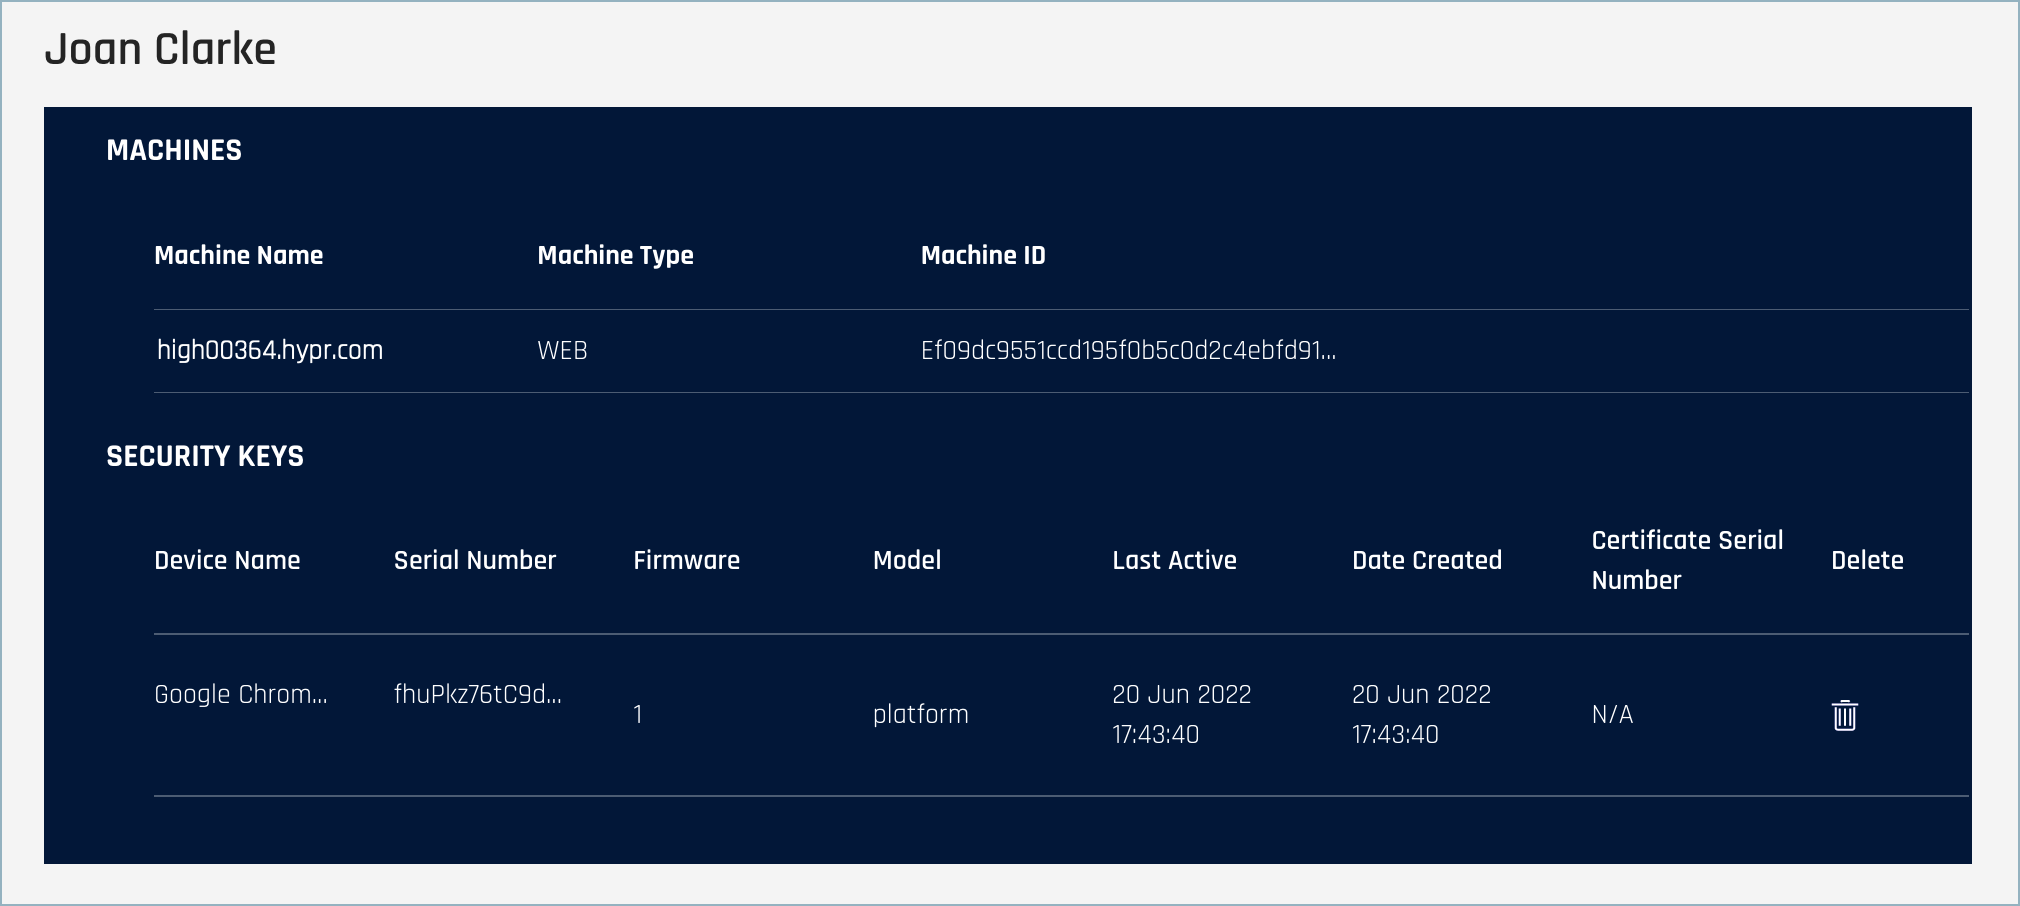
Clicking a user's Name in the Registered tab only will open a list of that user's machines and each machine's paired methods.
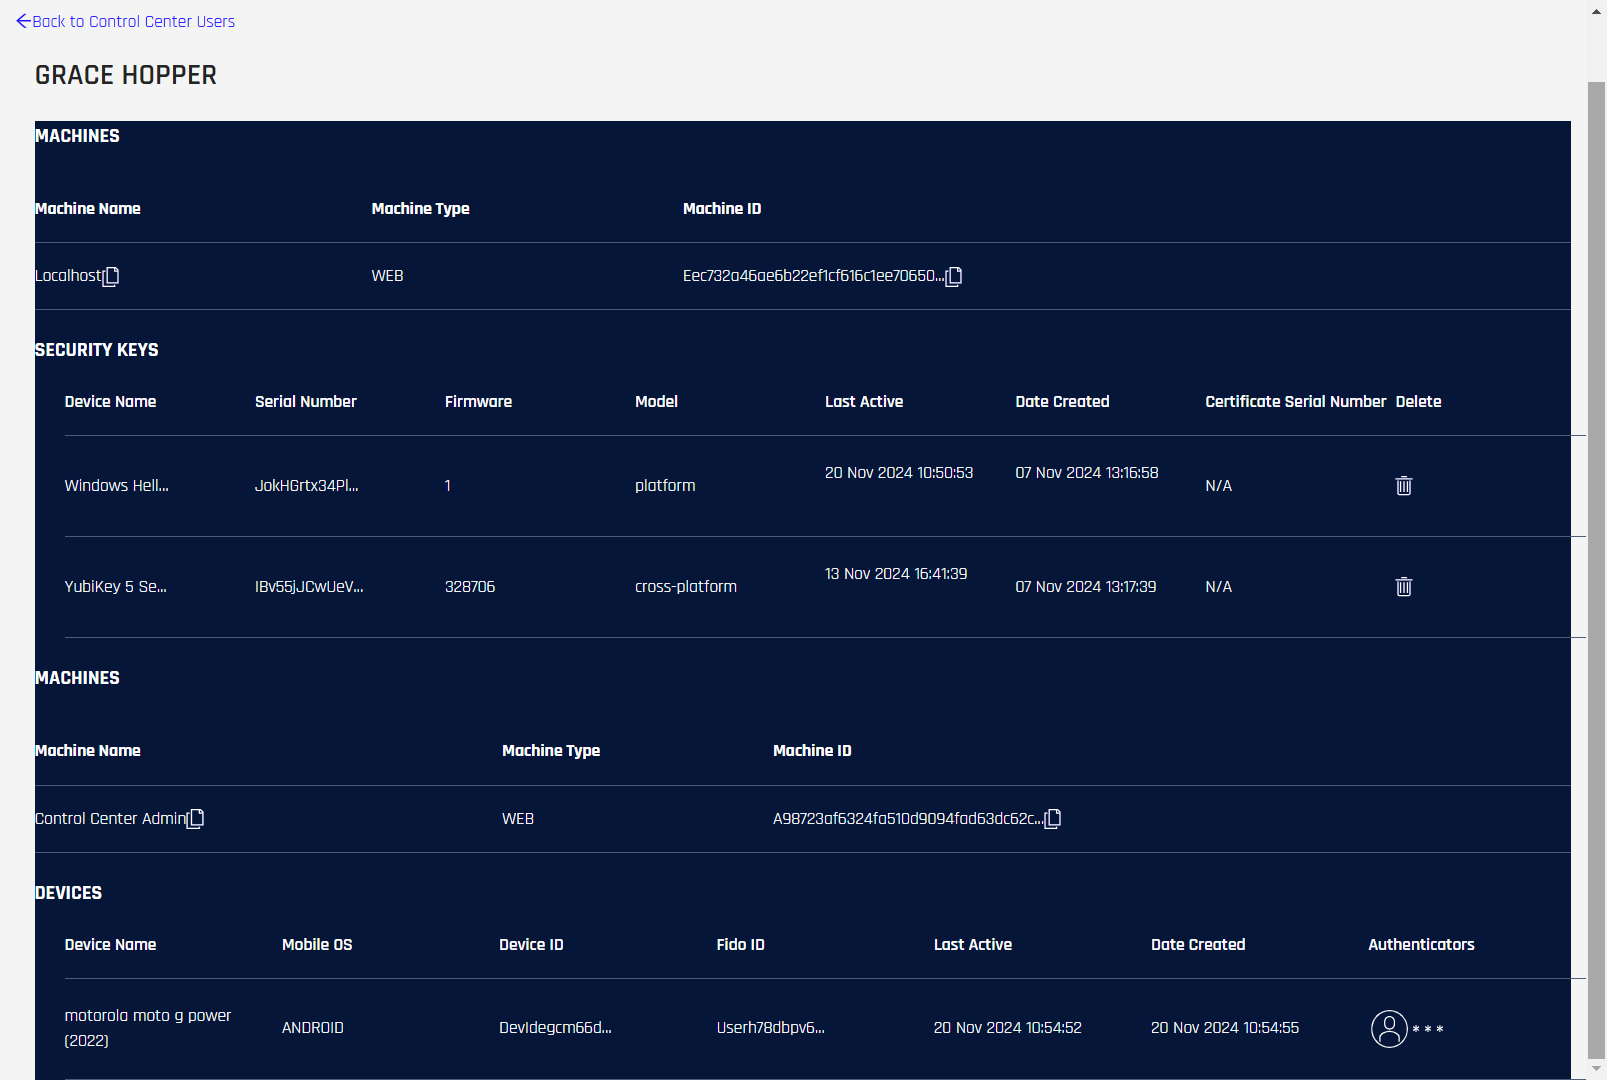
-
Each MACHINES entry will display the following columns, followed by either a SECURITY KEYS entry or DEVICES entry:
Column Description Machine Name The RP application hostname; this may be localhost when referring to the HYPR tenant. Machine Type Which HYPR Channel is in use? [WEB | WORKSTATION] Machine ID The unique identifier for the machine. -
SECURITY KEYS will display the following columns:
Column Description Device Name The name of the pairing as determined in Device Manager. Serial Number The unique serial number for the passkey. Firmware The device's firmware version. Model A breakdown of the Devices the user has paired with the Application. Last Active Time the user last logged in to the workstation or web. Date Created Time the user first registered the device to the workstation or web. Certificate Serial Number The certificate's serialized identifier, if present. If not, N/A will be displayed. Delete Clicking the trash can icon will revoke the user's ability to log into workstation or web with this security key; this action cannot be undone, and the user must register again to access the Application with this security key. See Removing a Passkey for Another User. -
DEVICES will display the following columns:
Column Description Device Name The name of the pairing as determined in Device Manager. Mobile OS AndroidoriOS.Device ID The unique identifier for the device. FIDO ID The unique FIDO identifier for the user. Last Active The time the device was last used. Date Created The time the device pairing was created. Authenticators Icons representing methods being used with the pairing.
Adding a Control Center User
This process is identical in both Standard and Advanced Modes.
To add a Control Center user, you send them an email invitation containing a link they can use to register a device for logging in to the Control Center. Successfully registering a device creates their Control Center user account.
The system automatically assigns the user's email address to be the account ID. To associate aliases to usernames, see Username Aliases.
-
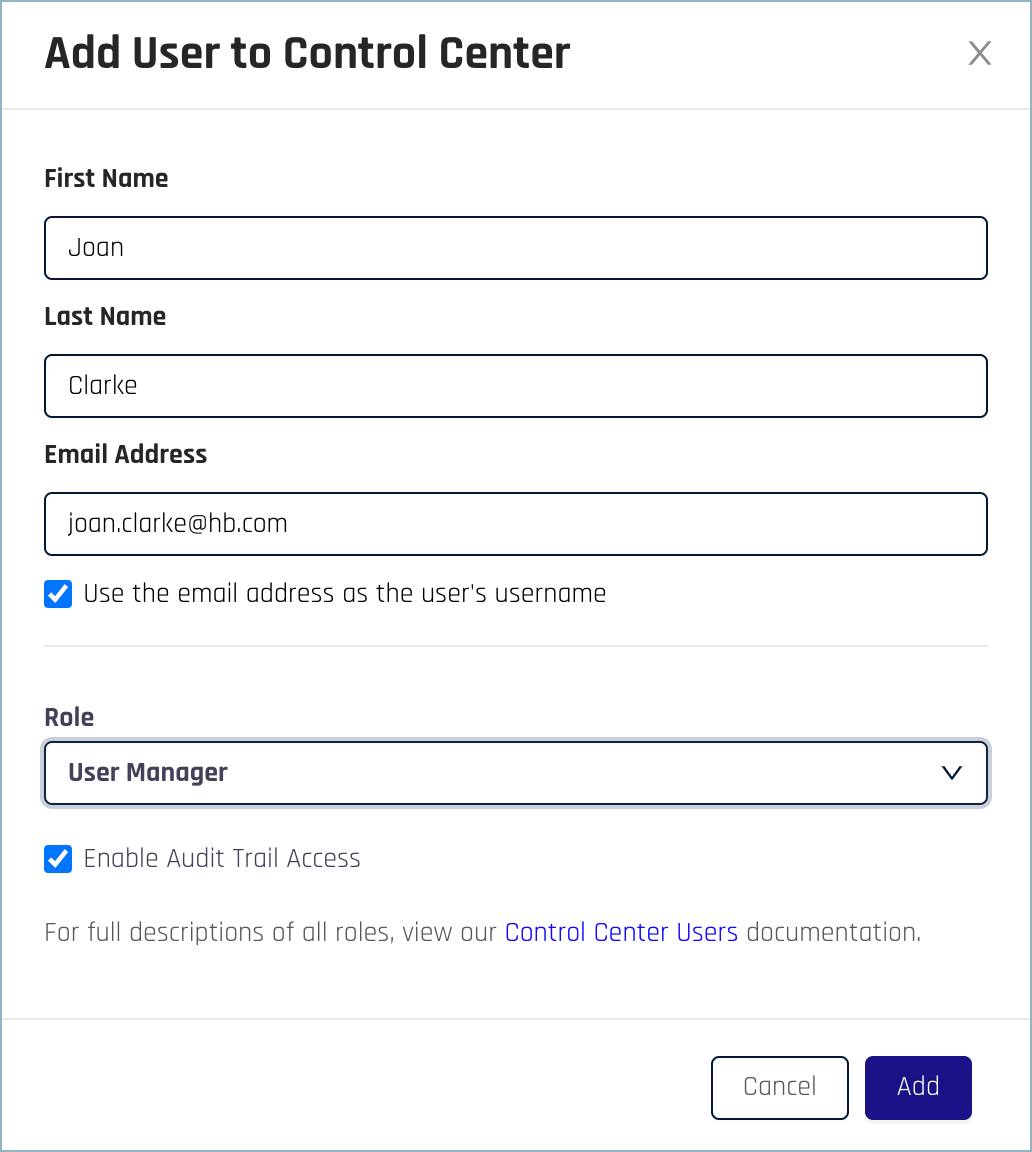
Click Add User in the upper right.
The Add User to Control Center screen appears:
-
Type the user's First Name, Last Name, and Email Address
-
The email address will be associated with this user for the purposes of logging in to the Control Center, so it's typically their business email
-
It's also the address where the invitation to be a Control Center user is sent, so it needs to be a valid address they can access
-
The email address must also be unique for your HYPR environment
-
If you want to use something other than the email address as the username, deselect Use the email address as the user's username and enter the value you want
-
-
Select the Control Center role you want to assign to this user. See Control Center User Roles for information on each role.
-
Select the Enable Audit Trail Access checkbox if you want to allow this user to view the Audit Trail screens. Admin users always have access to the Audit Trail, so you can't deselect this option if you've assigned the Admin role.
For more information on Audit Trail screens, see Changing a Control Center User's Role and Audit Trail Access.
-
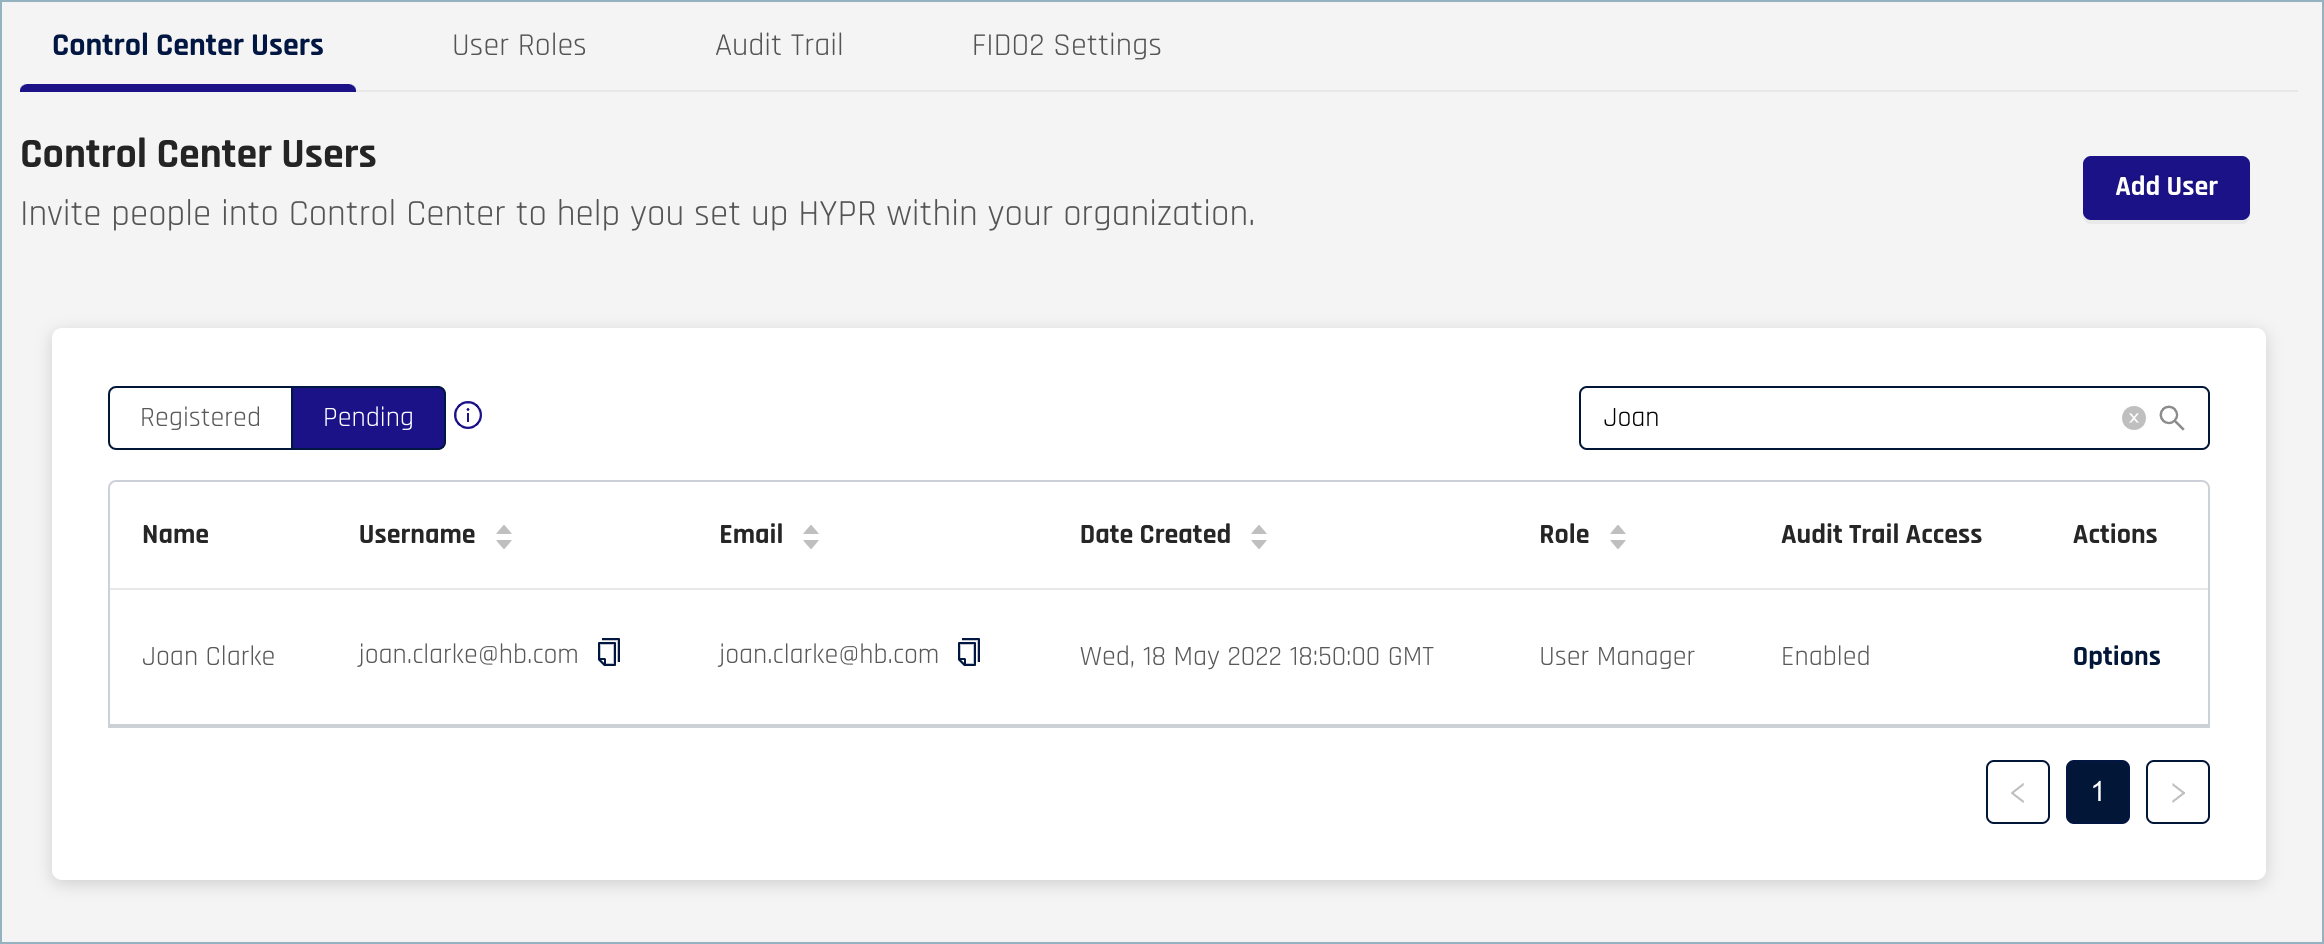
Click Add. The email is sent to the address you entered, and a confirmation screen appears.

The user's name appears in the Pending list:
Changing the Device Used for Control Center Logins
If Control Center users want to add another device for logging into the Control Center, or if they want to unpair an existing device, they can do so through the HYPR Device Manager. Please see Using the HYPR Device Manager for details.
Be careful about removing (unpairing) a device if it's the only one you've registered. If you remove it, you won't be able to access the Control Center until an Admin user sends you a login recovery email or a magic link. See Restoring a User's Control Center Access.
Removing a Passkey for Another User
If you need to remove a passkey for another user, you can do so through the Registered screen. (You can also use this procedure if you just want to view information about a device.)
-
In Standard Mode, open the Registered users list; in Advanced Mode, open the users list.
-
Locate the user whose device you want to remove.
-
Click the user's name in the Name column.
The following information is shown:
The MACHINES section shows information about the tenant used by your company's instance of HYPR. The SECURITY KEYS and DEVICES sections show pairings on a given machine to this user. Only Security Keys (Passkeys) can be removed here for another user.
-
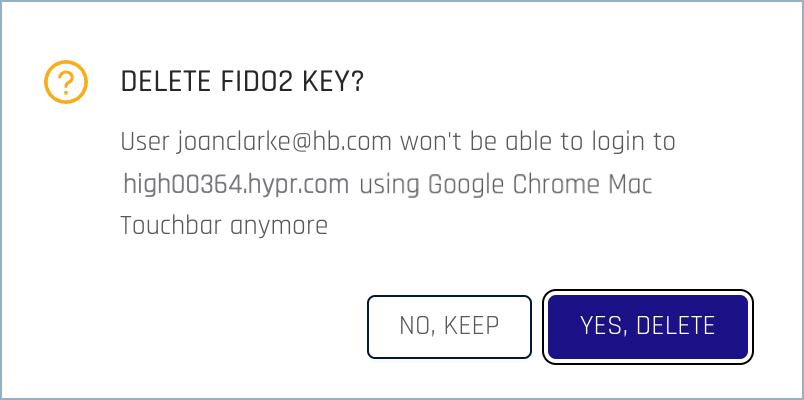
In the SECURITY KEYS or section, locate the row for the passkey you want to remove and click the Delete (trash can) icon.
-
Click Yes, Delete to confirm your choice. Click No, Keep to cancel.
-
To return to the users list:
-
In Standard Mode, click Back to Control Center Users
-
In Advanced Mode, click the chevron next to the username to roll up the information pane
-
Changing a Control Center User's Role and Audit Trail Access
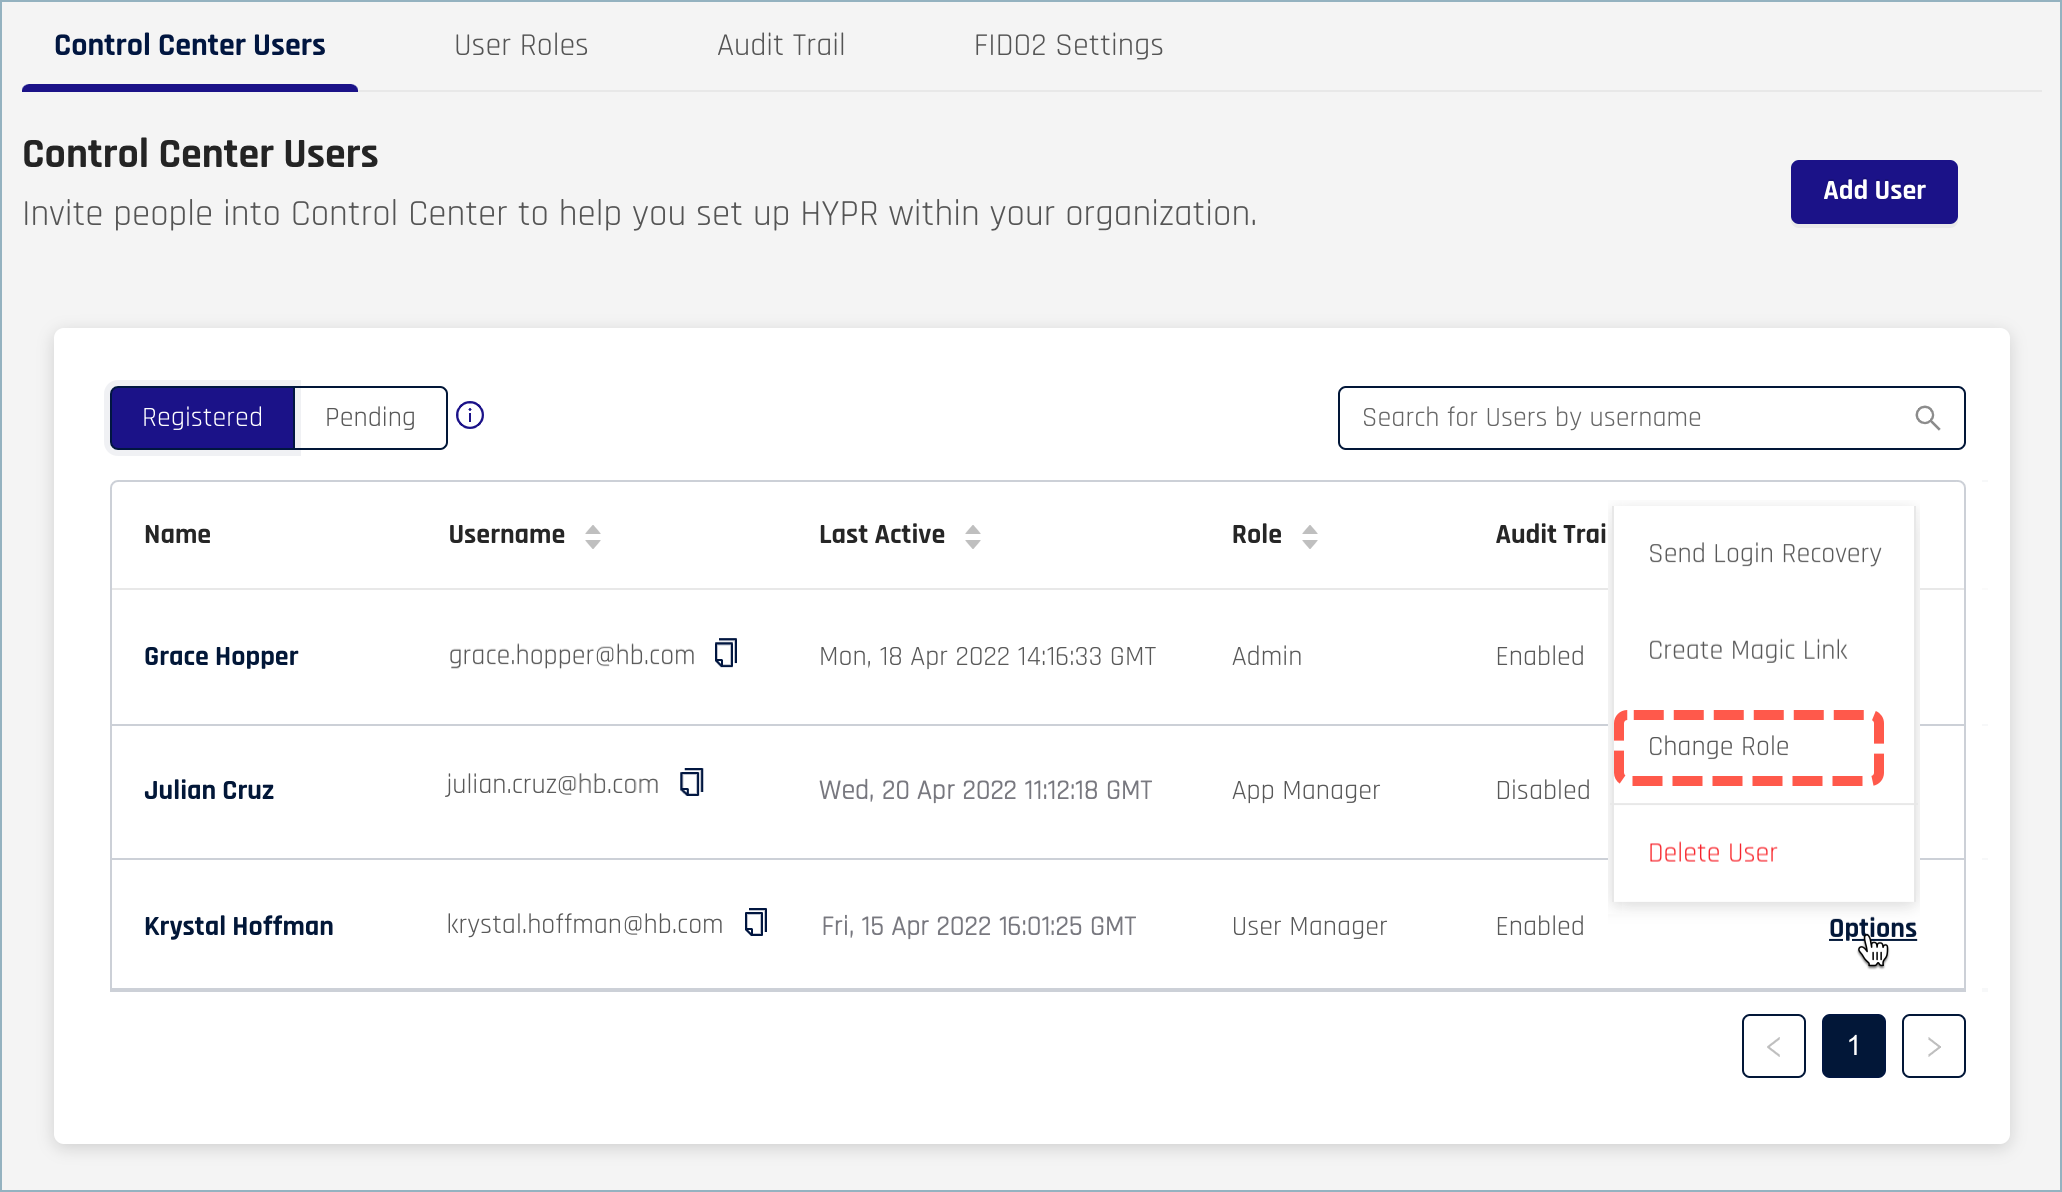
To change a Control Center user's role, complete these steps:
-
Locate the user whose role you want to change.
-
Click Options or the three-dot menu in the Actions column and select Change Role.
-
Choose the new role for the user.
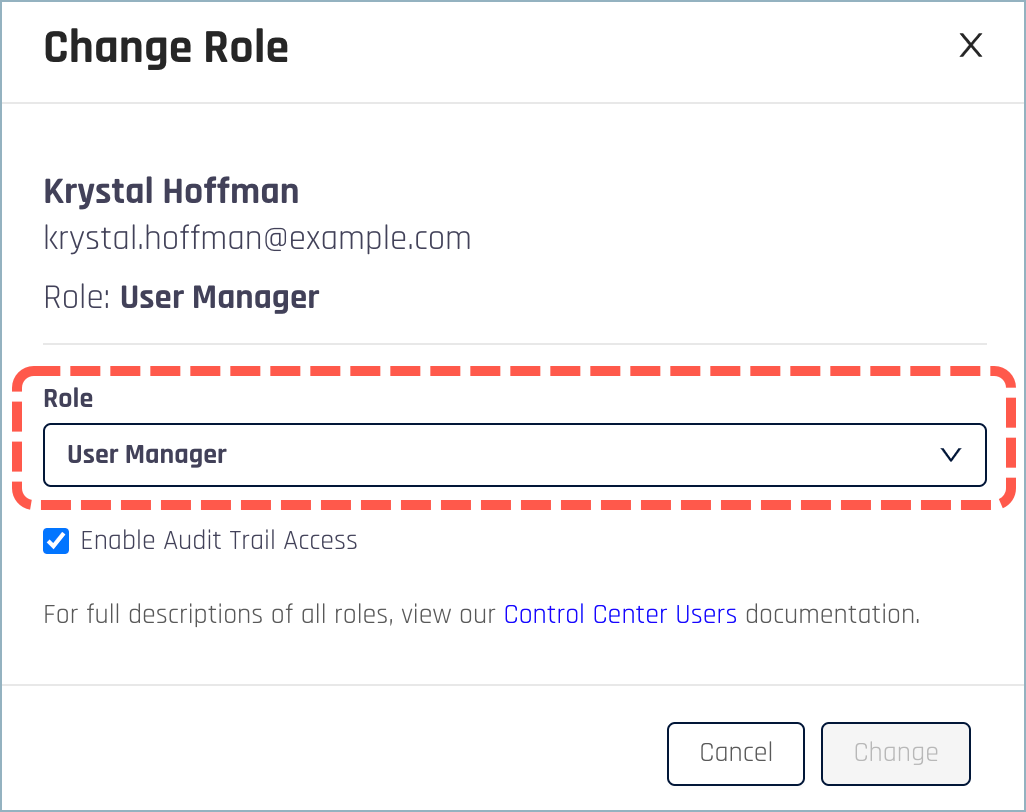
Note that Admin users can't change their own roles. Another Admin user can change your role for you, however.
-
Optionally, change the (Enable) Audit Trail Access option for this user.
-
Click Change.
Role CallWhen you change the role of a user who is currently logged in to the Control Center, the new role will take effect when they switch to a different page in the UI. In some cases, depending on the change you made, they may have to log out and back in again to see the new role.
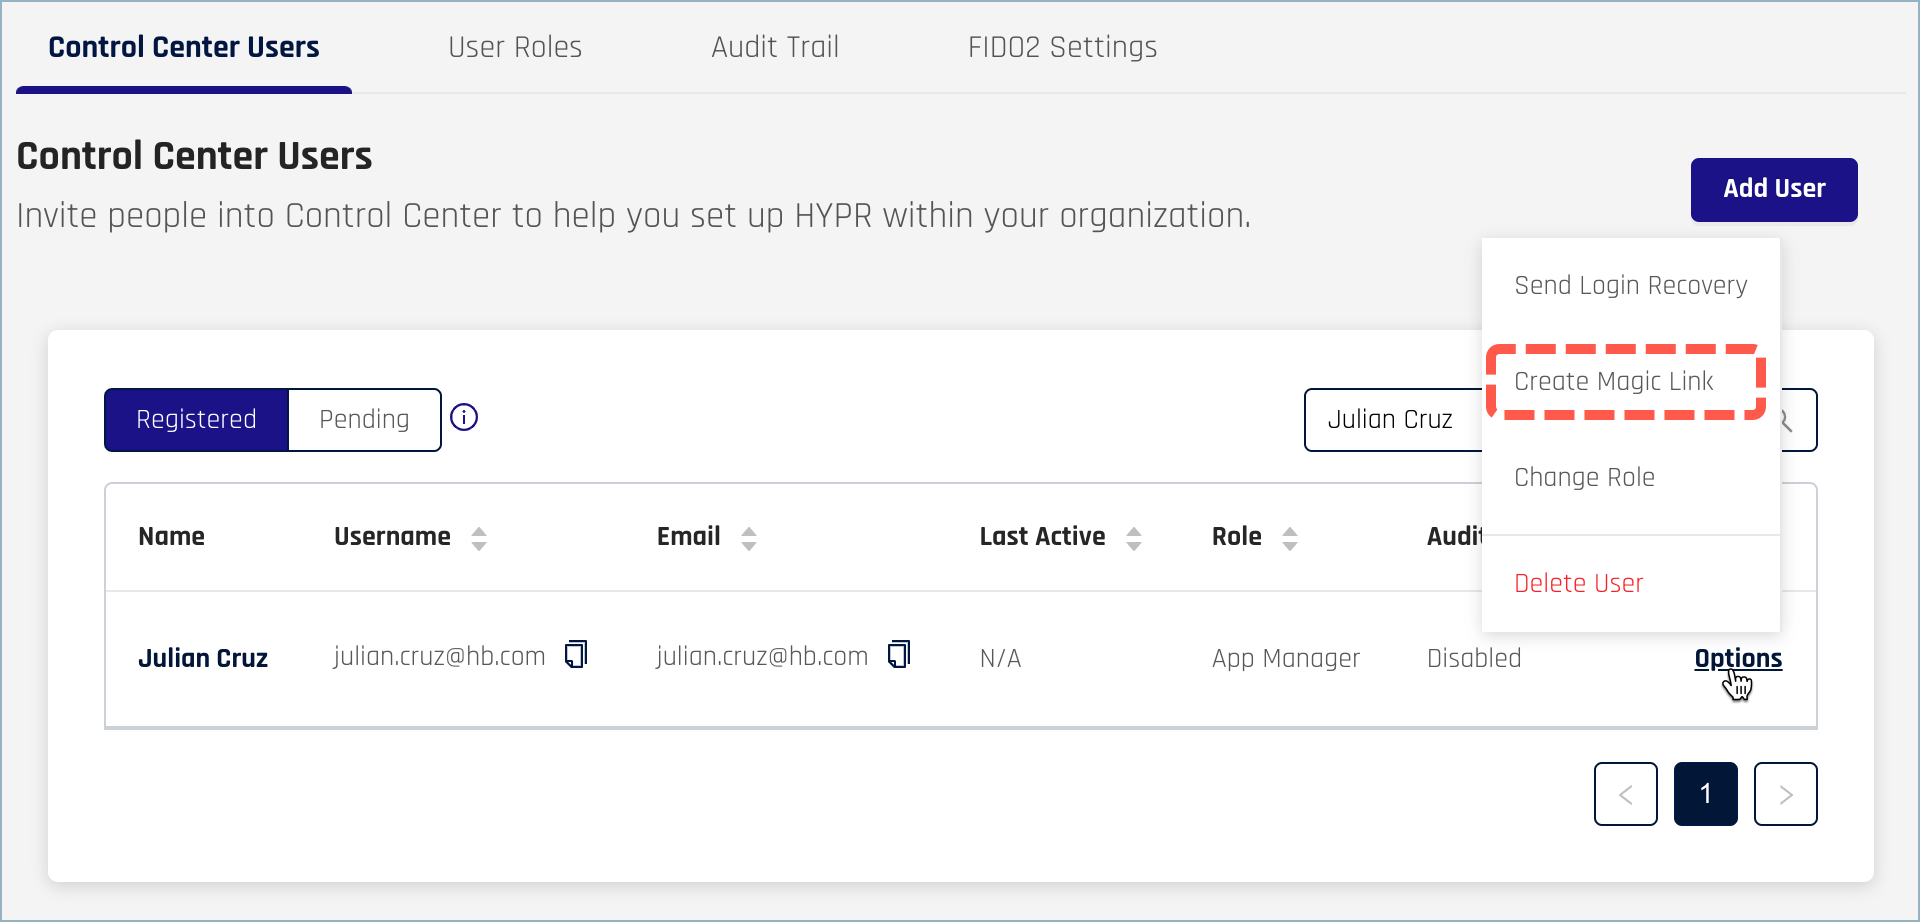
Removing a Control Center User
In the case of a Pending user, removing them invalidates the link in the original invitation email so it can't be used to register a device, which means the user can't create a Control Center account.
To remove a user's Control Center access, follow these steps:
-
Locate the desired username.
-
Under the Actions column:
-
In Standard Mode hover over Options and select Delete User
-
In Advanced Mode hover over the three-dot menu and select Remove
-
-
Complete confirmation. You are returned to the list where you started.
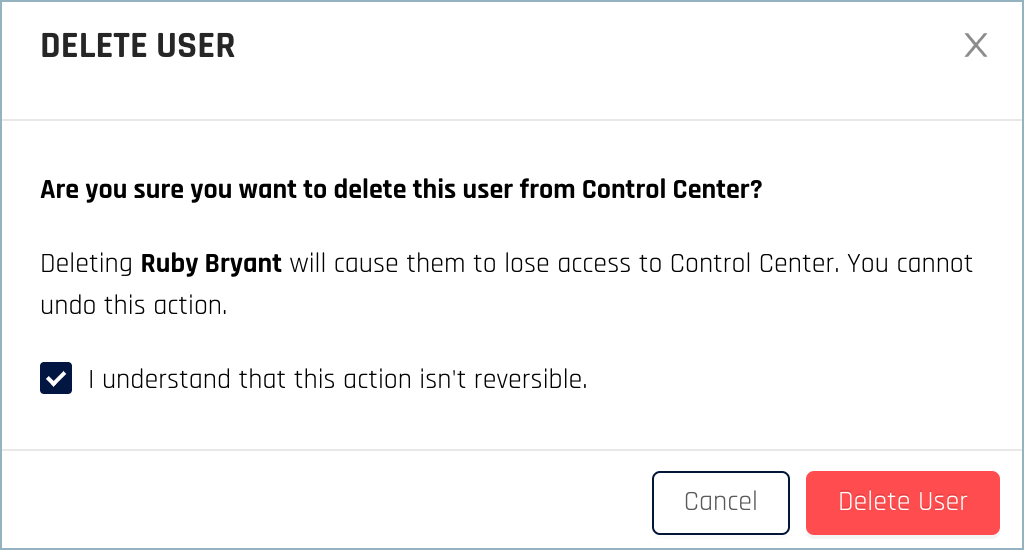
Deleting a user from the Control Center only removes their Control Center access; it doesn't remove them from other parts of the HYPR system. For example, if they have a regular user account and log in to their computer through the HYPR Passwordless client, they'll still be able to do that.
To keep you from deleting your own account, the Remove option isn't available for the current user.
See also Removing a Device for Another User.
Re-Inviting a User
There may be situations in which a user loses their access to the Control Center and needs to get it back. For example, if they registered their phone for logging in, and then lost the phone, they'll be unable to access the Control Center (there is no login+password alternative method for getting into the HYPR Control Center). In cases like this, they'll need help from another Control Center user.
Only users with the Admin role can re-invite other Control Center users.
There are two methods you can use to help another user regain Control Center access. Both are accessed by locating the user in the list (both Registered and Pending users) and clicking Options to the right of the username.
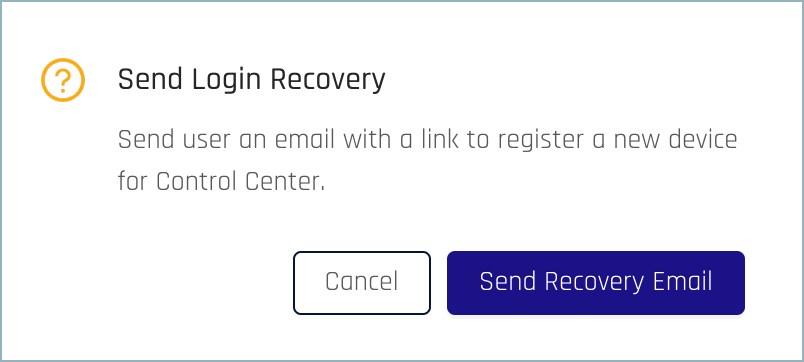
Send Login Recovery or Resend Magic Link
This is a quick, convenient way to restore login ability for a user who can still access the email address associated with their Control Center account. (This is the email address shown for them in the Email column of the Control Center Users screen.) This process is available in both Standard Mode and Advanced Mode.
-
On the user Options menu:
-
For registered users, click Send Login Recovery
-
For pending users, click Resend Magic Link
-
-
On the confirmation screen:
-
For registered users, click Send Recovery Email
-
For pending users, click Resend Invitation Email
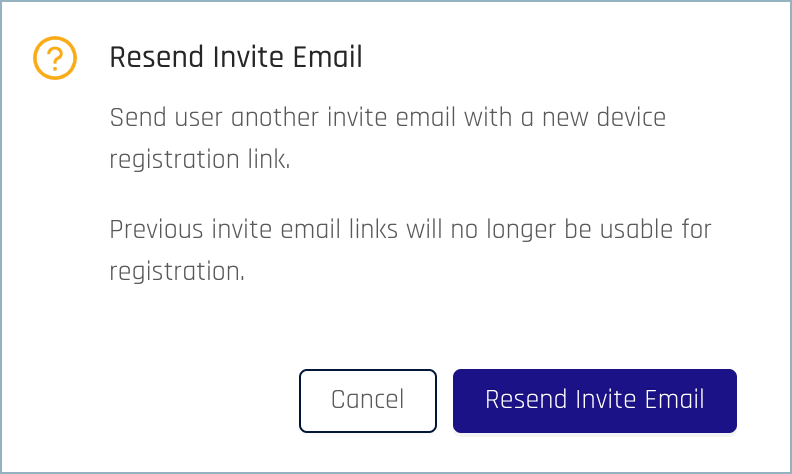
The user is sent an email with a link they can use to register a new device.
-
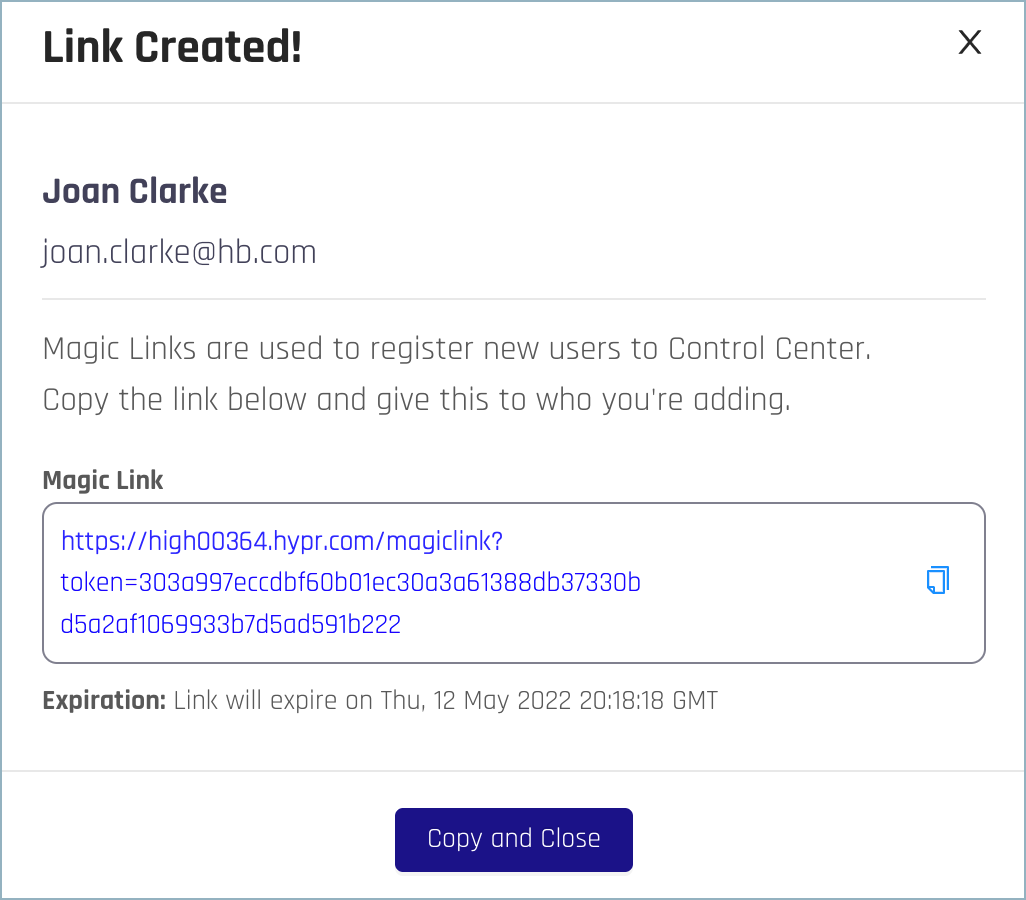
Create Magic Link
This method is useful if the Send Login Recovery/Resend Magic Link option doesn't work, or if the user can't access the email address associated with their Control Center account. Magic links work the same way as the links included in the auto-created email invitations, although magic links expire in 24 hours.
-
Locate the user and click Options in the Actions column.
-
Click Create Magic Link.

-
Magic links are valid for 24 hours (86,400 seconds) by default. If you want to increase or decrease this time, adjust the Token Validity Time in Seconds setting in the next screen.

-
Click Create.
Practical MagicWhen you create a new magic link, any links created earlier for that user are invalidated.
-
Click Copy and Close. You can then send the link to the user, for example by pasting it into a new email or a message in another communication channel. They use it the same way they would use the link sent through the original invitation. Note that magic links are valid only for the named user.
Note that once you close the pop-up window, you won't be able to view the Magic Link again. However, you can always generate another if necessary.
Secure ChannelsMagic links allow access to the Control Center and the Device Manager, and for this reason they should be treated as sensitive data. Make sure any channel you use to distribute them is secure.
For more information, please see Creating a Magic Link.
Control Center User Roles
When you add a new Control Center user, you assign them a role that defines the screens and features they can and can't access.
There are five roles in Control Center:
-
Admin
-
App Manager
-
Basic Login
-
User Manager
-
Viewer
Control Center roles are task-based, not hierarchical.
Admin users can see the role assigned to each user in the Role column of the Control Center Users screen. Any logged-in user can see their own username and role at the bottom left in the main navigation pane.
-
Admin Role
The Admin role is appropriate for anyone in your company who needs full Control Center access, such as system administrators.
For new HYPR environments, the first Control Center user in your organization is given the Admin role by HYPR.
Any Control Center users who were added in older versions of HYPR (versions without multiple roles) will be automatically assigned the Admin role after the upgrade.
Admin users can access and use all Control Center screens and features. Actions they can perform include the following:
-
Administer Applications within the Control Center
-
Change Control Center settings (the options on the Control Center Settings page)
-
Add, delete, and manage other Control Center users, including other Admin users
-
Change the roles of other Control Center users, including other Admin users
-
View Audit Trail screens
-
Set up, manage, and delete integrations
What Admin users can't do:
-
Delete their own Control Center user accounts
-
Change their own roles
-
-
App Manager Role
The App Manager role is designed for users who create and manage integrations, such as developers.
App Manager users can do the following:
-
Add new integrations (but not delete them)
-
View enrolled and pending users (but not add/delete users)
-
Assist users by sending login recoveries and creating magic links
-
Configure options on the FIDO2 Settings screen
-
Configure options on the Integration Settings screen (except for Delete Integration)
-
Configure options on the Access Tokens page (except for Revoke)
-
View the Audit Trail for RP Applications amd Integrations (optional)
-
-
Basic Login Role
-
Default role for new users that have not been directly assigned one of the other roles
-
Can use HYPR to authenticate passwordlessly
-
No access to Control Center
-
Only appears in the Roles tab
-
Not assignable with Add User
-
-
User Manager Role
The User Manager role is intended for anyone who manages and supports the end users (non-Control Center users) in your HYPR environment.
User Managers can do the following:
-
Delete HYPR Passwordless client users
-
Send login recovery PINs to HYPR Passwordless client users associated with RP Applications and Integrations (workstation unlock)
-
Add and delete RP Application and Integration users
-
Send login recovery PINs to RP Application and Integration users
-
Generate magic links for RP Application and Integration users
-
View the RP Application and Integration Audit Trail screens (optional)
-
View authentication history for RP Application or Integration users
-
-
Viewer Role
The Viewer role allows read-only access to certain Control Center pages and features. Viewer users can do the following:
-
View (but not change) information in the Applications menus
-
View (but not change) information on the Workstation page
-
View (but not change) information on the Integrations page
-
View the Workstation and Integrations Audit Trail screens (optional)
-
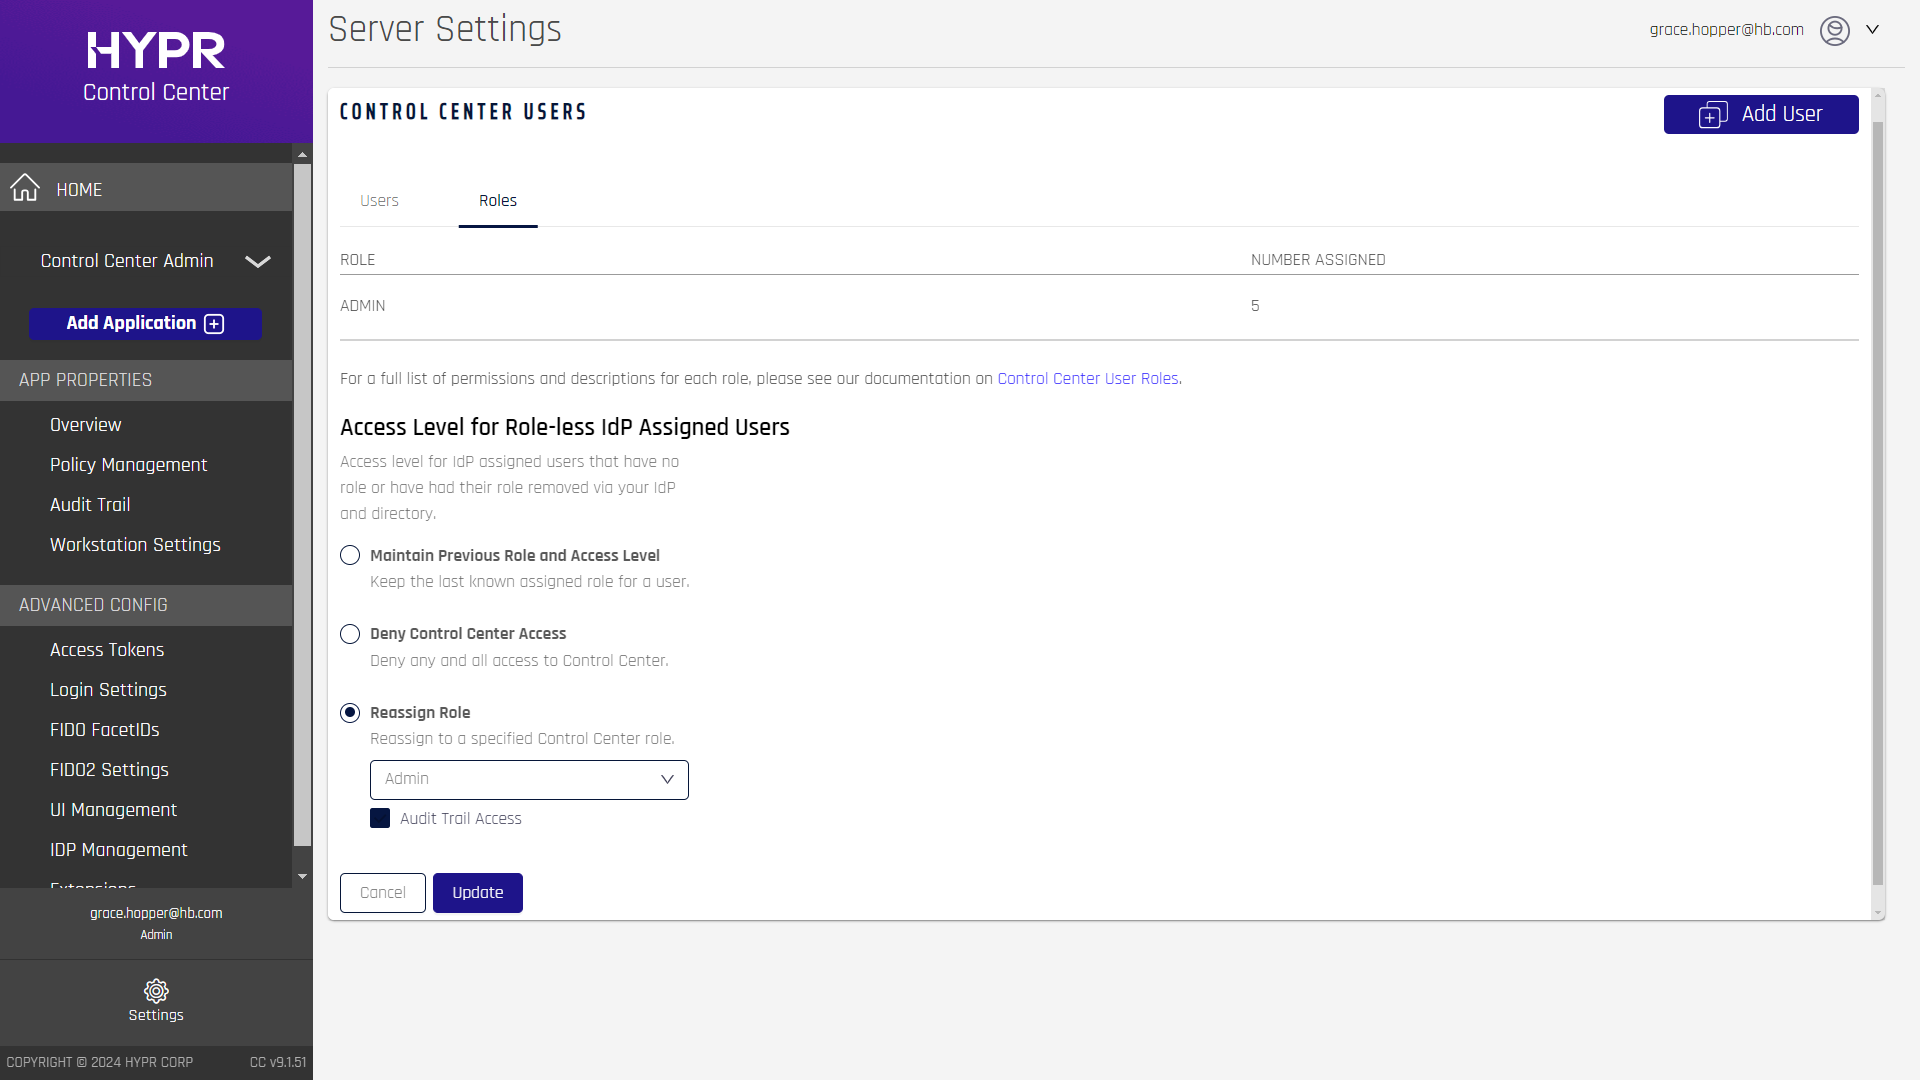
Setting Default Roles (Advanced Mode Only)
To set the default behavior for IdP-assigned users who don't have a role defined:
-
On the Roles tab Access Level for Role-less IdP Assigned Users section, click Edit.

The section expands to show the available settings.
-
Set the default access level as follows:
Setting Description Maintain Previous Role and Access Level Preserve the user's last known role. Deny Control Center Access Block users from accessing the Control Center. Reassign Role Give users a specific role. Audit Trail Access Optionally assign access to the Audit Trail page. -
Click Update to save the changes, which will take effect next time the user logs in to the Control Center.
Users whose role is defined externally will have "IdP Assigned" displayed next to their role on the main Control Center Users screen. You also cannot change their role from inside the Control Center.
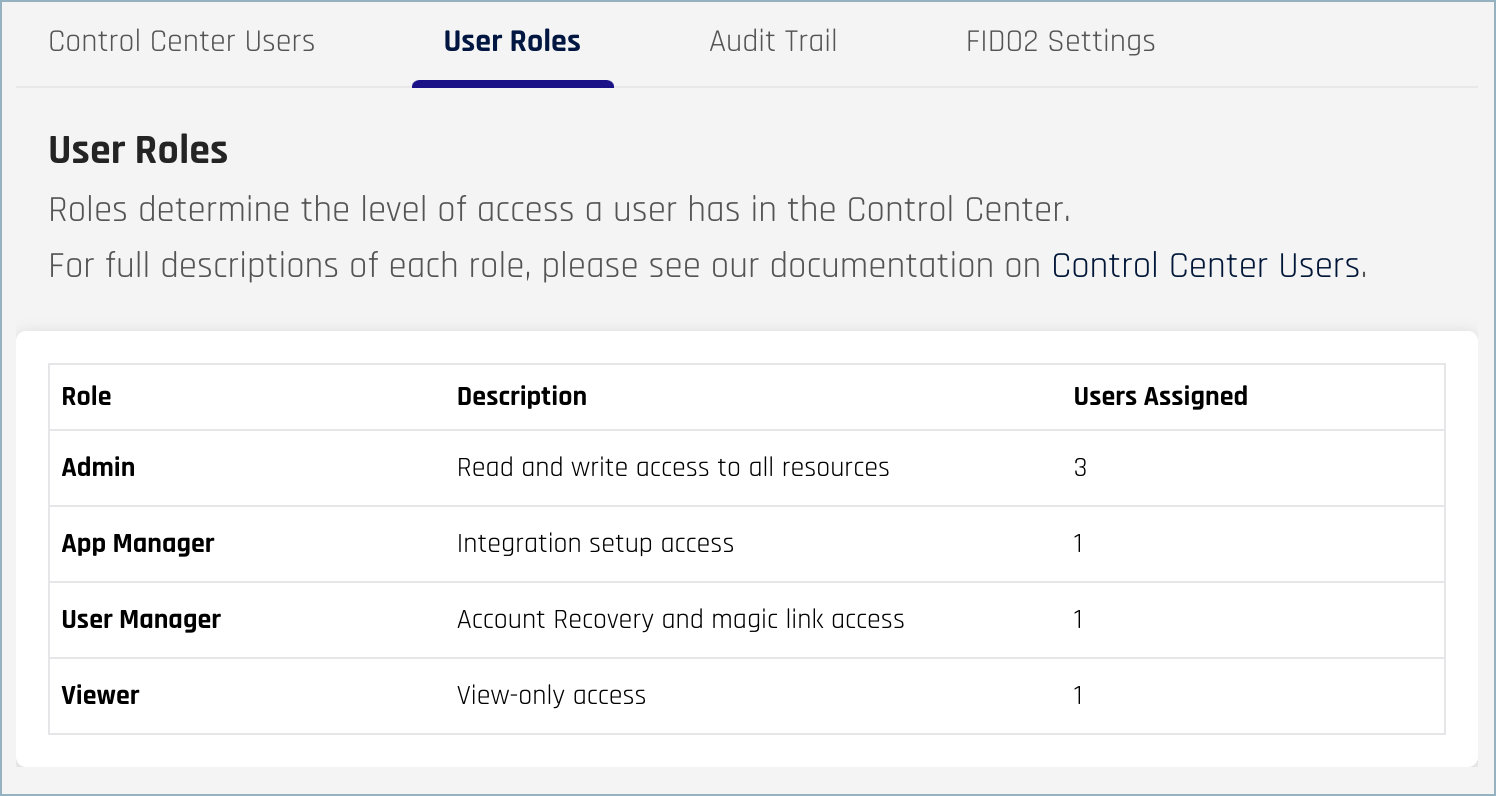
Viewing User Counts
To see how many users are in each role:
-
In Standard Mode click Control Center Settings and go to the User Roles tab; a Description is included
-
In Advanced Mode open Control Center Users and select the Roles tab; no Description is shown in Advanced Mode
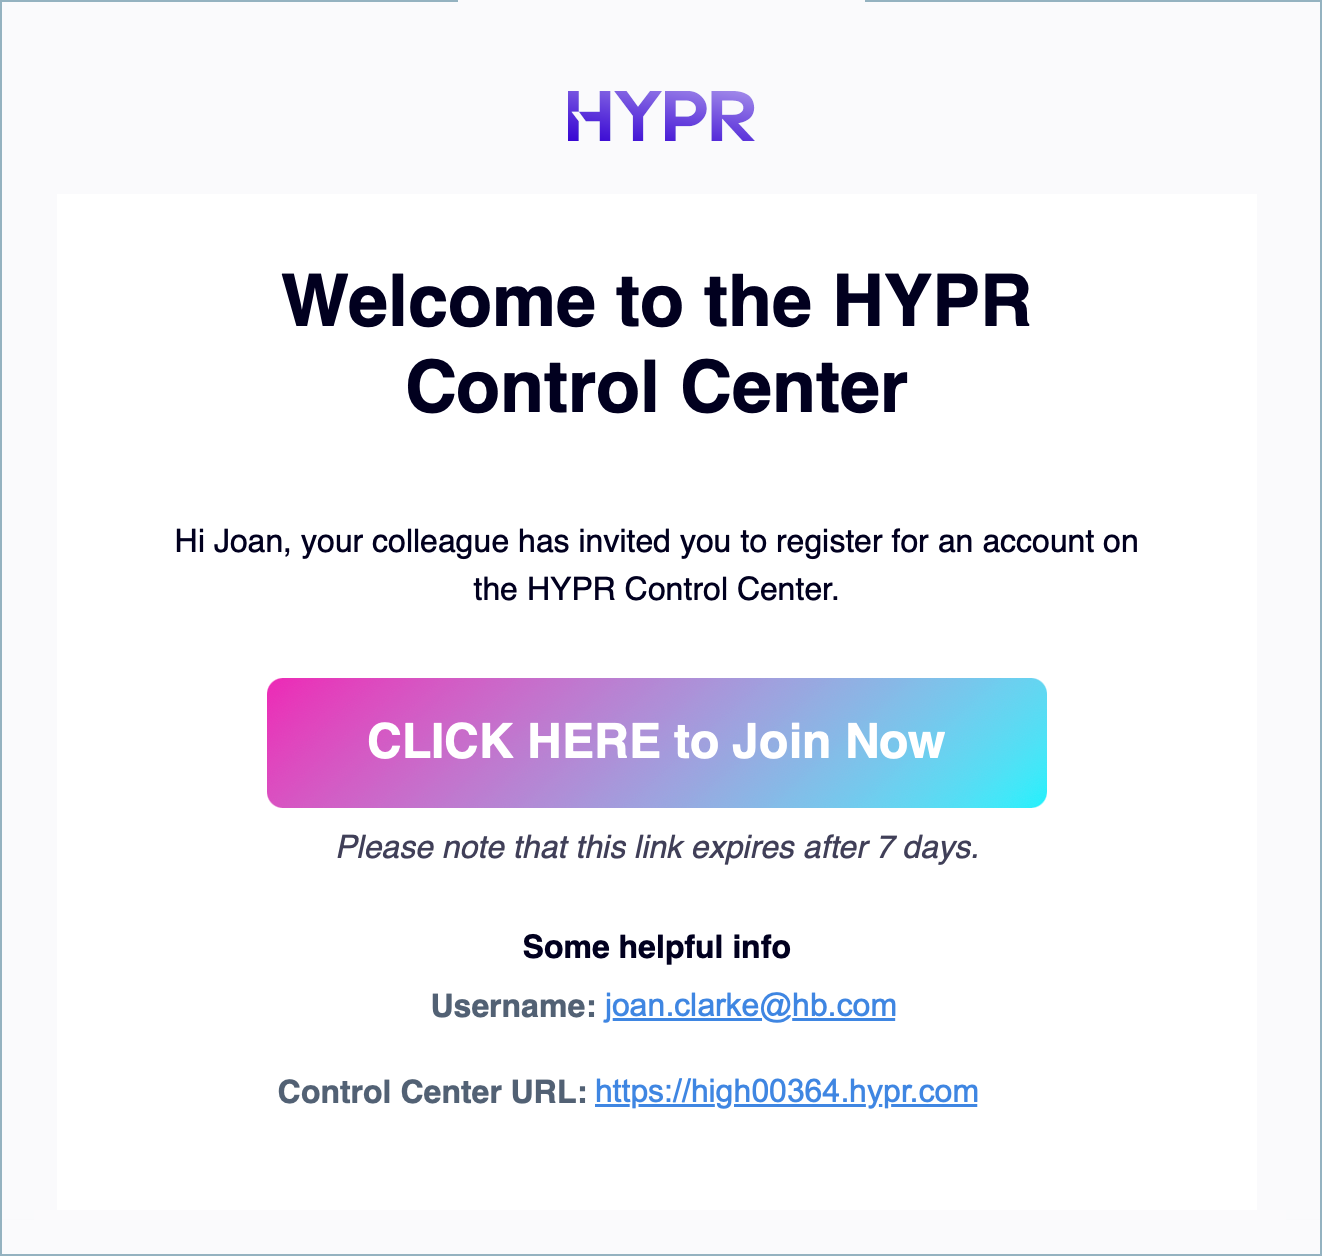
What the Invited User Does
Magic links can be sent using Control Center's email template or the links can be manually copied and sent to the user by other means. If you have opted to send an email, the user you invited should get an email similar to this one:
Using either method will take users to the HYPR Device Manager where they can begin the device registration process by scanning a QR Code or using a Passkey.
In the Device Manager, users select the type of device they want, then pair the device following the on-screen instructions. The process is similar to pairing a device with the HYPR Passwordless client for a workstation login; please see HYPR Passwordless and the HYPR Mobile App and Pairing with a Security Key.
If Smartphone is the only option that appears for new users, and you'd like them to be able to log in with a security key or through biometric recognition on their computer (Touch ID for Mac or Windows Hello, for example), you must enable FIDO2 authentication for the Control Center. See FIDO2 Settings.
After the user has successfully registered a device, their name moves to the Registered list in the Control Center Users screen, indicating they have been added successfully.
The URL for accessing the Control Center is included in their invitation email.
Mapping External IdP Users
For users who are logging in to the Control Center via an Identity Provider (IdP) such as Okta, you can assign and manage the Control Center roles externally as long as the IdP supports OIDC custom claims. You'll just need to assign the roles within the IdP using the hypr_role custom claim.
| Custom Claim Name | Claim Value (User Role) | Claim Value (Audit Trail) |
|---|---|---|
| hypr_role | HYPR_ADMIN HYPR_APP_MANAGER HYPR_USER_MANAGER HYPR_VIEWER | HYPR_LOG_AUDITOR |
If you're using Okta as your IdP, the Control Center role mapping feature requires an OAUTH2 server that supports the most current API versions. Typically this means using the default authorization server that was created along with your account, whose base URL is https://yourOktaDomain/oauth2/default.
Frequently Asked Questions
Q: I'm the only Control Center user at my company, and I lost my access to the Control Center. What should I do?
A: Please call HYPR Support for assistance.
Q: How can I tell what my role is?
A: Your role is shown under your username at the bottom of the left navigation pane in the Control Center.
Q: What happens to Control Center users created in older versions of HYPR before roles were introduced?
A: Existing users will be assigned the Admin role by default, but their role can be changed if required.
Q: Why doesn't a role change seem to have any effect?
A: In some cases, role changes only take effect after the user logs out and back in again.
Q: Why do users sometimes see an error message after a role change?
A: Occasionally, users who are logged in at the time you're changing their role will be logged out automatically when they navigate away from the current screen, and they may see an error message. (Typically, the change is either to or from the Admin role.) If this happens, ask them to log back in again, which should resolve the issue.