Offline Authentication: API
HYPR’s Offline Authentication gives users access to their workstation when their mobile device has no internet connection or the workstation is offline for some reason.
Offline Authentication requires that the HYPR Passwordless client has already been paired with a HYPR Mobile App device.
How It Works
-
Once registration/pairing is completed, a certificate is issued to the workstation and HYPR Mobile App
-
During the first successful authentication, the endpoint configurations are pulled from Control Center
-
The Offline PINs configuration is obtained from workstation registry (total PINs to be cached, days to remain valid, PIN length, etc.) and the PINs are generated based on the certificate
-
HYPR Passwordless creates an encrypted certificate with the PIN and stores it
-
An Offline Authentication request is triggered
-
Offline PINs are sent to the HYPR Mobile App
-
PINs from mobile device are supplied to the user
-
The user enters the PIN into the HYPR Passwordless client
-
PIN must match 1 PIN in the list of generated PINs
-
The PIN decrypts the certificate
-
Authentication completes
-
The PIN and encrypted certificate are deleted in both locations to prevent further use
Prerequisites
-
Offline Authentication is off by default and must be enabled and configured for the affected RP Application in Workstation Settings in Control Center before the API calls will work
-
A user and their device must first be registered before they can authenticate with HYPR. Typically this is done by generating a magic link for a user which takes them to a page in the HYPR tenant where they can scan a QR code with the HYPR-enabled app on their mobile device. This link can then be delivered to the user (e.g., via email or instant messaging).
-
Once a mobile device is paired with the affected RP Application on the HYPR Passwordless client, Offline PINs will be generated and stored for later use according to the configuration defined in Workstation Settings for the affected RP Application. See Generating Offline PINS at Registration to understand how this occurs.
Generating Offline PINs at Registration
Offline Authentication configuration data is created and stored during the process of pairing the HYPR Mobile App to a HYPR Passwordless client via POST /rp/api/client/reg; these values can be viewed GET and updated PATCH using the same endpoint.
Offline Authentication data is contained in all /rp/api/client/reg responses in the rpConfig.workstation.offlineAccess and workstation.offline objects:
{
  "response": {
    "rpConfig": {
      ...
      "workstation": {
        "offlineAccess": {
          "enabled": "<boolean>",
          "tokenLength": "<integer>",
          "tokenCount": "<integer>",
          "tokenEntryTimeoutSecs": "<integer>",
          "offlineAccessDays": "<integer>",
          "offlinePINPromptSecs": "<integer>",
          "tokenLowWarningThresholdPercentage": "<integer>"
        },
        ...
      }
    },
    ...
    "workstation": {
      ...
      "offline": {
        "tokens": "<string>",
        "tokensAuth": "<string>"
      }
    },
  ...
  },
}
-
offlineAccess: An array containing Offline Mode configuration data.enabled: Is Offline Authentication enabled? [true|false]tokenLength: The number of characters in each offline PIN.tokenCount: The number of offline PINs issued with each renewal. Default is 25.tokenEntryTimeoutSecs: The time in seconds after which PIN entry is no longer allowed. Default is 180.offlineAccessDays: The number of days a user may use offline access before needing to re-validate their account with the appropriate secure network. Default is 30.offlinePINPromptSecs: The number of seconds before the PIN entry prompt appears after a user initiates offline access. Default is 5.tokenLowWarningThresholdPercentage: The percentage of used tokens fromtokenCount, below which HYPR will remind the user to renew their tokens. Default is 20.
-
offline: An array containing offline token data.tokens: A list of one or more offline tokens.tokensAuth: The authorization code for the offline token(s).
Once these are on the server, the HYPR Mobile App polls the Control Center using POST /rp/versioned/device/setup to obtain the tokens for future use. Provided it is successful in doing so, the pairing will now appear in the HYPR Mobile App Device Manager under Workstations and in the HYPR Passwordless client as a paired device.
Using the Offline PIN to Log In
To initiate an authentication flow, the server must perform the following POST request, passing the HYPR access token as a “Bearer” token in the Authorization request header:
POST {{HYPR\_BASE\_URL}}/rp/api/oob/client/authentication/requests

Authorization: Bearer {{HYPR\_ACCESS\_TOKEN}}
The following JSON body must also be passed in the request:
{
 "attribute1":"{{ATTRIBUTE_1}}",
 "attribute2":"{{ATTRIBUTE_2}}",
 "attribute3":"{{ATTRIBUTE_3}}",
  ...
}
-
ATTRIBUTE_1: The camel case identifier of the RP app taken from the URL when viewing the app in the Control Center -
ATTRIBUTE_2: The username of the user that was previously registered -
ATTRIBUTE_3: These are all unique nonce values that must have the following characteristics:-
Random and unique
-
Exactly 64 characters in length
-
Hexadecimal format
-
-
etc.
Include any caveats about how to obtain the above attributes or about the behavior of the calls.
Response
If successful, this will result in an HTTP 200 response containing the following JSON body:
{
 "status": {
 "responseCode": 200,
 "responseMessage": "Device Authentication Started"
  },
 "response": {
 "requestId": "{{sessionId}}"
  }
}
Extract the sessionId from the response via the response.requestId value.
[Other Possible Responses]
(…besides 200 OK.)
Step 2 (EX: Check Authentication Session Status)
Request
With the sessionId that was returned from previous call, the server can then perform the following GET request to the HYPR server to poll for status:
GET {{HYPR\_BASE\_URL}}/rp/api/oob/client/authentication/requests/{{sessionId}}

Authorization: Bearer {{HYPR\_ACCESS\_TOKEN}}
The Request Body is empty.
Response
If successful, this will result in an HTTP 200 response containing the following JSON body:
{
 "requestId":"{{requestId}}",
 "namedUser":"{{username}}",
 "machine":"{{machineName}}",
 "device":{
    ...
 },
 "state":\[
    {
    "value":"REQUEST_SENT",
    "message":"",
    "timestamp":1703076816
    }
 \]
}
The state array will contain a list of states (identified by the value field in each) as the user progresses through the authentication process. The first state will always be REQUEST_SENT.
You may also see these intermediate states within the array before any of the above appear:
-
INITIATED
-
INITIATED_RESPONSE
The server should continue to call this endpoint every 3–5 seconds, looking for one of the following as a last state in the array to know that the OOB authentication flow has finished:
| State | Meaning |
|---|---|
| COMPLETED | The authentication completed successfully. |
| FAILED | An error occurred during the authentication process. |
| CANCELED | The user canceled the authentication in the UAF app. |
If the user does not respond at all, eventually the above call will result in anHTTP 400 response containing the following JSON body:
{
  "type": "/static/docs/com/hypr/server/rp/errorhandling/oob/OOBAuthRequestNotFoundProblem.html",
  "title": "The request could not be found.",
  "status": 400,
  "detail": "Please contact HYPR customer support and report this issue. ExceptionId: {{exceptionId}}",
  "errorCode": 1201013
}
Flow Diagrams
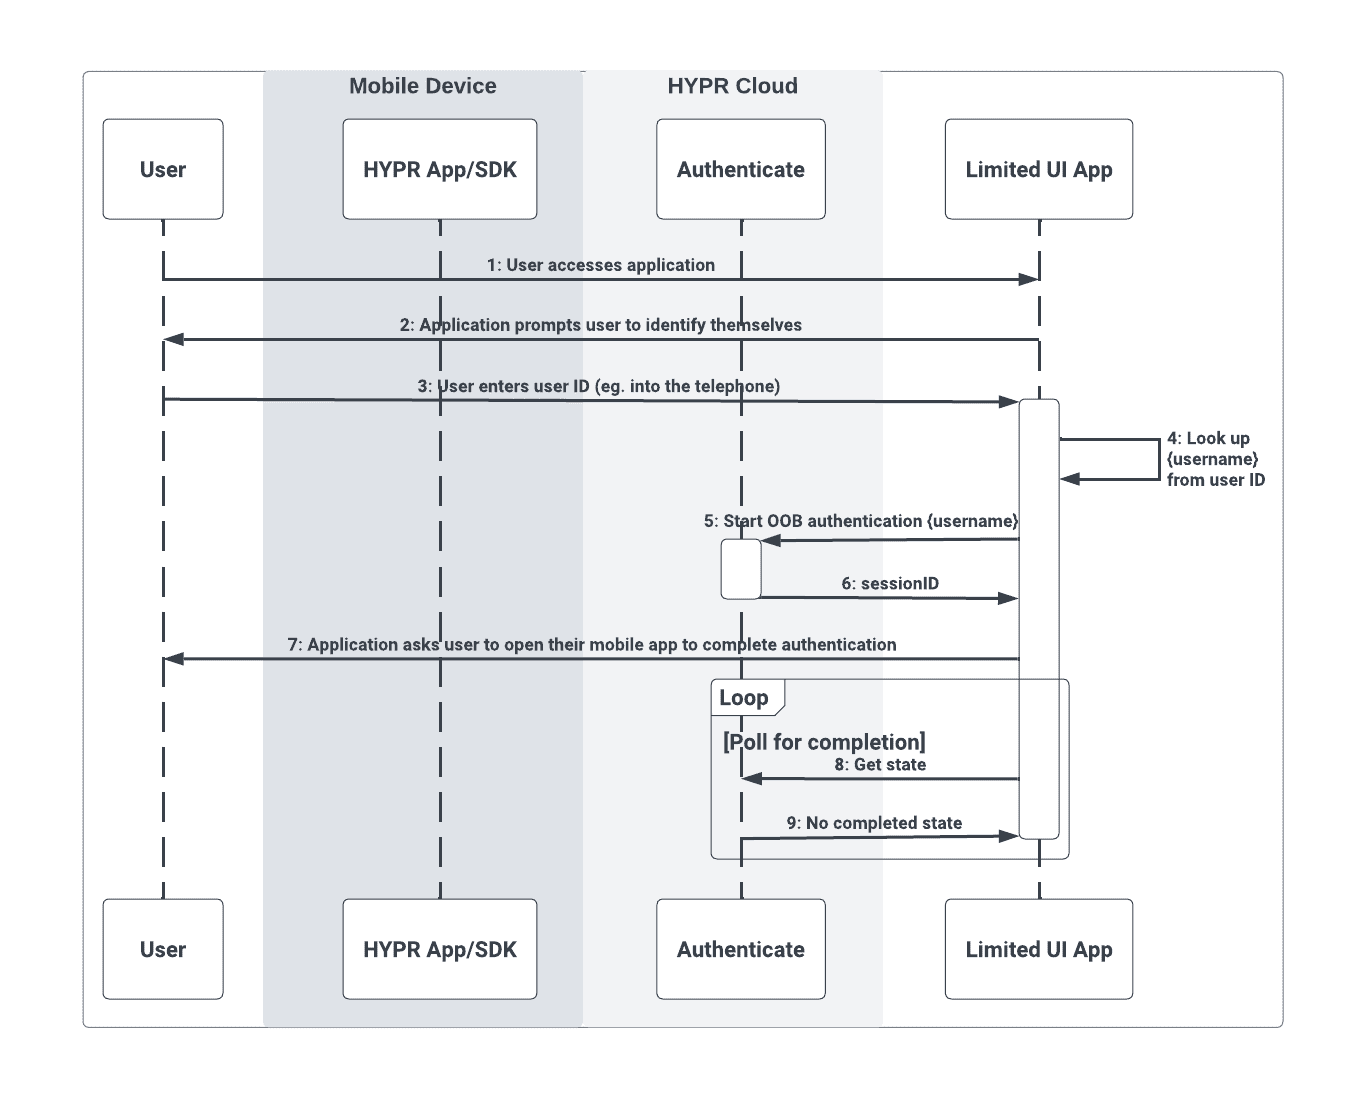
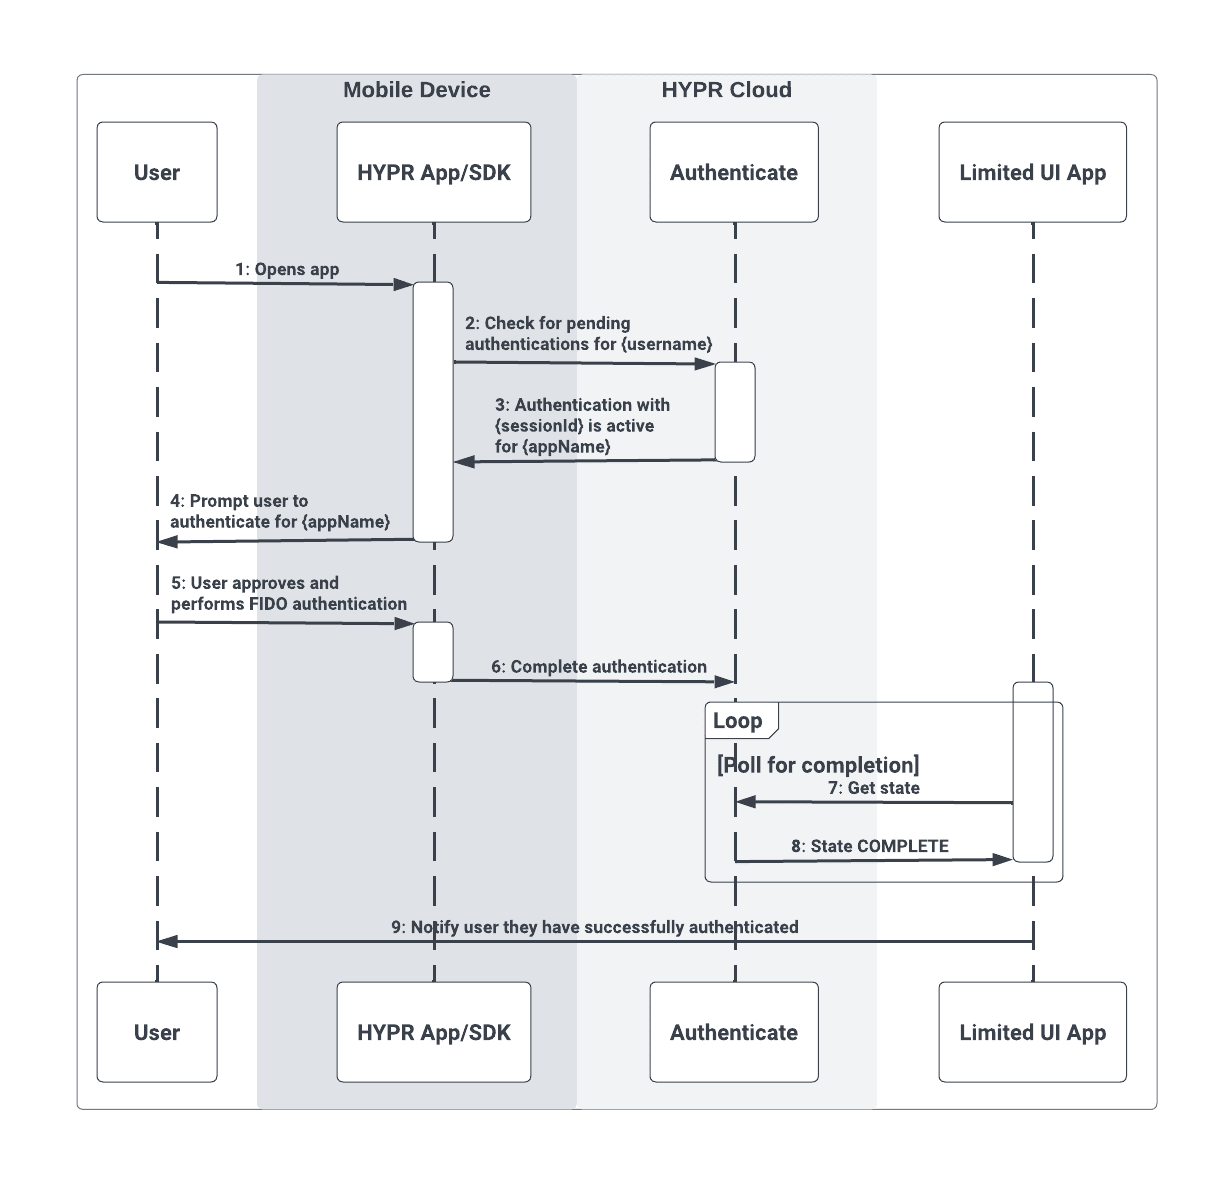
The [Function Name] flow can be visualized with the following two sequence diagrams:
Step 1 (EX: Start Authentication)
The first flow is the initial user interaction with the limited UI application, where they are prompted to enter their user ID (e.g., entering a series of digits into a telephone prompt) and the OOB authentication flow begins. The user is then prompted to open their mobile device.

Step 2 (EX: Complete Authentication)
The second flow shows the user completing the authentication flow using their mobile device, which returns control back to the limited UI application:

Additional Considerations
Consideration 1 (EX: Passing a Confirmation Code)
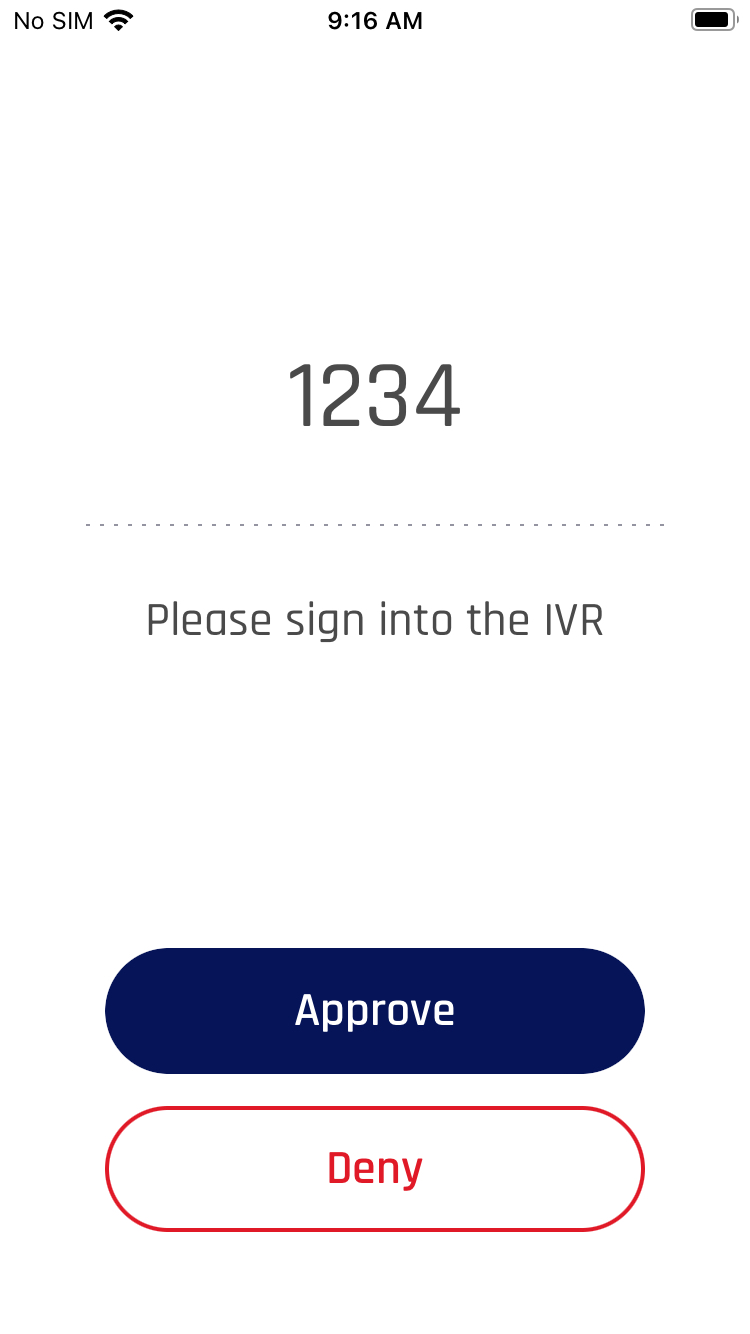
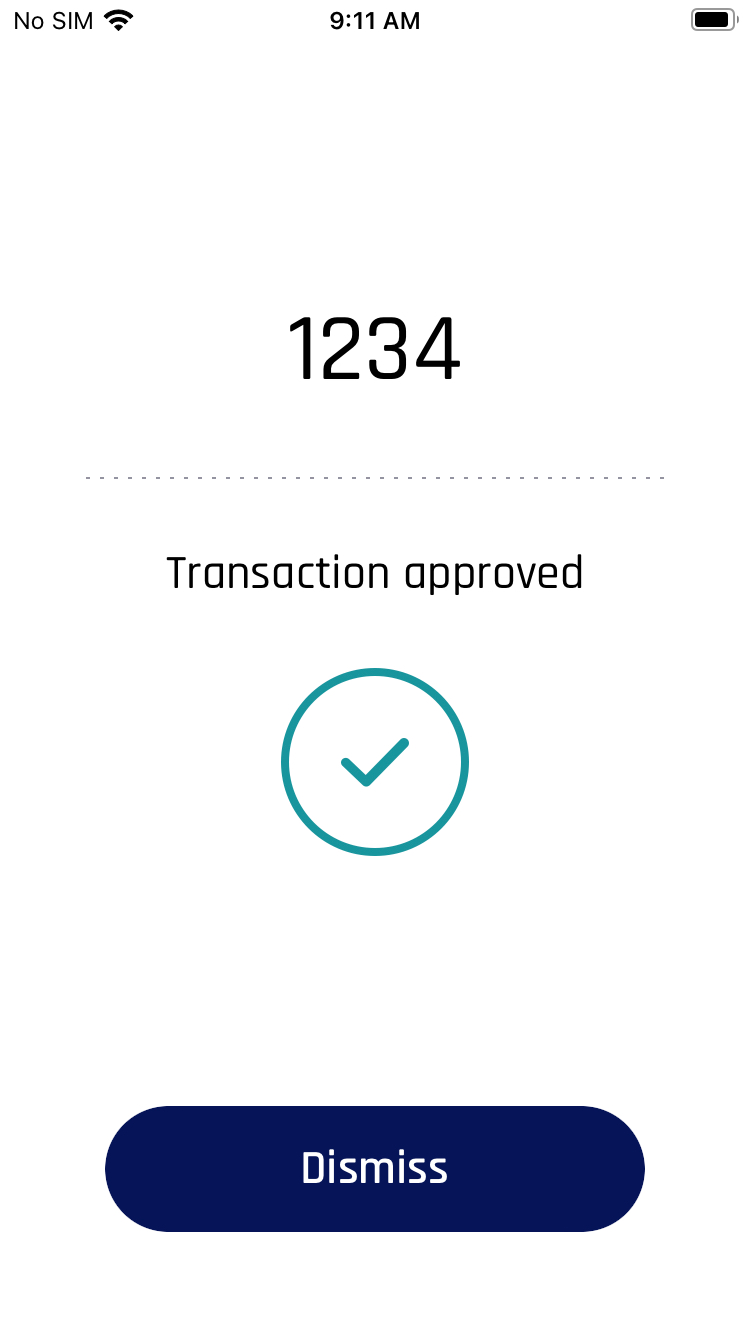
The security of both Tap To Log In and push notification authentication can be improved by passing an additional message that appears in the HYPR Mobile App/SDK on the mobile device. This can be used, for example, to generate a code (i.e., one-time password/OTP) within the limited UI application and then prompt for that same code when the user completes the normal FIDO authentication. When the user completes the FIDO authentication on the mobile device, they would see a UI that looks like this:


To pass the above message and confirmation code, append the following JSON to the original authentication request:
{
 "transactionText":"Please sign into the IVR",
 "transactionType":"(this can be anything)",
  "extras":{
 "amount": {code}
  }
}